
![💥 С нуля до Middle Front-end разработчика за 5 часов [ HTML / SCSS / JS / TS / React / Next ]](https://i.ytimg.com/vi/s0_3Jd34Fow/maxresdefault.jpg)























This video demonstrates how to build a Web3 DApp that stores files on IPFS using Pinata Cloud and stores the corresponding IPFS hash on a blockchain network. The process involves: (1) creating a React application with file upload functionality, (2) uploading files to Pinata Cloud to obtain an IPFS hash, (3) deploying a simple Solidity smart contract with getter and setter functions to store the IPFS hash, and (4) connecting the React app to the smart contract using ethers.js to store and retrieve the hash. This approach provides a free alternative to Web3 Storage for decentralized file storage.
IPFS and Blockchain Tutorial: Build a React DApp with Solid
Added:Fundamental understanding of React.js, including state management, hooks (useState, useEffect), and basic front-end development.
Basic knowledge of Ethereum blockchain concepts, such as transactions, gas fees, and how smart contracts operate.
Familiarity with Solidity syntax for writing and deploying basic smart contracts to a test network.
Conceptual understanding of decentralized storage and how IPFS uses cryptographic hash-based content addressing (CIDs).
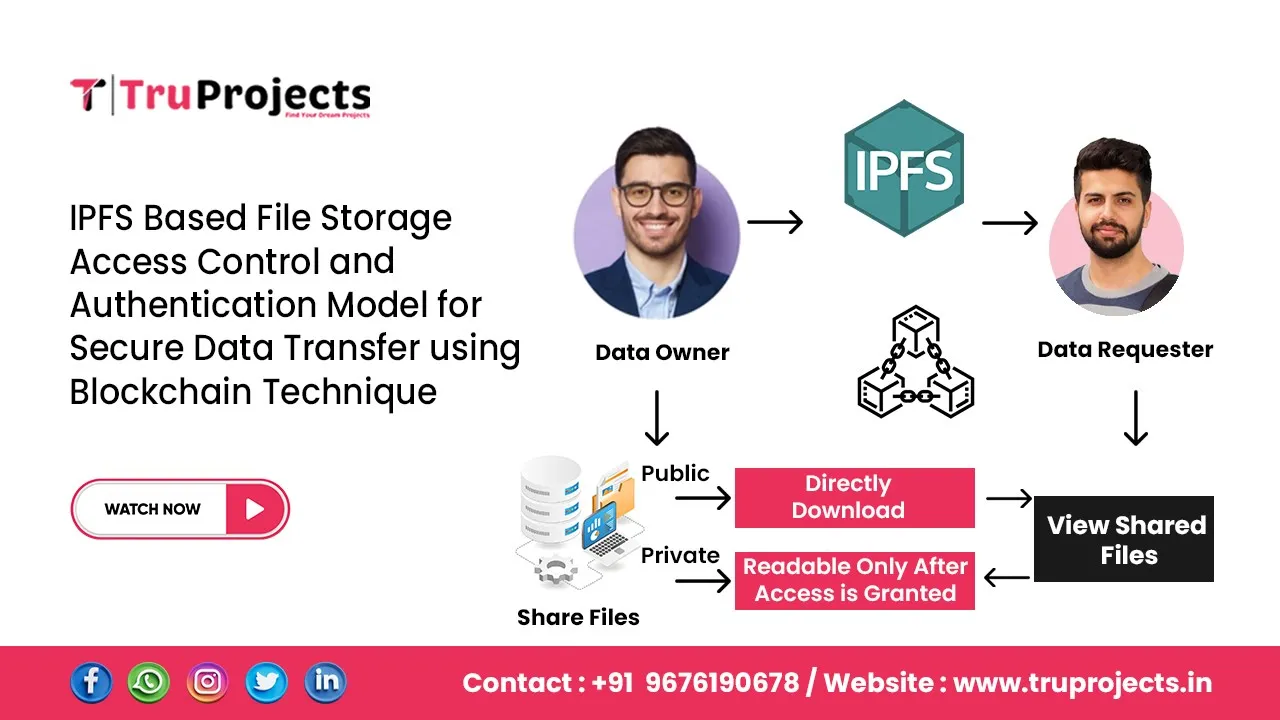
Implementing decentralized access control and encryption (such as Lit Protocol) to secure private files stored on IPFS.
Optimizing Solidity smart contracts to minimize gas costs when writing and updating IPFS hashes on-chain.
Deploying the DApp on Layer-2 scaling solutions (like Arbitrum, Optimism, or Polygon) to significantly reduce transaction fees for users.
Integrating decentralized indexing protocols like 'The Graph' to query and filter on-chain event data efficiently.
2.8K views66likes26:24Original Release: 2024-08-16
hi guys welcome back so in this video uh I'm going to talk about how we can store files on ipfs and store the corresponding hash on the blockchain network uh previously I made a video using web3 storage but it's not free now I mean it can be free but you have to provide the credit card information which is not optimal so I look for some uh alternatives for that uh either you can run your own ipfs node using Docker maybe or install it on your computer and just run it or maybe uh we can find a third party provider just like web3 storage so basically I found and it's pinata Cloud uh so uh they provide you an ipfs node and using their API key you upload the data on pinata ipfs uh and maybe you know store the corres corresponding hash on the blockchain network so application works like this it's just like the previous one I've written everything in react so you browse something let's say I'm going to put metamask Fox logo uh and I submit it so your data is stored in the ipfs and it has returned the ipfs hash and now we are storing this ipfs hash in the smart contract so let's wait for some time the smart contract is quite simple like it's storing a string and it is retrieving a string you can modify the smart contract based on your uh based on what you want to do uh for example if you want to store specific files for specific blockchain accounts you can always modify the smart contract so now the ipfs hash is stored in the smart contract we can retrieve it and we got this ipfs hash so we can check if something is uh so basically so this is the solidity file I tried before uh so we can test it and you see we have this uh for different hash we have different picture so so yeah so this app is all about how to store this ipfs hash on pinata cloud and again how to retrieve your data or to see the data like this so let's start so yeah so now we will start with um um we will create a react application so for that we just need npx create react app and let's call it ipfs storage okay so it's going to take some time so first I'm setting up this development environment later I will go to um this pinata cloud ipfs and I'm going to generate some API Keys JWT tokens and some uh you know the Gateway where we are going to communicate to store and retrieve the files uh that is one thing another thing is uh it's totally free okay so I'm going to show you how you can do that so let's first go do ipfs storage uh do npm install ether at 5.7.1 that's the version I use uh that's compatible and you also need to install pinata so npm install ethers and pinata so let's wait for it before that you need to enter in this folder okay ipfs storage so do that so I think it's done so we can simply use code we can open it here I'm going to bring it here from my another screen I'm going to hide it and um yeah so now we have everything so first we are going to create a config file um let me config.js in this config file we are going to put our tokens so so let's write this pinata SDK okay from pinata uh okay sorry and then we are going to export const pinata is equals to new pinata SDK so we are in this Constructor we going to pass uh pinata JWT okay that is something and pinata Gateway okay so that is something yeah and how do we get that so let's go to pinata Cloud okay so we are here um so now you need to type uh pinata Cloud on Google and on the first link you click on the first link it will ask you to go to you know login I have already logged in I have already created an account but you are going to create an account on this website um yeah so once you have created this account you will see a page like this you will go to API Keys you will create a new key you will select admin you name anything any random thing so the main thing is you need to copy this JWT and paste it here that is one thing okay and for the Gateway you go here um you go here to the Gateway you copy this link a dedicated Gateway where which you are going to use to uh interact with the ipfs node by pinata so you're going to go here and paste it here okay so that is uh uh the thing you uh you can do so now our configuration is finished and we have imported this pinata from this config.js and we have imported some files so we will start writing code from here before that I would like to go here uh on remix I'm going to remove all this and I will write the code again um so first I'm going to write spdx Das license Dash identifier and it's an MIT license that's okay then we will start with pragma solidity and the version is greater than 0.8.0 and our contract name is ipfs in the contract we will have just a simple string ipfs hash we are going to use that string to uh store the ipf s and we need a getter and Setter function so we need a Setter function and a getter function okay this is a very uh very simple smart contract so if you are looking for something complex maybe I will create a video in future but for now this is how thing works you can again go and uh create a smart contract based on your specific use case but the things will remain the same ipfs hash so you are going to take the ipfs hash and store it in this variable ipfs hash and this is Hash okay so you this is a getter function and the setter function will be similar but we are not going to pass anything in the argument and we're going to change the name get and here we're not going to pass anything in fact we are going to return it so the function will be like public view returns and it's going to return string memory and it's going to return ipfs it's going to return ipfs hash so now our smart contract is completed so we can simply go and upload it using metamask using injected web3 provider so it's going to ask okay so here is our in the meantime I will simply copy and paste uh this app. CSS here so I don't really like writing that so our our contract is almost you know uploaded so we we need to create a few variable const contract address is equals to something like this and con contract AI remember we need these two things to communicate with the smart contract because you are telling JavaScript that okay there is this contract the address is this and this is the ABI I need to communicate with this contract okay and for the ABI you simply go to this compiler you copy this ABI and paste it here and you just simp L remove okay at this point we are done almost so now let's start writing our uh application so at this point we just created a smart contract and we just put this address and ABI here so to start an application we need to uh store three things the file we have selected from the front end the ipfs hash we have stored in the ipfs and the stored ipfs hash that is stored in the blockchain Network so we need to retrieve it so we need to store all these three variables uh you know simultaneously so we need to use a use State selected file set selected file is equals to use so at this point the file is null so we're going to put null and then we're going to create ipfs hash set ipfs hash is equals to use St it's an empty string for now okay and finally we have stored hash and set stored hash is equals to use State again it's empty so yeah we have these three things here okay um so it's still giving error but that's okay so so we can start from here um so yeah so let's let's create a Dave okay so that is our div and I'm going to say class name app dash container okay and then I'm going to create a new div and the name of this div is upload Dash class name upload Dash section so in this div first of all I'm going to create a label um choose file and it should have a class name of um form D label okay label and once we have created this label choose file we need to create an input okay in this input uh the type of this input is file because if you remember I showed you at the start of this video we are going to take a file on change so let's say you select a file once and you change it so we need to call this function change Handler I'm going to explain this later um and it should be I'm going to explain this change Handler let let me write this first class name is equals to it's file- input and finally once you have selected a file you need a button to upload it so we have this button the class name of this button is uh submit dash button and it should say submit and another thing is once you click on it what happens on click it should call handle submission so once you have selected a file and you click on this submit button it should upload it on ipfs okay so that's what you need to do right now for now we have done this so let's write this Handler first okay so our Handler is like this uh so const change Handler is is an async function no it's basically it's going to take an event and it's going to say um set selected file to event. target. files and zero so and let's create this handle submission function to so so this Handler I'm again I'm sorry I'm going to explain what it what it does so let's first create this handle submission const handle submission is going to be an async function and it's not going to take anything so it will take const response is equals to A wait so so once you okay so now before this I'm going to explain okay so so now npm start is there okay so here if you see I have created this label choose file so you can see choose file here this is an input where we can select and we can get an input from here and then this button basically if you call it it's going to call handle submission so once you select let's say and you select ethereum logo PNG okay seek logo or anything so now this change Handler will be called and this file will be selected as this now let's say I click on browse again and I select react logo so now it's going to trigger this change Handler again and instead of ethereum logo it's going to select react logo so the whole idea is whenever you click on this and you select some file this uh change Handler will be called and your file will be selected here okay so yeah that was the point so now to handle the submission we simply need so once we have selected the file we need to upload on pinata so how do you do that con response is equals to await pinata do Cloud no pinata do upload.
file and we going to pass this as selected file okay so this selected file is so now we will create IP FS hash is equals to so now this response is an object and we are going to take ipfs hash so this property of this object and we will simply set ipfs hash to ipfs Hash okay so we have done this so it it's going to store the file in pinata it's going to get the ipfs hash and it store it here in the ipfs hash okay now in order to use it we can simply create something like this so once you click on submit your ipfs hash should show here right so for that we can do something like this so we say if we have ipfs hash and and so if we have an ipfs hash we can simply create a div so we will simply create a div oh no it's a problem we will simply create a div here and we will say a class name of result section and in this div we will simply create a p okay in this P we will say ipfs hash and we will simply pass ipfs hash okay so now yeah so let's try let's try submit it yeah so now you can see the ipfs hash here so at this point we created this type file we created this button if you call this button if you click on this button it's going to call uh handle submission and it's going to submit uh the file to um pinata Cloud so now that is one thing okay uh let's let's move it above let's move it here so now that is one thing now we need to you know store it on the blockchain network so so let's create a function await so the name of this function is just let me see just for the clarity so store hash on blockchain and it's going to take ipfs hash okay so you are going to pass this ipfs hash and this function will be called so that is a simple function store hash on blockchain and it's an async function and it's going to take hash and it's going to do something like this so again first of all it's going to create con provider is equals to new ethers do providers. web3 provider window. ethereum at this point you should remember this because whenever you want to connect with metamask you need to do that con signer is equals to provider dot get signer okay once you have the signer you need to create a contract address uh sorry contract instance uh you going to create new ethers dot contract and you're going to pass contract address contract ABI and signer who is going to communicate with the contract you are writing something on the blockchain right so you need to create a transaction con transaction is equals to await contract dot okay so let's see what was the function on uh remix so in order to set ipfs hash we need to use this function which takes ipfs hash as an input so let's call this here and here we will simply pass hash okay and we will say a wait tx. weit okay so we will wait for the transaction to be completed so what we are doing is as we click on this submit button um this submit button first it's going to upload the ipfs hash on pinata then it's going to call store hash on blockchain so we will again store everything on the blockchain network but so let's say things are stored here now we need to retrieve it so we need a button here right so for that we can do something exactly something like this so and um we need to uh uh yeah so so let's do this first we need a button mhm class name retrieve that section and basically this div is going to say we going to create a button okay so the button has a class name of re retrieve button and if you click on button it should retrieve something from the blockchain network right so it's going to retrieve hash from blockchain so this is the function that is going to run if you click on this button okay and let's say we call this function retrieve stored hash okay so now we have not implemented this function so let's simply go and copy and paste no so I'm not going to copy const retrieve hash from blockchain again it's an async function it's not going to take anything in the argument and we will copy and paste the same thing here okay provider is fine signer is fine contract is fine but we are not going to write something we're going to read something okay and the read function has no input and we can say stored hash and in order to like we we can we can use this set stored hash okay so we can use set store so we are retrieving the hash from the blockchain and we are just storing it okay so stored hash so we're going to pass the stored hash at this point we have this button here and if we click on this we will get the hash right yeah we will get the hash but we need to print it here right so in order to print it here we simply do something like this just like this yeah just like this or maybe write it again so this time we are going to use stored hash so if there is a stored hash value we simply create a paragraph and we say stored ipfs hash and we simply say pass stored hash okay so now things should work so let's say we select this file we select ethereum do logo we submit so the ipfs hashes uh created because the data is on the pinata Cloud so we confirm so let's wait for the transaction to be written on the blockchain network at this point I'm going to explain things okay so we are here so we selected the file we click on submit handle submission button so it went to handle submission it uploaded the data on ipfs hash sorry on uh this pinata cloud and we got the ipfs hash so as soon as we get the ipfs hash it's printed there on the front end okay and then there is this function store hash on blockchain so this function was called and you connect it with metamask and you store it okay and this transaction has been done so now it's stored on the blockchain so for to retrieve that simply I think there is an error oh what's the error oh start its name okay I think there is an uh error here but that's okay not a problem I I don't know let's let's wait for it stored hash is assigned a value but never used ah okay I think this is the problem now yeah okay so now we can see that so there was a problem with with variable so once we have clicked on it then we have this function like retrieve stored hash this so as we click on this we go to this function retrieve hash from blockchain we again connect to the smart contract and we call the get ipfs hash function and we simply uh present it here okay on the front end so that was a very basic application of how you can create this type of application so if you like this please uh um uh subscribe to my YouTube channel and like this video and share it with your friends so basically this is um this is an alternative to web 3 storage which is now not free you need to put your credit card information and I don't think so now you need that because you can use pinata Cloud okay so yeah thank you so much for watching take care bye-bye
Up Next

90:48
Build Dynamic NFTs with Chainlink VRF: A Workflow Guide
@chainlink
32.5K views•2021-03-18

52:00
Hybrid Key Establishment in Production: Post-Quantum Cryptography
@durumcrustulum
14.7K views•2025-08-27
64:25
Operational Security Essentials: A Guide for Hacktivists (OPSEC)
@hitbsecconf
157.4K views•2012-11-26

11:49
Understanding Ethereum: A Comprehensive Beginner's Overview
@99Bitcoins
3.1M views•2018-06-26
Related Study Plans & Knowledge Roadmaps
Structured learning paths in Blockchain & Crypto
blockchain-and-crypto
MPC Wallets: TSS, DKG & Secure Custody
01Foundations of Cryptography & Digital Signatures
02Secret Sharing & Introduction to MPC
03Distributed Key Generation (DKG)
+ 2 more learning modules
24h5 modules
Explore Roadmap
blockchain-and-crypto
ERC-4626: Yield Aggregators & Leverage
01Blockchain, Ethereum, and Solidity Foundations
02DeFi Primitives: Lending, Pools, and Yield Farming
03Mastering the ERC-4626 Tokenized Vault Standard
+ 3 more learning modules
35h6 modules
Explore Roadmap
blockchain-and-crypto
DePIN: IoT Registries, Proofs & Rewards
01Foundations of Blockchain & IoT
02Introduction to DePIN and the Flywheel Effect
03Designing IoT Device Registries & Secure Identity
+ 3 more learning modules
30h6 modules
Explore Roadmap
blockchain-and-crypto
Building EigenLayer AVS: Operators & Contracts
01Blockchain, Ethereum, and Smart Contract Basics
02Proof of Stake and Ethereum Staking
03Introduction to EigenLayer and Restaking
+ 3 more learning modules
24h6 modules
Explore Roadmap