


















Ultrasound imaging works by emitting sound waves at 1540 m/s through tissue and plotting echoes based on their return time, with deeper structures appearing lower on the screen; clinicians must balance transducer frequency (higher for resolution, lower for penetration), use appropriate transducers (convex for deep structures, linear for superficial), and understand key controls including depth, gain, and Doppler settings to produce diagnostic-quality images while recognizing artifacts like posterior shadowing and mirror-image reflections that aid in clinical interpretation.
Ultrasound Physics and Instrumentation: How to Generate Images
Added:Basic physics of sound waves, including concepts of frequency, wavelength, amplitude, and propagation speed.
The concept of acoustic impedance and how sound interacts with different physical mediums (reflection, refraction, transmission, and attenuation).
The piezoelectric effect and the basic function of an ultrasound transducer in converting electrical energy to mechanical energy and vice versa.
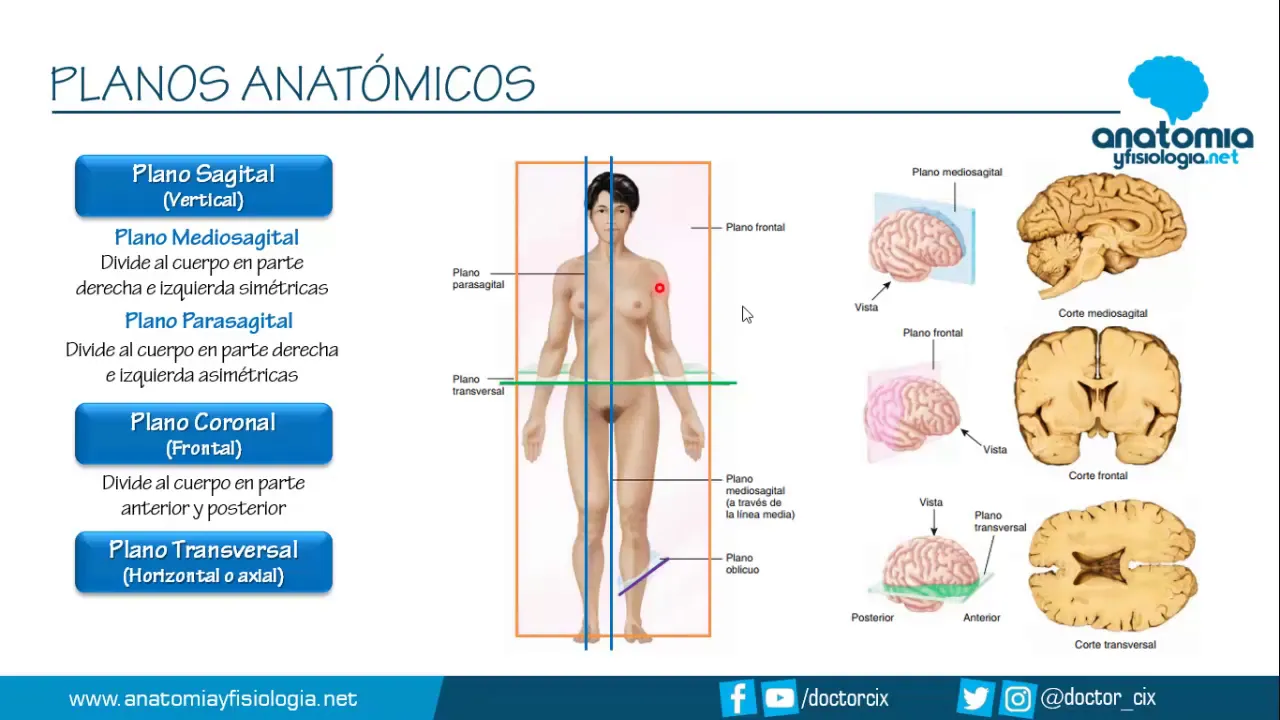
Fundamental anatomical terminology, specifically spatial orientation and standard anatomical planes (sagittal, transverse, and coronal).
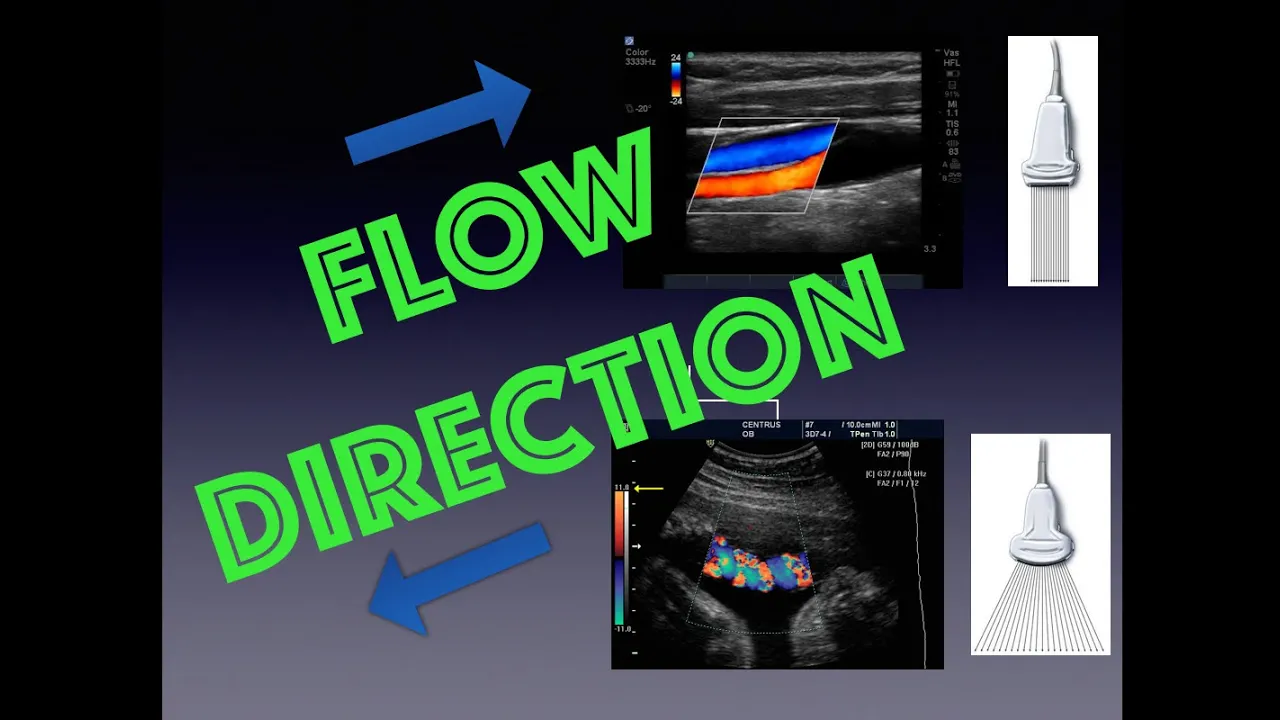
Introduction to Doppler Ultrasound (Color, Power, and Spectral Doppler) to evaluate blood flow velocity and direction.
Clinical application protocols for Point-of-Care Ultrasound (POCUS), such as the FAST (Focused Assessment with Sonography for Trauma) exam.
Advanced knobology and image optimization settings, including spatial compounding, speckle reduction, and tissue harmonic imaging.
In-depth study of specific pathological ultrasound presentations and distinguishing true anatomy from complex acoustic artifacts.
135.9K views2.5Klikes48:06Original Release: 2016-07-10
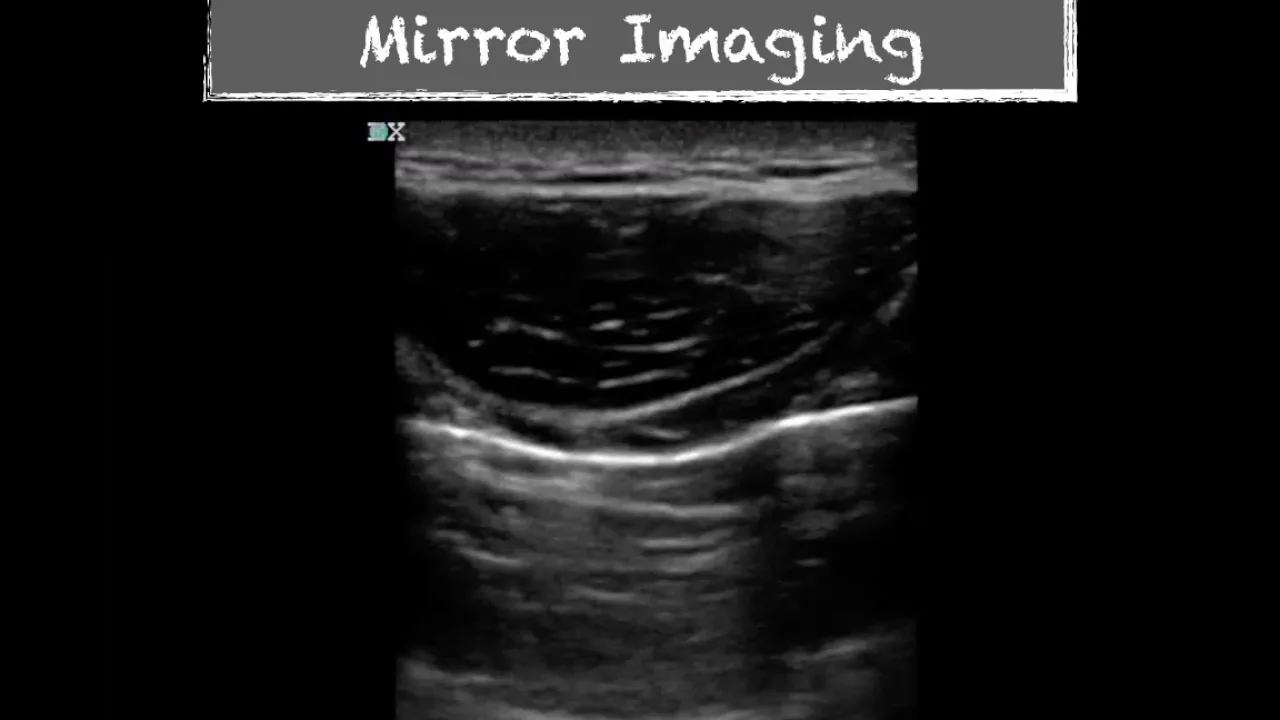
this podcast is on ultrasound instrumentation and image acquisition we're going to discuss how to obtain an ultrasound image which transducer to use will discuss some artifacts and really get you going to try to get those images on the screen to look nice bats have been using ultrasound to find their prey for thousands and thousands of years and so have dolphins and eventually the military started to use it with sonar to find its prey as well but luckily for us in 1965 humans started using it for good and we could see structures in the body using ultrasound now initially these machines were gigantic things and we're looking at babies connected to an oscilloscope but ultimately we really perfected the use of this device and ironically here we are using it on a bat to find a pregnancy inside this little animal such a cute picture there but the machines themselves have gotten very small they've grown from these massive structures in the last 30 years to really much more handheld compact devices and this is a great way to look inside of our patients to find out what's going on at the point-of-care something we call pocus point of care ultrasound and really the only other way to look inside the body is to use a scalpel or to use ionizing radiation such as this CT scan here one CT scan of the abdomen pelvis is equal to roughly 500 to a thousand chest x-rays worth of radiation so if we could avoid unnecessary use of radiation by using point of care ultrasound well then we should the current healthcare structure in the United States is super complicated and one of the things I think that really connects the physician and the patient is just being in the same room together and performing a physical examination on them and I think that that's where ultrasound really comes into play because it it necessarily forces me to put probe to patient thereby connecting with my patient and I can show them what's wrong with their organs right there on the screen at the bedside at the point of care now dr. Abraham for gays II is sort of a modern-day William Osler and he wrote something called the Stanford 25 it's the 25 things every Stanford medical students got to be able to do with the physical examination and we took it a little bit further at UC Irvine we called the UCI 30 the 30 things that all UCI medical students should be able to do with ultrasound and publish it a couple years ago and in the UCI 30 we look at the entire body from the brain and the eye all the way down through the ankle and this is going to be important going forward I think as we try to reduce health care costs a couple ways to do that with scale and integration operational improvements but it's this clinical re-engineering what we do at the bedside changing what we do at the bedside by eliminating unnecessary testing is really going to cut down a lot of the cost of healthcare and that's right where ultrasound fits in so how exactly does ultrasound work we're going to talk more about the physics now and no better person to explain ultrasound physics than Sean Connery himself three verify I reached grunting I just painted one ping only reason I have to do that so one ping only this is a classic scene from The Hunt for Red October and it basically means he said Rivera fie our range to target and what he means is he releases the ping he knows how fast sound travels through water and then he just times the time of flight he listens for the time of flight for the ping to go from one submarine out to the other and then back again and then the other submarine hears this ping and realizing that the whole point of the movie was that he was trying to defect and give up his position and well spoil it for you but that's how ultrasound works we know how fast sound travels through water or in this case human tissue 1540 meters per second through human tissue and so the Machine lets out of pain waits for its release and then it plots a dot on the screen and depending how long the sound took to go out and come back it plots a dot on the screen in terms of depth and so the longer takes to come back the further down the screen is going to plot that dot so as the machine is listening for the echoes to travel into and then back out of the body again the longer takes the echoes to come back to the machine the further down the screen its going to plot the dots so the skin line is up here the sound is going 5 10 15 centimeters into human tissue so the structures down here on this side of the screen took longer to come back to the probe that's why it plots it further down the screen it's all about depth and time it takes to come back to the screen and it's also about density the denser the object the more echo bright it is this is the diaphragm here it's relatively dense muscular structure so it's very echo bright this anechoic structure here is a hepatic vein hepatic vein that's just fluid blood flowing in the liver and it's not dense at all so it's not very bright in fact it's quite dark now the different modes on the ultrasound machine you can see here this is the the main control panel here that controls the modes of the ultrasound and the first modem pointing out to you is straight up 1972 ultrasound or brightness mode B mode we can see it there with the yellow arrow now when you activate that button you're going to get white dots on a black background the next mode I want to tell you about is M mode or motion mode and we use this primarily in the heart to look at the various contractility in valves and what we do with M mode is we can see structures its motion over time it's created as a graphical representation and stuff that squiggly moving up and down is moving stuff that's more horizontal is not moving and so that's basically what this is this is a still image showing the pathway whatever was underneath this M mode spike here either it's moving or it's not but you can make out this structure here being a septum of the heart in the Paris or long axis this being the posterior wall we see the septum here and then the post your wall down here in between those two structures you'll see the movement of the mitral valve color flow Doppler or CF is basically the shift of Doppler frequencies of the red blood cells moving towards the probe or away from the probe and during diastole moving from the left atrium to the left ventricle we see this red blush of flow here red blush of flow going up here and then during systole unfortunately for this patient when the left ventricle squeezes is a big blue jet that back walls left atrium blew away from the probe because of this incompetent mitral valve regurgitation its flow back into the left atrium and that's how color flow Doppler works it is a directional type of flow looking at the Doppler shift in frequencies of the moving red blood cells and then pulsed wave Doppler or PW is another type of Doppler that shows velocity and so what you're doing is you're taking the sampling gait here looks like a TIE fighter from Star Wars and you're placing it over a vascular structure and then you can actually measure how fast those moving red blood cells are in this case this this value here corresponds to a seven point six centimeters per second during systole and then during diastole there's still some good forward flow here at three centimeters per second so these are velocity waveforms pulse wave Doppler sometimes called spectral Doppler now I talked to you about those dots being brighter or darker well that's kind of a confusing language to use so we're going to use a uniform language of echo genesee structures are hyper coat if they're more ago genic than the surrounding tissue hypoechoic if less psychogenic and anechoic if completely devoid of echoes so blood in it's moving state non clotted form liquid state is anechoic or jet-black so is the urine bile structure such as that now there's this whole issue of frequency when it comes to ultrasound machines and as you increase the frequency you definitely get better resolution but the sound can't penetrate as far so the idea is you want to choose the correct transducer that will give you the best possible frequency at that depth of penetration so it's sort of like lenses on a camera this low frequency probe here think of that like a telephoto lens you're looking far away into the body in this case this very high frequency linear probe here has a high frequency bandwidth so the frequency is beautiful but it can only see structures up really close sort of like a macro lens on a camera and so then you've got this mid-range frequency transducer here large footprint curvilinear probe that is sort of a balance between low and high frequencies so it can penetrate pretty good but also gets nice pretty images and you can actually turn up and down the frequency within one transducer notice there's a range air 2 to 5 for 13 1.7 to 4 so we can bump it up or bump it down using the controls here underneath a screen here this primary control panel but so you know you see this area here this is like a mid frequency somewhere halfway between the two frequency band widths let's say if the probe goes from you know like I don't know one to five megahertz this would be the three megahertz setting here and the dots are pretty close together is a pretty resolute image when you turn up the frequency to that say five megahertz range now the dots got a little bit tighter a little bit closer together the sound doesn't penetrate as well but the image is more resolute and as you bump it down to that lowest frequency setting say one megahertz now the dots play away from each other and it's I don't want to say the word grainy but it's a little grainy er than the other images so I'll go back to the previous resolution high frequency mode here like five megahertz dots are very close together and then the other extreme down here to the lower frequency mode so when would I use this in patients who are really big like a hundred and fifty kilograms let's say then I'm going to be using that low frequency setting in this case I'm looking at Morrison's pouch this happens to be the kidney right here this is all the liver up here here's the diaphragm now if I have a smaller person let's say if not oh no a four-year-old that fell out of a tree then I'm going to take advantage of that person's small body size and turn up the frequency and get a much more resolute image here and so yeah so frequency and body habitus kind of you'll be adjusting that depending on the patient's size now the different transducers do have different footprints I just want to point out some basic components of that so a large footprint what we call curve a linear probe or sometimes called a convex Turay you hear called a curved probe or abdominal probe this one's got all these elements lined up in a sequential array and the ultrasound beams fire into the body and then reflect back but as you can see right down the center of this probe these beam lines are a little closer together so on the edges of this convexed array I'm going to lose a little bit of lateral resolution or the ability to tell that one dot are actually two dots side-by-side from one another whereas down the center dead down the sir I'm going to get the best possible lateral resolution on this probe you lose a little it's not too bad because of all these elements here though you get beautiful images from this convex tray transducer now look at the difference though when you use this phased array smaller footprint transducer here it's really good at getting between the ribs and for that reason you hear called a cardiac probe sometimes but the the phased array small footprint transducer it's got a single crystal here in the lecture and the sound is electronically steered into the body in a very wide array it's amazing you can see all the way from the diaphragm superiorly in that coronal plane all the way down to the lower pull the kidney in fairly on the same window sometimes because this wide array but like the convexed array you get the best punch lateral resolution right down the center whereas on the edges it really splays out much more so than it did even with that convex tour I'm going to go back to that convex terrain show you how there's a little splaying here look how much more splain we have here so just keep that in mind if you need to really hone in on something get it right down the center of the screen that would be your your best bet here and then finally there's the linear array which is the same resolution across the screen from side to side you you don't have any splaying out of the sound which really gives you the same lateral resolution when you're going side to side and you don't lose any resolution there which makes it a very effective transducer for looking in the superficial soft tissue beautiful resolution all the way side to side the downside though is you don't get this splaying out so you don't oh you don't get to see out past the edges of the transducer so whatever skin this comes in contact with we call this an end fire transducer the sound is coming out right off the end of it there's no array now some machines do having a way to steer this beam and do some funky stuff which we're not gonna get into this talk but just sort of keep it when you work at the linear probe what-you-see-is-what-you-get right underneath it because it's higher frequency and because most vascular structures are very superficial this probe sometimes gets dubbed the vascular probe I like to call it the linear transducer because it can do so much more than just the vascular stuff so one thing you got to keep in mind about these probes though is you would think in this day and time with cell phones that have accelerometers and gyroscopes and this and that that the machine would know where the probe is the machine does not know where the probe is you are the one in control of where the probe is in the environment you need to be very careful of that and keep in mind that you are the gyroscope you need to look for this this indicator here the indicator is the way on the probe it's trying to talk to you it's trying to say hey pay attention to me this little line here on the probe sometimes it's a notch a groove it's got all kinds of different ways to identify itself but basically it's trying to tell you the person handling the transducer pay attention to me and there's a convention in which you're going to to orient me with regards to the body's axis so what I mean is this indicator right here corresponds to the dot or the logo on the screen and this is the orientation that we're going to be talking about here next so in the sagittal plane the indicator goes towards the patient's head okay that's the standard convention in North America so that everything over here is towards the patient's head this is the inferior vena cava here and now the inferior vena cava is down towards the patient's foot we see it in a longitudinal plane sagittal means longitudinal when approaching from the anterior surface of the body so everything over here is anterior and the sound is being thrown posterior Lee into this body this being antis being superior this being inferior again anterior posterior in a sagittal plane now if we go to the transverse plane the convention is to aim the indicator to the patient's right so everything over here to the right everything over here is the left here's that IVC again this time it's at a short axis on the screen it's as if you're standing below the patient's feet looking up towards a head and finally coronal view this is where people get a little bit confused coronal sure the indicators still pointed towards the patient's head but now look at the skin line here is lateral and the sound is being thrown medially into the body here's the diaphragm here again this is all Morrison's pouch and here the interface between the liver and the kidney this is the coronal vo this is that classic Morrison's pouch view everything over here is towards the patient's head everything here's towards a patient's feet so this is the inferior pole the kidney and this is the superior pole the kidney makes sense right because it's more superior more towards the patient's head then this inferior pole was okay now moving on we're going to talk about depth if there was a button that I could wear out on the ultrasound machine it would be this one right here so the depth here it's sometimes it's a it's a button that you push sometimes it's a novel in this case here it's a rotary knob that we're going to rotate as we rotate it counterclockwise the depth that goes shallower and as we rotate it clockwise we dive deeper into the body and let me show you why the depths so important here's our old friend Morrison's pouch diaphragm paddock vein right now we're diving 22 centimeters into the body aren't we we're wasting all of this screen real estate over here because all we care about is this little Morrison's pouch air maybe from about here on down maybe 12 or so centimeters because each one of these dots is one centimeter hashmark every fifth daughter so I get a bigger every fifth dot I get a bigger white mark bigger white mark bigger white mark so I can quickly tell 5 10 11 12 centimeters that's about where I need to be so what do I need to do in the submarine analogy I need to go shallower so I'm going to rotate this counter clockwise and as I do so it bumps up well now I'm at 18 and Morrison's pouch just got bigger on the screen if I rotate some more counter clockwise boom now I'm at 14 so some people would call this zoom but zoom is not the right word zoom is where you zoom in on a particular part of the screen and that's got a different function to it something you can play with later on I want you to really focus on that episode because when you adjust the depth it's not just zooming in or magnifying a part of the screen its rewriting that image every single time to give you the best possible resolution so that's why it's always much more important to adjust the depth before you start messing around with the zoom I know that might sound confusing but just remember depth is the most common button on the machine that you're going to operate so here we are at 14 centimeters and now morrison's pouch takes up the whole screen this is a much better use of our screen real estate gained the strength of the returning echoes when you throw sound into the body it comes back you can turn up the sensitivity of the machine to make it a little brighter to make those return echoes a little bit brighter and you can do that in two ways really actually three ways one way is just the rotary gain knob a lot like the depth this is a rotary knob on this particular device sometimes it's a button that you push but right in the center of this rotary knob is something called a OH Auto optimization so I use that quite a bit so I might give the gain a good crank and then maybe I don't like that I'll hit that auto optimization button sometimes it takes it a little bit too darker for me and I bump up the gain a little bit with that overall and that's usually how I approach it however if you wanted to adjust gain at different depths you could do so at this control over here it's called the time gain compensation or tgc and don't worry about that term so much but what you've got to know here is this is gain at different depths I can adjust the gain at the top part of the screen the middle part or towards the bottom or even all the way at the bottom only if I want to do this is sometimes called a gain curve because you can kind of slide your hand along here and make it look a certain way now let me show you how I use that gain you want to make sure the gain is uniform from top to bottom right now the top half the field is over gain the bottom half the fields under gain like a mess around this time gain compensation and kind of do the opposite I can back off my top half turn out my my bottom half get an image like that well now it's the opposite top half Sun or gain bottom half so regained I want to make a uniform so what can I do like you just back off my bottom half only slide these slide pods to the left and then the whole thing would be uniform but in this case it's uniformly under gained so what am I going to do I'm going to crank this rotary knob clockwise as you can see as you go clockwise the game gets a little thicker in this case it gets a little brighter and boom look what happened here now it's like it's like it gotta wear sunglasses it's too bright of an image so I might take this overall and back it down a little bit until it's perfect I know it's perfect now because it's uniform all the way top to bottom and it's not too bright not too dark one way to get to this level is to push that auto optimization button but what I want to show you guys here is if you can see that the the cortex of the kidney here is slightly less echogenic than the liver then you know you've got the gain set just right so if I to rank everything out in terms of their echogenicity I would say diaphragm is number one that's a common test question by the way diaphragm is number one number one echogenic thing on the screen the second most echogenic thing on the screen I think might be this kidney renal pelvis right here the third most psychogenic thing I'm going to say is the liver parenchymal the fourth most is the renal cortex see how that renal cortex is slightly less psychogenic than that liver pragma good and then the fifth the last echogenic thing pretty much anechoic here is this hepatic vein that's just an ACOG blood running out of the liver and down towards the IVC okay that was gain now artifacts artifacts an ultrasound help you when sound encounters something really dense it gets attenuated attenuation means the progressive weakening of the sound as it travels into and then out of the body so when the sound encounters something really dense it's going to bounce right back and you're going to get a high attenuation of that structure this gallstone is highly attenuating and there's a posterior shadow that happens after it so that reflection artifact when the sound comes in reflects straight back off that gallstone shadow is what gets produced that helps me define that structure indeed as a gallstone and not something more concerning like I don't know : Jo carcinoma so which won't exude a shadow like that so as I mentioned artifacts very helpful with ultrasound and you can have the opposite of a high tailing artifact which is a low attending artifact what does sound love to travel through sound loves to travel through water and so we use water filled structures to see structures that are more posterior to them we use that as our advantage in this case we're looking at the urinary bladder seen here and before I play this clip what I want you to realize is that look how much more echo bright the structure is here behind the bladder we call this posterior acoustic enhancement it's the fact that the sound is traveling through the bladder and everything behind it becomes post dearly acoustically enhanced and so that's what I use in order to look behind the bladder for for example free fluid in the setting of a ruptured ectopic pregnancy or a trauma fast exam but but look how when there's a little bit of sediment in the bladder this patient happens to have a urinary tract infection they've got some sediment in their bladder and you can see that sediment as the bladder jetfire's and is that that left ureter fires we can see it squirt the the sediment across the bladder from left to right here and it's just another example of how the bladder the fluid there is so low attenuating and it outlines other structures very well in this case sediment in the urinary bladder now gas is the true enemy of ultrasound when sound encounters air it gets scattered all over the abdomen and you can't make any sense out of it and that's usually bowel gas the way to overcome bowel gas it's very simple the patients don't like it but you got to push so in this case this is somewhere in the belly I'm not sure where we are here if I wanted to see a deeper structure such as so as muscle or a or two or something like that I would have the patient bend their legs and then I would use two hands on the probe push down with you know third pounds of pressure so good amount of pressure and then you'd see those loops of bowel either move out of the way or compress and then you'd be able to see the structures behind it so gas causes scatter refraction is a type of artifact where sound gets redirected from one as it's going from one medium to another medium it gets redirected and there's an edge artifact that occurs sometimes we call this lateral cystic shattering as you can see here on this cystic structure the lateral edges of it are exerting these shadows and that straight-up refraction artifact sounds going from one medium to another it gets bent kind of like Snell's law like the way light gets bent as it goes from water to air and you get a it looks like the pencil is bent that's sitting in a glass of water sound does the same thing there's some refraction here you get this edge artifact helps me identify the edges of an organ reverberation artifact are equidistant arcs that come down usually from the top of the transducer you can see these equidistant arcs here coming down from the top of this convex transducer these are just reverberation artifacts here doesn't it doesn't have any clinical significance but you wouldn't want to mistake it for something so this is some reverb coming down the top of this gallbladder here no that's not sludge in the gallbladder sludge wood layer outpost dearly and it wouldn't traverse the wall of the gallbladder going toward the organ next to it so these equidistant reverberation artifacts you can see them easily there at the top of that gallbladder now a mirror-image artifact we're going to come back to this and a lot and with the fast exam and also with pulmonary ultrasound but basically without getting too detailed the the machine sends some sound out of the transducer and it's waiting for the sound to come back to the probe and depending how long it takes the sound to come back it plots you know the organs on the screen so what's happening the weird thing with the diaphragm in the setting of somebody who has a normal chest who doesn't have any fluid up here in their chest again this is Morrison's pouch here you can see the area here between the live between the liver in the kidney this is the diaphragm here when the sound goes through the liver it encounters the diaphragm and somebody who has no fluid in their chest and it kind of rolls along the diaphragm and goes over here and then it makes its way back to the probe and the Machine goes huh that was weird you know I said that sound out there it took a little longer to come back to me then I figured it would have and you know what I'm going to do is I'm going to plot the stuff that the sound was rolling through aka liver on further down the screen and so it mistakenly plots liver in the chest as a reflection across this diaphragm that's kind of how I think of it maybe I broke some rules there with my description but that's to me that sort of how it was explained one time that makes the most sense to me so we can see the liver or the spleen up in the chest in patients who have a dry chest it looks like this so here's your diaphragm here sound went down encounter the diaphragm rolled along it went back to the Machine and the Machine stuck the liver up in the chest mistakenly and that's a nice artifact because when we see liver in the chest or spleen in the chest as a mirror image artifact then we know that that is a dry chest there is no pleural effusion or hemothorax with with very very very high accuracy so we're going to shift gears a little bit and talk about Doppler for a few slides and and then this talk is over so just bear with me here we use Doppler a lot to look at the flow of red blood cells going through the vasculature going through tubes in the body and the only thing you really need to know about these tubes is that the the flow through that tube or vessel is proportional to the pressure difference across the tube and that's called PO CIL's equation and probably said that wrong but and so it's the pressure is really related to the radius of the tube and so as the radius goes up it goes up a little bit you can get a lot more pressure and flow through that tube and so what I mean by that is even with a little bit of stenosis you're going to get really high velocities and so that's what happens when the blood vessels get stenotic and block they get narrowed then you get these really high pressure differentials across the area of stenosis and the flow goes up really really really high and so that's what you got to think about when it comes to stenosis it's a really knows equation but you got to have an idea that even a little bit of change in radius is going to cause a big change in flow so what is a Doppler equation the Doppler equation all might fellows have this tattooed on their on their lower back and so if you ever need to know it just just stop any one of my fellows and you'll see a tattoo it's part of the fellowship criteria but but the thing you got to know is the Doppler equation is trying to assess the Doppler shift in frequencies of the moving red blood cells as they go towards and away from the transducer and of this whole equation really the only important thing here is cosine of theta okay that's really the only thing you got to know about this dollar equation because what does that mean so does anybody know what cosine of 90 degrees is good it's zero yes right here on my slide so that's why our works much better here as a more parallel plane because this theta once you get all the way up to 90 degrees if the probe is right here the angle of insulation once that gets to 90 degrees then the Doppler doesn't it's not accurate so you really want to be more parallel when it comes to Doppler than perpendicular but it's important to remember the difference between B mode and Doppler and angles and beam angles when it comes to B mode perpendicular is going to offer the best reflection and the best images possible okay so when you really want to look at something for getting about Doppler for a second when you really want to look at something on B mode or brightness mode TD mode then you want to be perpendicular to that organ that you're trying to insulate but when it comes to Doppler it's different you need to be off axis and think more about being parallel for example every time driving down the freeway and for example when my wife is driving down the freeway this happened recently she's driving along all of a sudden she sees a cop right off to her right and she jams on the brakes and I'm like Danielle obviously the cop can't see when you're perpendicular cosine of theta is the numerator Doppler equation and you're 90 degrees right now so clearly it doesn't do any good to slam the brakes on and she looks at me like I'm crazy but the bottom line is that cop got her all the way down the freeway because they do this in a much more parallel fashion that's when Doppler is most accurate and as the flow is coming towards and then away from the transducer in this example here of pulsed wave Doppler images you can see as it's coming towards the probe the beam angle is constantly changing and where it's more parallel you get a much better representation of the actual velocity of the flow and when it gets more perpendicular almost seems like the velocity is dropping it's not it's just not as accurate okay and then as the as the flow goes away from the transducer again in a more parallel fashion you get a nice peak here but in this case it's underneath the baseline because it's going away from the probe and in an example a it's coming towards a probe so it's above the baseline so sometimes you'll see these these pulse wave Doppler waveforms going up and sometimes you'll see them going down you'll wonder what's going on it all it means is it's just the orientation of the direction towards the probe or away from the probe colorflow Doppler is as I mentioned earlier it's a nice way to check the valvular competency here is a nice normal-looking heart we can see the left atrium the left ventricle in this apical for chamber view but notice I talked a lot about Doppler you'll hear this when I get to my cardiac stuff too in that apical for chamber view rather than other windows because in this apical for chamber view or in this case it's the fifth chamber as we see the aortic valve here during systole we see this nice blue jet bomb and down the aortic valve blue jet away from the probe I like that a Artic fifth or fourth chamber because the sound is very parallel in this view and you can actually change the angle of the probe and make vessels turn red or blue here we are of one anymore just we're just we're just angling the probe here now the the the probe flow looks blue here we didn't change any parameters here or change this flow box at all we just angled the probe one way or the other here though we are changing the angle of the of the color angle you can actually adjust the color angle pretty easily on most ultrasound machines by just flipping a control and see how it's this way and then we're going to flip it up now it's this way and just changing steering the color beam if you will can change the the angle of your Doppler angle that way to a more parallel one the pulse repetition frequency is probably the most important thing you got to know about Doppler the pulse repetition frequency is how it's listening okay so when when when it's sending a lot of pulses a high pulse repetition frequency it's talking a lot and not listening as much and when it's not talking very much when the pulse repetition frequency is really low then it's listening more and we all know that when you listen more you're a more sensitive person so that's kind of how I remember that high PRF blabbity blabbity blah not listening not very sensitive so when would I use that High Flow state like the carotid right next to where you talked in your trachea I'm going to have a high PRF because there's so much flow going on there that I don't have to have a very sensitive sampling area but when I'm say down in the testicles where there's a very low flow state or lymph nodes then my PRF is really much lower because I really wanted to listen more and be more sensitive and so you can see here on this view we've got the PRF here at 2003 now it's at 3000 it's 4,000 5,000 7,000 and as you get to 9,000 you don't see as much flow anymore and then back down at 2,000 to see a lot of flow here so that's one way that you can adjust the sensitivity is with the PRF I usually start there the problem with Doppler though is that when you activate the Doppler you've got two things going on now you've got the B mode and then on top of it you've got the Doppler sampling and so what that does is it crushes your temporal resolution temporal resolution is frame rate the number of frames per second that's passing in front of your eye now on ultrasound anything greater than 40 frames per second you can't tell it's just a bunch of still images strung together and so b-mode ultrasound has got really high frame rates when you're using cardiac software we activate the cardiology package on any ultrasound machine the cardiac software those cardiologists they want to see every possible range of motion that those sarcomeres are doing so that they can best assess for ejection fraction right so they love high frame rate but those images tend to be a little grainy err because you're turning off all the other image processing stuff on the screen or to get the highest possible frame rate because when you work with abdominal software settings you do have lower frame rates sometimes they're as low as 15 without even activating a doppler you're all the way down to 15 on a on an abdominal software setting but the image looks beautiful because it's scraping off all the artifacts and processing that image and so things look really pretty on the screen not grainy so what happens when you activate the Doppler only activate the Doppler and what happens is that really slows down your temporal resolution so the image looks a little bit herky-jerky what I mean is when you move the probe the image kind of lags behind it doesn't have that high frame rate real-time image as much and so sound is going into the body reflects back out and then on the screen it's writing those images at a certain frame rate adding Doppler slows down that frame rate and then that's called poor temporal resolution it's a number of frames per second and you can see here how increase in the Doppler sampling area is going to decrease your grayscale frame rate so right here your frame rate is now hi it's 48 but we have a tiny little sampling area right here and when we increase that sampling year maybe you want to make it stretch out across this this vessel here look what it's going to do to our frame rate once it refreshes 21 it 1/2 dit just by increasing this and so it doesn't really matter too much if you hold the probe really still you can have low frame rates which is fine outs down to 13 here as long as I hold my probe really still but here's what you don't want to do you don't want to flip on the Doppler or the color and then start dragging the probe around the body looking for a blood vessel because the probe is going to lag behind what the image shows you and you're going to get all kinds of flash artifact on the screen another way to adjust the Doppler signal is to turn up the color gain and you could crank the color gain all the way up or crank it all the way down that's another good place to go so I usually turn down my PRF and twice you a good signal and then as and I might tweak a little bit more than my color gain now pulse wave Doppler as I mentioned before sometimes we call that spectral Doppler it's a velocity waveform and you can see this velocity scale over here centimeters per second this is the systolic forward flow here and then all the way at the end of diastole we still have forward flow going on in this particular vessel that's what that means it's above the baseline there not to get too into it we do use Doppler pulse wave Doppler quite a bit in our cardiac measurements and that's we'll talk a lot more about that when we get to the more advanced cardiac stuff with the hemodynamics I use it every shift in that way but just the basics of it here you're going to steer this sampling gait this little tie fighter and that's going to result in once you activate that in a in a Doppler waveform that corresponds to a velocity scale over here you can do all kinds of measurements along that waveform now that's pulse wave Doppler pulse wave Doppler right here that's what we did this is pulse wave Doppler we did a very specific sampling location now the problem with that is if you've got an area that's really stenotic and maybe a a small portion of the blood of the red blood cells are going really crazy high velocities if you don't have your pulse wave Doppler sampling gate in the exact right spot you might miss the highest velocities going along like you're only going to get what you're sampling in a very specific area however there's another type of Doppler called continuous wave or CW and this is a it's it's a way to signal all of the red blood cells in this entire pathway the spike that comes down it's going to get the highest it's going to get all of the blood vessels velocity scales in a much larger area and so we do that continuous wave Doppler you can see it's getting all these red blood cells here rather than just a small sampling gate here it's actually taking this entire spectrum here and it's getting much larger swath of of the blood vessel there and so if you're looking for somebody who's got a a peak a really high peak velocity you'll have a better chance of finding what those peak velocities are here when using continuous wave and that comes in to play when you're talking about mitral valve stenosis and specifically so this is the better type of Doppler to use because you're more likely to get the highest possible velocity values when using mitral when using continuous wave Doppler so it gives you a better accuracy I mean look at how high these scales are here 300 centimeters per second that's very very very high velocity due to this stenotic mitral valve alright so wrapping up here you got to know your anatomy because you want to visualize it in two planes define the boundaries of your organs as you're scanning through the various organs you want to use the right transducer you don't want to be you know trying to look at the jugular vein using the phased-array transducer on the neck I mean all you're going to see is a tiny tiny tiny little circle the top of the screen whereas if you went to the correct transducer the linear high-frequency probe the jugular vein is like a massive target on the screen you can miss and so that's why that's one of many reasons why it's important to you the right transducer and you're going to learn which probes to use and how to acquire those acoustic windows where to put the probe on the skin as you as you peel back more and more layers of your ultrasound training and the system controls the depth the gain the frequency very important controls there too to learn how to adjust and and I just kind of want to end this talk with this particular type of an ultrasound machine and how to adjust some basic controls of it this is called a GE logic v2 and it came out in the year 2016 and this is the control panel here when you first see the control panel you see all these buttons and I think for some people novices they're a little intimidated by all the buttons on the screen so I'm going to break it down and show you what the most important buttons are in fact we've already talked about most of them right we talked about the depth right here we talked about the gain and the time gain compensation gain at different depths and and we talked about the different modes so B mode color flow pulse wave Doppler and M mode now a couple of the other controls here I think probably the most important control is actually the power button you know I mean when you come over here you got a you got a turn the power on okay so that's that's number one and then another really important control is the patient button here you need to enter that patient data we'll have this this card limited on all the machines in case you forget but it sits here in this podcast you want to go back to it to enter the patient data though it's this button here you click that patient key and then you're going to enter the the patient's ID and that's really what when you down there we need the patient ID on every single ultrasound that's ever done so that way we know you know we can see what images we're coming from because you're going to you're going to be archiving these images as you go along and that's the that's the standard of care when taking care of patients with ultrasound is to archive the images and create a report but specifically hit the patient key and you enter in the the ID and then you're going to exit that screen by clicking the Scan button now to select a transducer to use a probe to use you're going to push the preset key when you hit that preset key you're going to use the trackball to point the arrow to the correct probe and application for the exam that you're doing so if like you're going to do a you know a cardiac exam on a patient you would just go towards that cardiac exam and select it pretty pretty basic and you can always hit cancel if you're not going to change the exam type and then to measure something pretty easy to do you hit the measure key a caliper pops up and then you're going to put the caliper where you need it at the set key another caliper pops up and you move that caliper to where the other the other side of the thing you're trying to measure and you hit the set key and the result comes up and when you're working with pulse wave Doppler you're going to use the measure key to get those velocity values that they own those Doppler waveforms as we saw earlier to annotate an image that means to put text on an image really important to annotate especially when you're working with certain applications that are really esoteric like some musculoskeletal applications where no one's really sure where you're looking at I think it's super critical in general to annotate but specifically when it comes to an organ that may not be obvious to everybody so you can hit that comment key and and when you hit the the comment key I see it over here number 25 then that activates the the annotation function you're going to move the cursor where you need it and put the text in and then hit set and then finally to end exam you click the end exam button that way all those images and the values and any comments you made get packed together under the patient ID really really important to do that it's as important as making the right diagnosis is being able to correctly archive the images another correct patient identification number so that basically concludes this presentation I love this picture here of the ultrasound resolution drawn by one of our foreign medical students Brian and thank you very much
Up Next

62:12
Ocean & Coastal Acidification: Data in the Classroom Webinar
@NOAAOceanAcidification
251 views•2020-09-21

12:54
Triumph of Orthodoxy Icon: Byzantine Art & History Explained
@BenCallan
2.1K views•2024-08-06

9:49
FastAPI vs Flask vs Django: Choosing the Right Python Web Framework
@TechWithTim
302.5K views•2024-05-26

1:42
Game of Thrones Opening Credits: A Cinematic Analysis
@gameofthrones
46.3M views•2011-04-18
Related Study Plans & Knowledge Roadmaps
Structured learning paths in General & Interdisciplinary Studies
general-studies
Elevator Engineering: History, Physics & Cities
01From Hoists to Safety Brakes: The Dawn of Vertical Lift
02Hydraulic vs. Traction: The Engineering Physics of Elevators
03Modern Speed, Safety, and Algorithms
+ 2 more learning modules
12h5 modules
Explore Roadmap
general-studies
Rubber: Material Science, History & Geopolitics
01Origins of Natural Rubber & Mesoamerican History
02The Chemistry of Natural Rubber & Vulcanization
03The Geopolitics of the Rubber Boom & Colonization
+ 2 more learning modules
12h5 modules
Explore Roadmap
general-studies
Containerization: Evolution, Logistics & Trade
01Ancient Trade & Bulk Cargo: Amphorae to Barrels
02The Industrial Revolution & Cardboard Packaging
03The Containerization Revolution: Malcom McLean
+ 2 more learning modules
12h5 modules
Explore Roadmap
general-studies
Textile Tech: Evolution, Labor & Global Impact
01Pre-Industrial Textiles: Handloom & Cottage Industry
02Mechanization: The Spinning Jenny to the Power Loom
03The Factory System & Global Labor Transformation
+ 2 more learning modules
10h5 modules
Explore Roadmap