












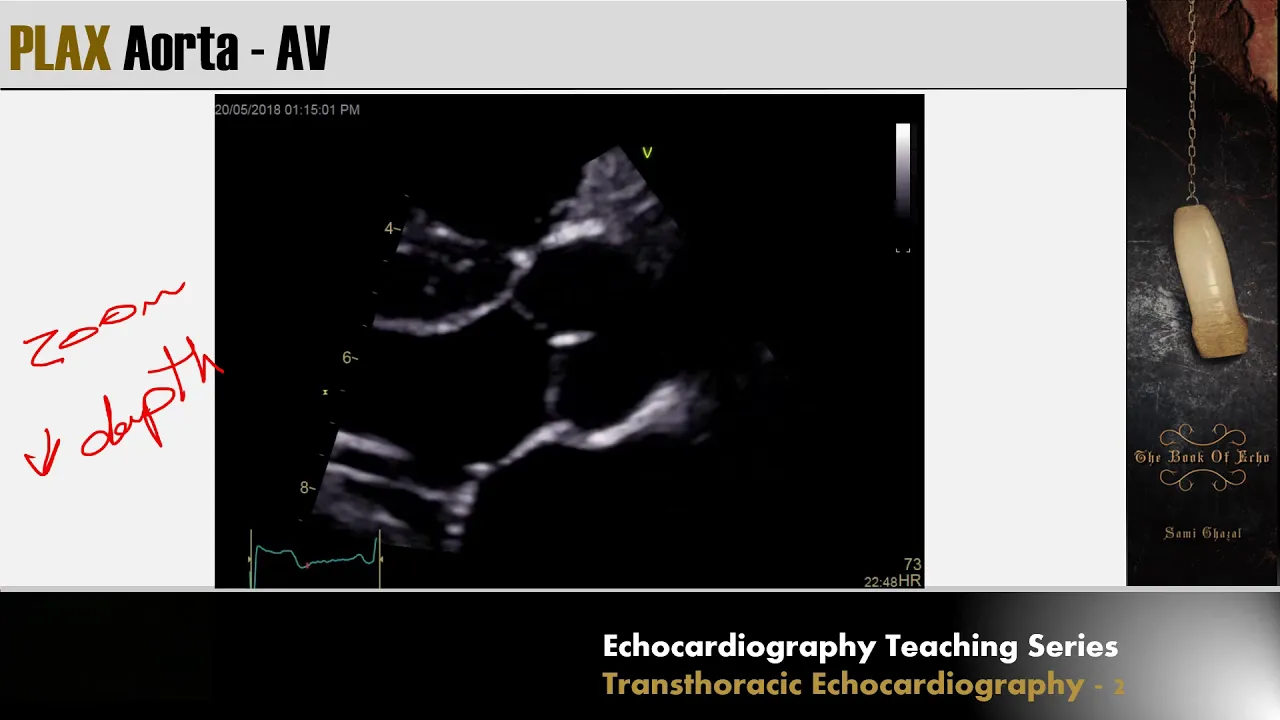


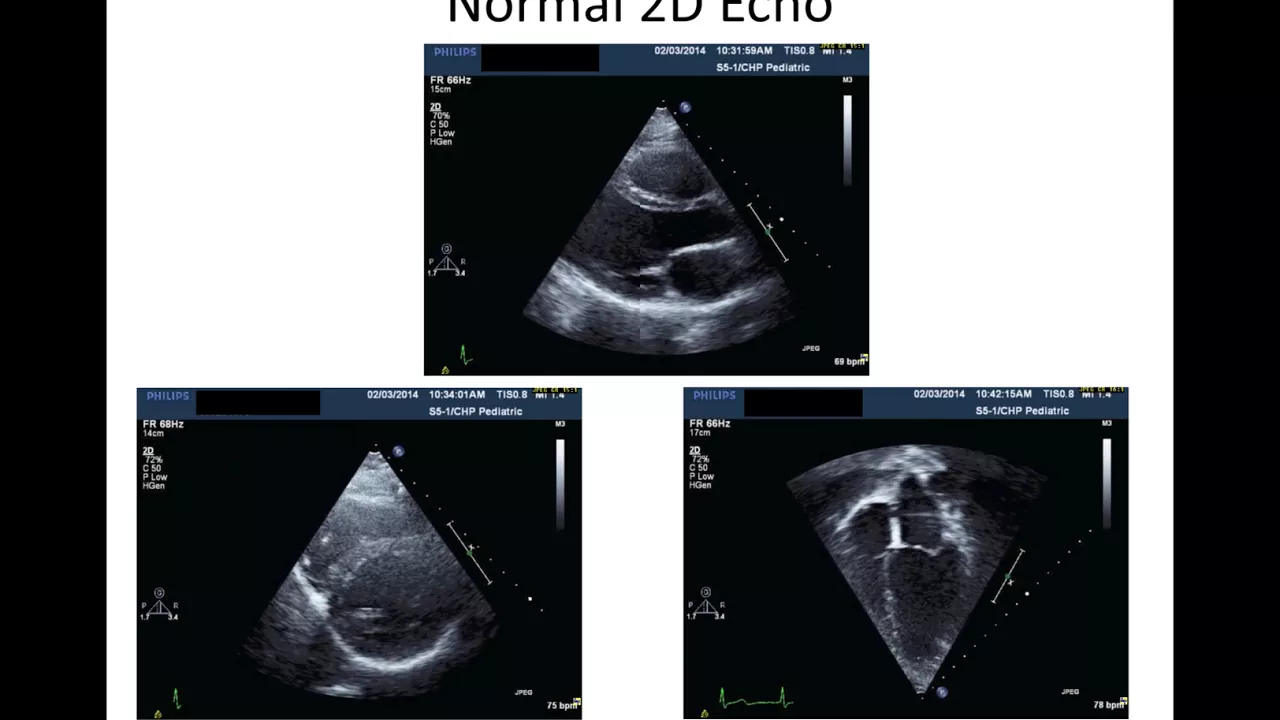




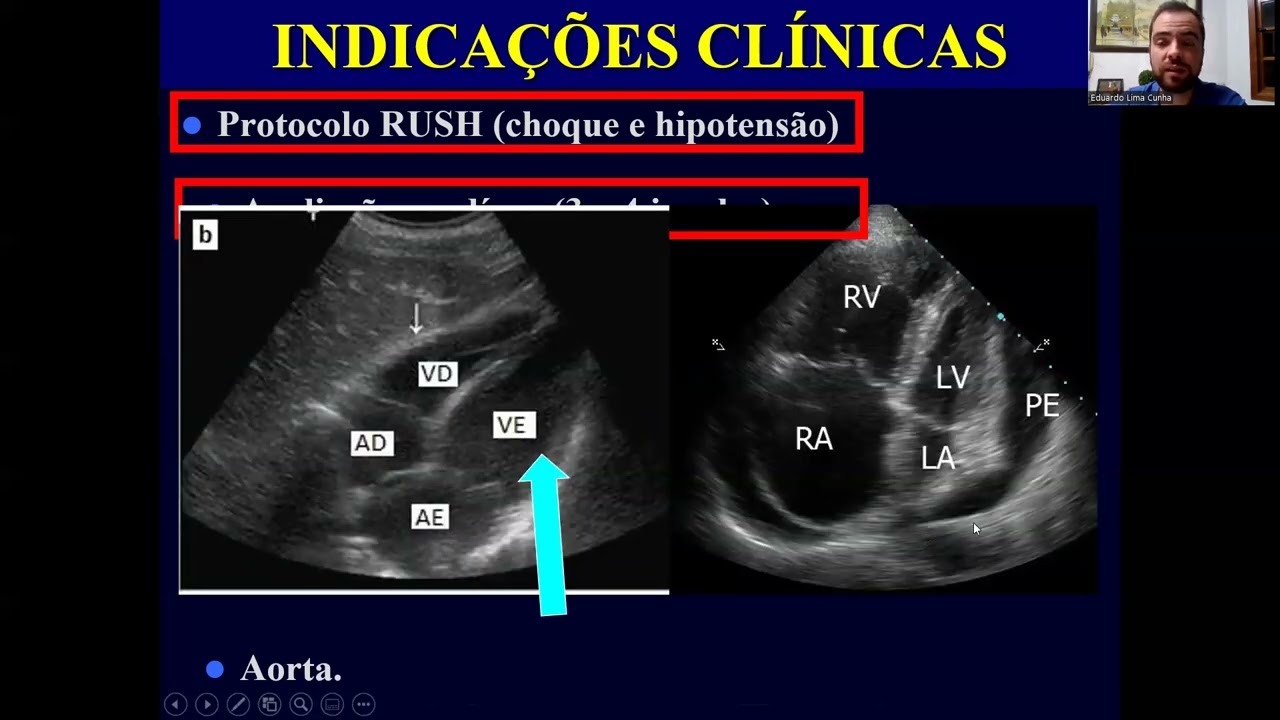




This tutorial teaches four fundamental echocardiography views essential for emergency department assessment: the long-axis view (obtained by moving the probe from the sternum toward the left side, showing the left atrium, left ventricle outflow tract, and aortic root); the short-axis view (acquired by rotating the probe toward the right hip, ideal for assessing myocardial contractility and wall motion abnormalities); the apical four-chamber view (gained by positioning the probe beneath the nipple and pointing it toward the patient's right side, providing the best view for right ventricular dilation assessment); and the suprasternal notch view (used for evaluating aortic dissection by imaging the aortic arch). Key clinical applications include differentiating pericardial effusion from pleural effusion using the descending thoracic aorta as a landmark, assessing right ventricular strain for suspected pulmonary embolism, evaluating global cardiac contractility to guide fluid versus vasopressor management in hypotensive patients, and identifying tamponade through right atrial and ventricular scalloping.
Basic Echocardiography Tutorial: Cardiac Ultrasound Views
Added:hey again everybody we're going to be doing um Echo today or cardiac ultrasound uh again this is poft just going to do a short segment on Echo which is kind of the most from speaking to people the most feared of of all these modalities uh tends to be most frustrating for people I think it's the most applicable word it can be difficult to find in some patients sometimes you got to do the best you can and get the best f you can these views today will be uh hopefully good and some and we'll provide you with some learning and some education um we're going to be going over each of the uh the views whether it's the long AIS view which is this view we're looking at on the screen now and then we'll be looking at the short axis well as the apical four chamber uh views and we'll be talking about the applications that we're using um and uh trying to implement with getting these views um here's a long AIS view of the heart um this is the only instance or one of the only instances um that you're going to be using the probe and uh orienting it towards the left side of the patient in this case I usually start as you can see right in the middle of the chest and I'll just spring my probe over leftward and if you do that you'll generally find some sort of a view and again what I try to stress when I teach this is move it a move the pro probe quite a bit at first so what I call macro movement so big movements at first when you see something stop and then start using small or micro movements to gain a better image whether that's rocking it Fanning it or tilting the probe that's a good technique to have whether it's the heart or anything else you're trying to find in the body so macro movements and then micro movements in this case moving from the center of the body or right on the sternum and then just move a little laterally to the left to gain this image you can see here left atrium left ventricle outflow tract nice aortic View and here again is your right ventricle which as you can see is closest to the probe this structure here is a good one to remember again um this is the descending thoracic aorta if you can imagine the aorta wraps around comes off here off the heart and then will wrap around and actually come towards you um and downward uh towards the abdomen here it's the landmark to differentiate between plural or thoracic from pericardial affusions and we'll talk about that shortly to gain the short axis view You're simply going to take your probe and you're going to rotate it right where you were and you're just going to rotate it to the right hip so you're moving from the left hip here just twist it get used to that motion take it to the right hip and here's your corresponding image here on the ultrasound to show you what I mean so long axis twist here's your short axis right ventricle closest to the probe here's your LV and this is the view where you're going to be assessing contractility and looking for any significant or overt wall motion abnormality um here uh again here this this is just a representation of Fanning all the way through the short axis once you get this view of the short axis here's your LV you can rock probe and go down towards the apex of the heart and then up to the base of the heart which is right here when you get that towards the base which is a term that always has confounded me because the base of the heart is actually the top of the heart but you're going to see your aortic valve root here and then you're going to sweep all the way down here on the on the right you can see Scott here scanning all the way down towards the Apex right here through the mitro valve towards the Apex here's your apical four chamber again the way I get this is I go from a axis view right up here in the top left at the beginning and then I'm going to move my probe right underneath the nipple and I'm going to point the probe to the right of the patient and that will generally give you this nice view of the heart the goal on this view is to get both valves both the mitro valve here and the tricuspid valve here in View kind of looks like a four square game once you get a good view you'll have all both ventricles both Atria in your view the left atrium and your right atrium here this is the view the best view to assess for any right ventricular dilation or strain this is a normal view of the heart as we can see here this is a view which is sometimes Troublesome to get depending on your patient tricks you can do um are just simply moving the patient's arm left arm above their head head as well as having them Roll Just slightly over to the left that'll bring the heart kind of towards the bo the surface of the body a little easier uh a little more and lets you get your view easier here's a super sternal view why you do this view if you're concerned about a dissection so if you see a large aortic root if you have a patient has ripping chest pain and unstable and unstable or unequal pulses etc etc if you're worried about that all you got to do there's no Rhyme or Reason to this one just stick your pro probe your phase aray probe up above the super sternal notch and you're going to be looking down downward at the aorta um and the aortic Arch so this is your a Aortic Arch here with a dissection You' see a nice flap here in the middle of this Arch why are we doing this alluded to this at the beginning we have a few pointed questions we want to ask here in the Ed when we're doing echo echo are neat things you can do lots of more Advanced Studies but for the basic you know critical actions clinical changing actions in the Ed these are the things that you want to make sure you are perfecting is uh differentiating between a pericardio fusion and a fat pad um seeing if the infusion is causing any strain in the heart you want to also be able to tell if the RV is dilated you're concerned about a PE uh and lastly you just want to get a sense of the contractility of the heart if you have a patient with hyp hypotension or shock uh that can certainly change your management about whether you're going to give fluids or you're going to give um some Bas oppressor support for the blood pressure um here's some pathologic cases um these are all four views and this is a sick heart here that's looks like it's in fibrillation with surrounding large pericardial infusion this one is not hard to miss what I will point out here is this view here which is your long and this structure here is your descending thoracic aorta this is the one I mentioned before which is going to be help you differentiate differentiate between a plural and a paracardial fusion as you can see here the fluid is tracking in front of the aorta in front of that DTA and this is going to be a paric cardio Fusion which you can obviously see with the other images but if you only have this image this is the structure you'd have to uh notice and verify this kind of just highlight highlights that point again in front of the DTA you see here these yellow and blue in front of the descending thoracic aorta here the plural Fusion goes in back of the descending AA so the thoracic a is here you see this stops here and will track behind behind the aorta so this is a plural Fusion this here is a u paracardial Fusion I hope that makes sense um when we assess for tamponade basically on ultrasound you're you can either look at the right atrium which is tends to be the first thing to um show some scalloping or inward the pressure from the outside of the heart is so much from the T from the uh fluid that it's causing clinical tampaon and pushing inward on that right atrial wall or more commonly and what's more commonly described is in textbooks is the right ventricle is um during diis Dias in particular but uh is showing scalloping motion Inward and the pressure is causing um uh circulatory compromise um again this is the long axis view not a great view to look for the right ventricle and not one we ever Ed to assess right ventricle size but you can see it's having a significant effect on the right ventricle here is your apical four chamber again a lot of pressure from the outside onto that right ventricle um this is important to differentiate between whether you're going to see uh a pericardia fusion or what's called a fat pad so the it's can be tough and you know as many as you look at you're still going to look at some and say I'm not sure but uh in general what I try to what I try to look for what I try to make me think of a fat pad is it almost looks like a little bit of a Starry Sky appearance it's a hypo aoic whereas a fat pad will be darker and more an aoic um the other thing that can make you think that it's a fat pad is it kind of it seems to be stuck to the end to the outside of the heart with an affusion um it tends to have more versatility and more movement the fat pad seems to be kind of tacked on to the heart's surface and it just looks sticky I know that's more subjective but to me a fat pad just has a more characteristic appearance in how the dynamic changes occur so hypo aoic around the heart like we a fat pad dark an aoic likely an infusion this is what I mean here dark andic the interesting thing about this case is not the little affusion here it's this large area here which is actually clotted blood so this is what's a called a hemorrhagic tampeno this patient had either a ruptured LV or some sort of catastrophic cardiac condition in which they extravasated blood out into their pericardium and this clotted off and this is more active or free or recent bleeding around around it this Heart's Not not alive at this point uh we alluded to some RV issues so RV strain again this is the four chamber this is almost a five chamber what I mean by that is you can actually see the outflow tract from the LV into the aorta this is what's used in more advanced cardiac imaging uh Echo Imaging but in general this is a nice four chamber here again you get that four square appearance you get all the chambers and you have both valves that are in View and in these uh pictures are looking to see basically if the RV is bigger than the LV if it's bigger than the LV that's typically abnormal it doesn't mean they have a PE it just means that the RV is has acutely or has chronically faced more pressure and grown greater size of the LV and the setting of chronic COPD pulmonary fibrosis this can be the patient's quote normal finding but in an acute setting in a especially in a younger patient um with uh story consistent with possible PE that needs to really um rise in your differential if you're seeing a big dilated RV and should and can precipitate giving thrombolytics um acutely to the patient LV bigger than RV on the right side Here RV bigger than LV I hope you guys can see that uh differentiation so this is concerning over here on the right this is normal here's your short axis again right ventricle closest to the probe nice LV probe again remember pointed towards the right hip that's after getting the long axis and just twisting the probe this is getting your right hip or towards your right hip and this is a normal here you should see the ventricle should look like a circle or an O this should cause some concern for you as a sonographer this D What's called the D sign um nice o here here's your D sign here essentially means that there's some so much pressure in the RV that it's pressing down onto the left ventricle uh wall and causing some compression there from this view I definitely get a four chamber view but this should rise some concern in your mind um another application we use it for is just kind of global assessment I don't care whether the patient has 37% or 35% or 30% as long as you can tell if there's a decrease in the ejection fraction acutely in the emergency department this is a normal EF nice squeeze conent concentric wall everything's coming towards the middle this patient has a significantly decreased or severely decreased ejection fraction where there's rarely hardly any squeeze towards the middle it's hard to appreciate any acute wall motion abnormalities in terms of uh particular areas along the left entric wall but a global assessment tells me that this patient's not going to respond well to a ton of fluids and will likely back that fluid up into their lungs before getting it out into their bloodstream and helping their blood pressure uh here's another view so this is just your long axis View and same type of thing the one caveat here is that with this VI I often look at the mitro valve and uh they talk about uh normal mitro Val should almost touch your septum here I think it's about four millimeters what they say um is what is described as being a uh robust or a normal ejection fraction in this view you can see this mitro valve Excursion is is poor and diminished barely coming off this anterior Leaf it's barely barely moving off uh as well as as you can see here the walls of the left ventricle aren't doing much in terms of squeeze whereas in this case you have nice concentric squeeze um and nice Excursion of the mitro valve so just another way to assess a different view uh this is kind of exactly what I was talking about about um and gives you a representation um next off we're going to be moving on to pulmonary so stay tuned
Up Next

RUSH Exam Part 3: Ultrasound in Shock - Pipes & RV Evaluation
@Sonosite
25.3K views•2013-12-17

Graphic Medicine: Comics for Collaborative Healthcare Communication
@nationalpatientadvocate
189 views•2023-12-04

Neuroanatomy: Central and Peripheral Nervous System Divisions Explained
@AKLECTURES
136.2K views•2014-09-20
Stages of Labor and Vaginal Birth | Childbirth Animation
@nucleusmedicalmedia
52.1M views•2017-08-18
Related Study Plans & Knowledge Roadmaps
Structured learning paths in Medicine