



















![Большой обзор плагинов Cockos Reaper [М.Мачалов]](https://i.ytimg.com/vi/LFknbU2M6Nk/maxresdefault.jpg)

Oscillators generate sound waves (sine, square, triangle, sawtooth) by converting frequency to angular velocity, while envelopes (ADSR: Attack, Decay, Sustain, Release) control how amplitude changes over time to create realistic instrument sounds, with attack determining how quickly sound reaches maximum volume, decay settling to sustain level, sustain maintaining volume while key is held, and release fading sound after key release.
Sound Synthesizer Oscillators and Envelopes Programming Tutorial
Added:Fundamental programming concepts, including loops, functions, and working with digital audio arrays or buffers.
Basic physics of sound, including concepts of frequency, amplitude, period, and digital audio representation (sampling rate and bit depth).
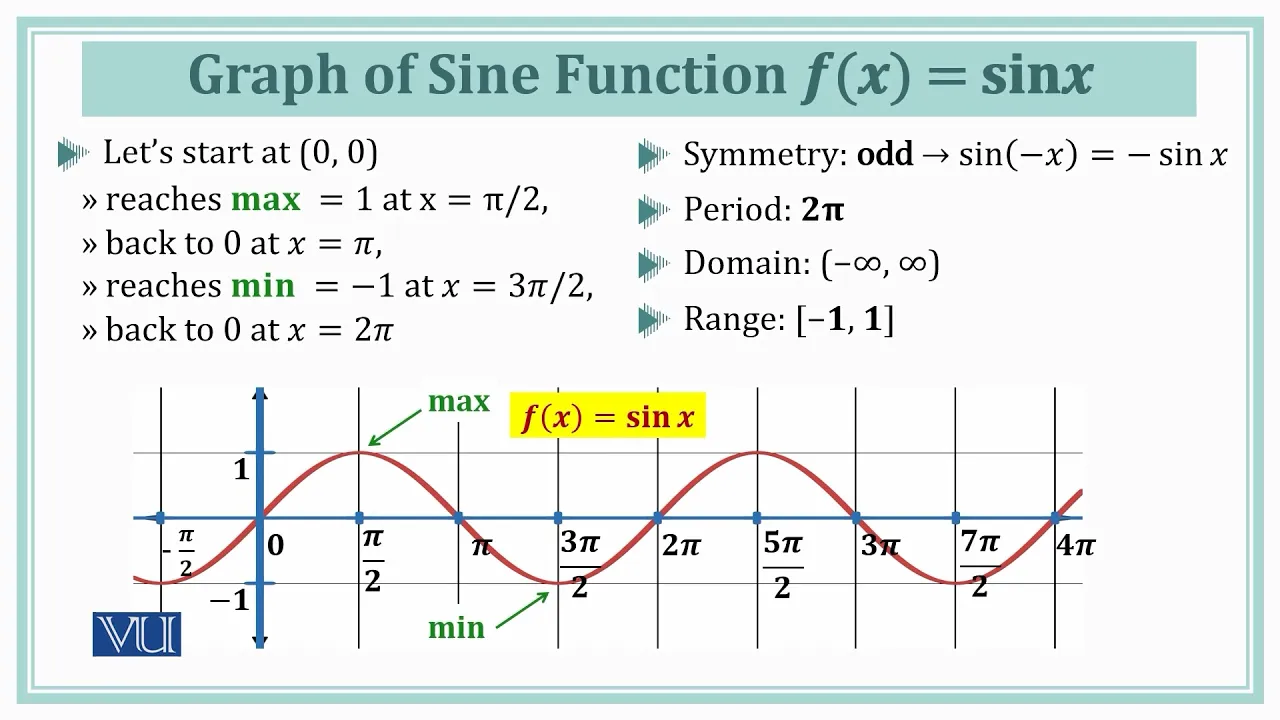
Mathematical understanding of periodic functions and basic trigonometry (specifically sine functions).
An introductory conceptual understanding of subtractive synthesis and its core components (Oscillator, Filter, Amplifier).
Designing and programming digital filters (e.g., low-pass, high-pass) to shape the timbre of the generated waveforms.
Implementing Low-Frequency Oscillators (LFOs) to modulate parameters like pitch (vibrato) or volume (tremolo).
Developing polyphony systems and voice allocation algorithms to allow the synthesizer to play multiple notes simultaneously.
Exploring advanced synthesis methods such as Frequency Modulation (FM) synthesis, Wavetable synthesis, or Physical Modeling.
Integrating MIDI (Musical Instrument Digital Interface) input to control the synthesizer parameters in real-time.
80.8K views2.9Klikes30:37Original Release: 2017-02-27
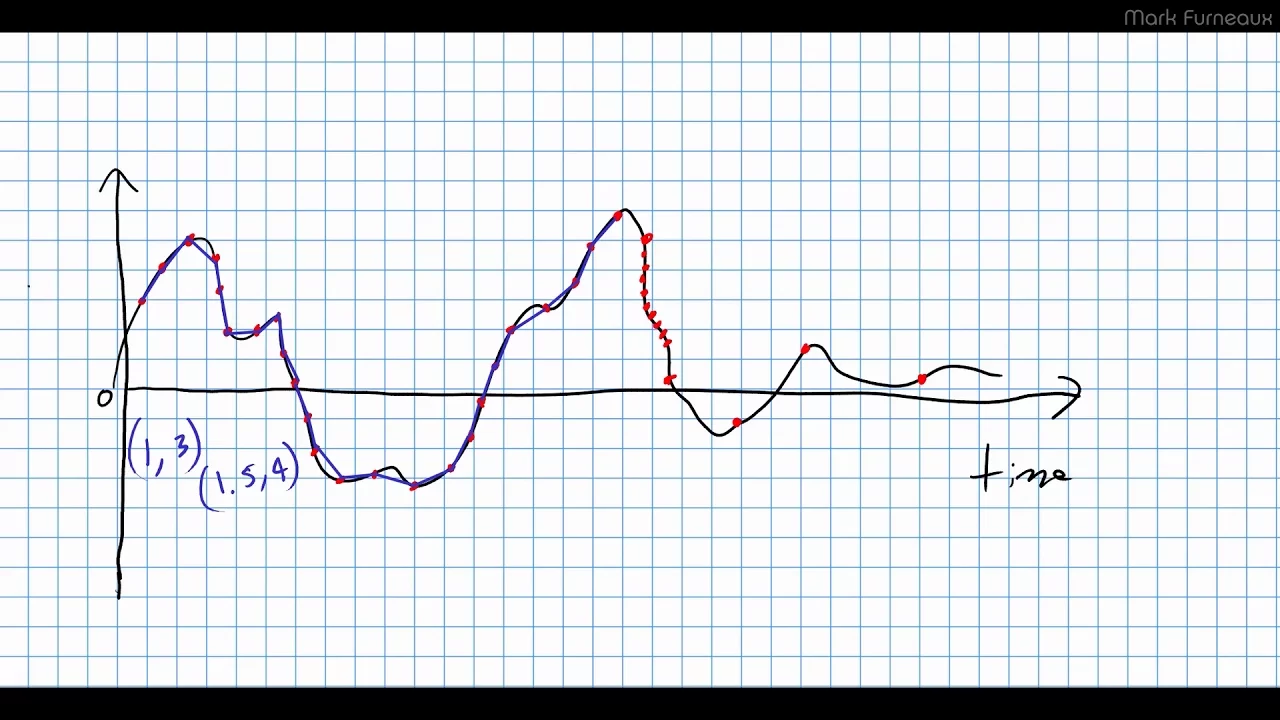
[Music] [Music] welcome to the second video of my code aty yourself synthesizer series uh today we're going to be looking at envelopes and oscillators this is uh due to some feedback from the previous video I'm going to keep it a bit shorter and a bit snappier hey I'm still learning as I'm going along and uh today I specifically want to cover the very basics of how what we did last time how the code is actually used as a synthesizer in the last video we specifically talked about waveforms being the fundamentals of sound synthesis but we didn't really use any of the synthesizer lingo so I'm going to start introducing that today and we'll be looking at some other wave forms and we'll be looking at how we can shape the waveforms to sound like a more realistic instrument in the previous video we really just played a out with sine waves and we used a trick to turn those sine waves into square waves and we listen to them um but there's a there's other types of waves that we can play with now in sound synthesis these waves are called oscillators I think it's time to take the original program and make some of it more convenient to use it's going to get a little bit more complicated from now on now some of the feedback I got from the first video is that the code wasn't always visible so I'm going to experiment with dynamically zooming the code so we can focus on the parts of the pro program I'm talking about let's start by making some optimizations to our little program from the first video one of the things we're going to see a lot of is turning Hertz into angular velocity so I'm going to wrap that up in a small function so I've created a little function here and it's going to be simply frequency in hertz time 2.0 * pi now Pi is a constant defined in the olc noise maker header and we'll just quickly test that so we can get rid of the 2 * pi and wrap up our frequency in our function W we'll just compile that and click play yeah sine wave with uh with the clicks what we also saw in the first video it would be handy to use different oscillators without having to rewrite the mathematics each time so let's create a function called OS which represents an oscillator so our oscillator function will take a frequency input uh it needs to take the current time so we know we're about in our oscillation cycle we are and we're going to have several different types of oscillators so we need to wait for the user to to choose that and uh let's let's do a quick switch statement here uh so depending on the type of oscillator uh we can depending on the type of oscillator we can now choose a different function and if there's an invalid type we're just going to return zero it's probably the safest thing to return zero I there's no sound output so it won't damage your speakers if it goes wrong I should take this moment to actually say be careful using this stuff if you have really large amplitudes and very low frequencies you could easily damage your speakers or headphones I'm not going to be liable for that so use with caution uh let's take a case of zero for being our standard sine wave so we want to just return the sign of our frequency in hertz times D time simply enough we also know how to do a square wave if remember a square wave was just thresholding the sine wave around its middle so we can do uh the same as before D time what we want to test now is that greater than zero and if it is greater than zero we want to Output a full amplitude of one and if it is less than zero we want to Output minus one I really do like the inline if then else syntax what other type of waves could we include along with the sine wave and the square wave we may also have the triangle wave which looks like this and the triangle wave is described as being the AR sign of the sign of our standard sign Wave It's scaled here at the front with the 2 * the amplitude over Pi but it follows all of the same rules uh as we change the frequency and we can change the amplitude so let's add the triangle wave to our oscillator function triangle wave and so this is the same as our sine wave again but this time we take the AR sign of the result and we do a little bit of scaling Capital Pi there we go let's take a moment to test these functions and listen to the differences so in our make noise function uh we now want to call our OS function so instead of calling the sign function directly we call oscillate and we know that now our frequency output is in hertz we need to pass along the time and our first one shall be sine waves let's have a listen so nice very mellow let's change it to a square [Music] [Applause] [Music] wave not sharper that time and louder now let's change it to our triangle [Music] wave not surprisingly it sounds a bit like a square wave and a sine wave mixed together there are two other types of waveform the next one is the S Wave now there's two ways to generate a S Wave there's the mathematically great way to do it and there's the computer great way to do it we'll look at both the Sawtooth wave is called such because it looks like the edge of a saw here we can see the wave increasing and a rapid fall so we've got a slope and a fall to generate a Sawtooth wave mathematically we sum up all of the multiples of a particular frequency um of a sine wave so if we take for example 110 Herz which is one of our A's from the last video we would add to that 110 we'd add a frequency at 220 we'd add 330 we'd add 440 each time scaling it a little bit but summing up all of these sine waves and this really cleverly gives us a Sawtooth wave and so we can see here in the function we're summing up all of the Waves up to a number of uh sine waves here this is the count of the sine waves and if we have one sine wave we add it as we add it we can see that it becomes more linear and more linear and the idea is this goes off to infinity and you get a a perfect saw too however adding up sine waves in this manner is grossly inefficient for a computer so we can also apply a hack to this using the mod function using computer rounding integer mathematics to simulate the addition of all of these sine waves to give us a perfect piece-wise linear approximation so here if I enable this we can see the computer function here using the mod um mod function gives us perfect linear black lines here so straight up straight down straight up straight down I think there'll be some difference acoustically between these two waveforms so I'm going to include them both in the oscillator function here is the code for two implementations of the Sawtooth wave this first uh instance three here is for the analog version I've called it analog um it might feel a bit warmer uh and it's definitely computationally slower calculating all of these sign functions if we just quickly go back to our Desmos here why have I said it's warmer well because if I change the number of sine waves included in the summation we can see that we get an interesting characteristic it's not just straight lines and I think that these will sound acoustically interesting um and so I'm going to call that warmth as opposed to the alternative which we just look at the code is using the modun function in this case I'm using fod because I'm working with doubles um and I'm using the time period so as time progresses along the xaxis we mod it with our frequency or period which is one over frequency so that will give us our a straight line slope and we're offsetting and scaling in both instances to make sure that we lie between minus1 and + one so I'm curious to see what these sound like I'm going to make sure that we're using number three here and so this is with 10 additions of [Music] sign it already sounds much better than the standard sine wave and far less harsh than the square wave let's try it now with say 50 additions definitely getting that retro feel now let's go up to 100 well I think that sounds Ace now let's try our approximation uh so this time instead of calculating s 100 times and doing divisions we're just going to calculate the mod function once so we need to change it here in our make noise function to index 4 now I think that that sounds very similar but not quite the same uh I might be fortunate enough to be listening to this through my headphones you'll have to try the code yourself and see if you can discern a difference I think there definitely is one I think that this method sounds far more clinical and I don't want to start some big audio file Fanboy argument about whether vinyl sounds better than MP3 but there's certainly something to be said for the additional detail in the signal of the addition of sine waves as opposed to the co mod function there is one final type of oscillator source which we've not included and that is uh the introduction of pseudo random noise I can't graph this in Desmos so I'll just assume that you know what a random number looks like and in this case I am using the C++ Rand function please don't write in I know it's not the best random number generator in the world um but it's good enough for this purpose so we need to do lots of casting here yes yes I know not good uh so I'm taking the Rand and oh bracket's in the wrong place again it and dividing it by Rand Max and I want to take the whole thing offset it and we're going to scale it so this should give us a random number between min-1 and + one and it doesn't matter what the frequency is of course because we've not included it in our calculation however just to prepare you because this our frequency output is shut off down here if we're not pressing a key in the code we just simply set our frequency to zero uh that's not going to silence this oscillator so when as soon as I start this program we're going to get a random noise sound and here we go you ready turn down your speakers and what's this for well some percussion maybe later on uh and what will be nice to try in a future video is blending together different oscillator sources to try and come up with more interesting textured sounds for the time being I'm going to set this back to our analog Sawtooth wave I like it that's number three now a musical instrument isn't just simply a onoff sound uh the sound volume will change during the period of the notes its frequency might change so we need to introduce a property called envelopes or envelopes depending on where you're from let's consider a church organ key being pressed we first of all draw ourselves an axis so here we've got some time and here we've got amplitude so we're going to change the volume of the signal as time passes and there's two interesting points in time for a key press first is when is the key pressed and when does the player release it so we'll have that as our uh press release so what happens when the say the church organ key is pressed well there's pressure in the pipes and that pressure is built up and released so we get a sudden surge of sound but this takes some time and we call this the attack time once that pressure is released it actually just releases a little bit here this is our Decay time uh because it wants to settle at a particular volume the pressure has suddenly been released and now we've reached a state of equilibrium so this becomes our Decay time and the church oron will continue now blowing Earth through the pipes until the player releases the key and the valve switches off and this is called our release time so these are three important times and in between this time can be however long the player has got the key pressed on the keyboard but it sits at a particular level and this is called the sustain level or sustain amplitude in this case so that gives us four components to this envelope which is the attack time the Decay time the sustain level or amplitude and the release time which is the time taken for all of the sound to stop any real instrument cannot do things instantly it has to obey the laws of physics so things take time to happen only virtual instruments can break these rules and that's why you can get some pretty funky sounding synthesis sounds now let's consider a slightly different instrument let's consider a guitar string being plucked but no note being held just plucked in this case we have an attack time as before but we probably don't have a Decay time and there is no sustain uh the note has been plucked it can't there is no more energy being fed into the system to keep the sound alive so we just have a release a release time so for plucked instruments the envelope can be much simpler it's now time to start writing some real code as as much as possible I've tried to keep things very simple but unfortunately we're going to have to start introducing more complex code which will take some study I don't think I can just get the point across straight away you'll have to look at some source code but we're going to create uh a structure to represent our envelope and uh in the synthesis world these are adsr for attack Decay sustain and release as we've just seen um scribbled out so what properties do we need to store as part of our envelope well we're going to keep everything as double again we know that we've got the attack time is required and we've got a Decay time and we've got a release time and we know that we've got an amplitude for our sustain the initial attack might go to quite a different amplitude than the note will rest at in fact let's capture that amplitude as well and we'll call that the start amplitude even though the duration of a note is known by when the player presses the key and releases it the duration of the envelope might be longer because it takes time to release the key so we need to know when has the user pressed and release the key and the envelope will then tell us what the amplitude should be at any point in time so let's capture uh two more variables for D trigger trigger on time and Double D trigger off time so this is when the key is pressed and when the key is released let's default some values and everything is in uh standard unit so if we want our attack time let's say we want it to be 10 milliseconds there we go the envelope can be indexed at any point in time by our make noise function so we need to return the amplitude of this envelope for a given time to make this easier to work with let's add some methods for note on and note off so when a note is pressed we'll need to call the note on function and when a note is release we'll call a note off function and these simply capture the time on time so and off time because the release phase happens once the key has been released we'll probably need to store a state that says whether the key is up or down for this envelope so let's throw in here quick Bol and initialize it let's add the guts of the adsr envelope structure then well D time here is real time uh in in the song the piece of music whatever the wall time is so we need to turn that into an index into the lifetime of this envelope and that's simply enough actually so we call lifetime of the envelope is simply the current time being passed to this function taking trigger taking the start point so this gives us the time after the note was pressed so as soon as the note is pressed lifetime is zero and increases from zero we know that there's two distinct phases here either the key is held down or it's not so if the note is on we want to do something else we want to do something else else so in fact when the key is down we want to handle the A and S parts of the envelope and when it's released we want to handle the r parts of the envelope so let's start with the attack phase so if our lifetime is less than the attack time we know we're in this Attack Phase less than or equals to so out and so our amplitude what I'm going to do here is is uh normalize the attack Time by simply by D attack time time D starting amplitude and we're going to see notation like this a f a bit so what I'm doing here is actually creating a value between zero and one so if the lifetime is less than the attack time let's say the attack time is 5 Seconds and our lifetime is zero here we've got 0 divided by 5 however after 5 seconds or let's say 4 seconds we're approaching approaching 5 Seconds our lifetime here is 4id 5 and eventually we approach a one here so we're going from no amplitude to 100% start amplitude now the Decay phase only happens once our life time is greater than our attack time but less than the total of the attack time and the Decay time added together time is greater than DCT time and time it's less than let me just help visualize that we're breaking it up now so we've done our attack phase which is there and now we've got our attack and Decay phase so you can see that's the summation of both this time and that time so in a similar way to above here we're uh trying to create an index between zero and one of how far into the Decay time period we are it's quite a long line we're taking our index into the Decay time and this time our gradient is defined by the sustain amplitude minus the St amplitude now the sustain amplitude will typically be lower than the start amplitude doesn't always have to be but it can be so let's think about the sustain phase so we know the sustain phase exists once we have done both the attack phase and the Decay phase added together so if D lifetime is greater than time plus d DEC time the nice thing about the sustain phase is it's a it's a constant amplitude there is no change and that's been described in our structure so anytime after the attack and the Decay phase is finished we exist and the key is held down sorry we exist in our sustain phase uh so all we can do is output a solitary volume now in our release phase uh we want to do a similar thing to up here we're getting the lifetime but instead of the trigger on time being our starting point we now care about our trigger off time so again it's uh the amplitude being outputed um and instead of the trigger on time we want the trigger off time and as before that is normalized to our release time so we're getting a0 to one value of the release phase we're going to put in a little check here called an Epsilon value check and this is to stop uh signals coming out of the envelope that we we don't really care about they're so low that we can't hear them anyway and they just might call problems not having things set to zero if they're below a certain value I apologies for that being a big chunk of code but I think it was a useful exercise we now know how we can use time to index into an envelope to control the amplitude of our notes let's put this into practice and have some fun so the first thing we're going to need is actually the envelope spell it correctly andv BL now because we have a Constructor in this struct the values are defined when the when the variable is created to use the envelope remember that the envelope controls the amplitude we want to modify now our output so whereas before we were hardcoding numbers here we're now using the envelope itself to give us the amplitude at a point of time we need to link the envelope with when the note is pressed and released so we can do this with our note on methods uh and we also need to provide this with the current time of the system now the olc noise maker class comes with a function that will give you the current time so we're going to use that sound. get time and we need the equivalent note off as well now here's an important thing our sound is now controlled by an envelope so having a frequency output here means that whenever the key is released the frequency will be set to zero so none of our release phase will work because there'll be no frequencies to listen to regardless of the amplitude so we need to remove this line and that should be it so let's let's see if we can get any [Music] sound well I think that sounds quite cool but you can barely tell that there's anything happening at all let's slow down our attack phase and our release phase and see what happens so to do this we can change the values here in our Constructor so instead of 10 milliseconds for the attack let's set that to 100 milliseconds and instead of 20 millisecs for the release we'll set that to 200 milliseconds and we can press a note so I press the key and release it press release it's no longer an onoff key it fades in and it fades out very [Music] nice and there you have it we've Ed an envelope now as a little bit of bonus content I want us to play with the oscillators we created at the start of the video here I've adjusted the make noise function to use the envelope as it was before no changes what I'm doing this time is using the envelope to modulate the addition of two different frequencies so if remember three was our saw too generator and one was our sine wave generator now for the frequency I'm harving it for the saw too and I'm keeping the sine wave as it stands let's have a listen and though we've got a very textured instrument this is definitely starting to sound like a usable synthesizer thanks for watching this video today we've covered envelopes and oscillators and in the next video I'm hoping to cover filters I've tried to take on some advice and keep this one a bit more concise so I'm sorry if it's sounded a bit rushed all of the source code is available on the one Lo cod.com blog and from the links below if you've enjoyed this video please give me a thumbs up uh you know it all helps
Up Next

22:55
JavaScript MIDI Synth Tutorial: Accessing MIDI in the Browser | Web Audio API Integration
@MusicandCoding
13.3K views•2021-09-30

12:54
Triumph of Orthodoxy Icon: Byzantine Art & History Explained
@BenCallan
2.1K views•2024-08-06

9:49
FastAPI vs Flask vs Django: Choosing the Right Python Web Framework
@TechWithTim
302.5K views•2024-05-26

1:42
Game of Thrones Opening Credits: A Cinematic Analysis
@gameofthrones
46.3M views•2011-04-18
Related Study Plans & Knowledge Roadmaps
Structured learning paths in General & Interdisciplinary Studies
general-studies
Elevator Engineering: History, Physics & Cities
01From Hoists to Safety Brakes: The Dawn of Vertical Lift
02Hydraulic vs. Traction: The Engineering Physics of Elevators
03Modern Speed, Safety, and Algorithms
+ 2 more learning modules
12h5 modules
Explore Roadmap
general-studies
Rubber: Material Science, History & Geopolitics
01Origins of Natural Rubber & Mesoamerican History
02The Chemistry of Natural Rubber & Vulcanization
03The Geopolitics of the Rubber Boom & Colonization
+ 2 more learning modules
12h5 modules
Explore Roadmap
general-studies
Containerization: Evolution, Logistics & Trade
01Ancient Trade & Bulk Cargo: Amphorae to Barrels
02The Industrial Revolution & Cardboard Packaging
03The Containerization Revolution: Malcom McLean
+ 2 more learning modules
12h5 modules
Explore Roadmap
general-studies
Textile Tech: Evolution, Labor & Global Impact
01Pre-Industrial Textiles: Handloom & Cottage Industry
02Mechanization: The Spinning Jenny to the Power Loom
03The Factory System & Global Labor Transformation
+ 2 more learning modules
10h5 modules
Explore Roadmap