






![Sealing of Custom Enclosures [Edited]](https://i.ytimg.com/vi_webp/tTdZXM6Qvj4/maxresdefault.webp)



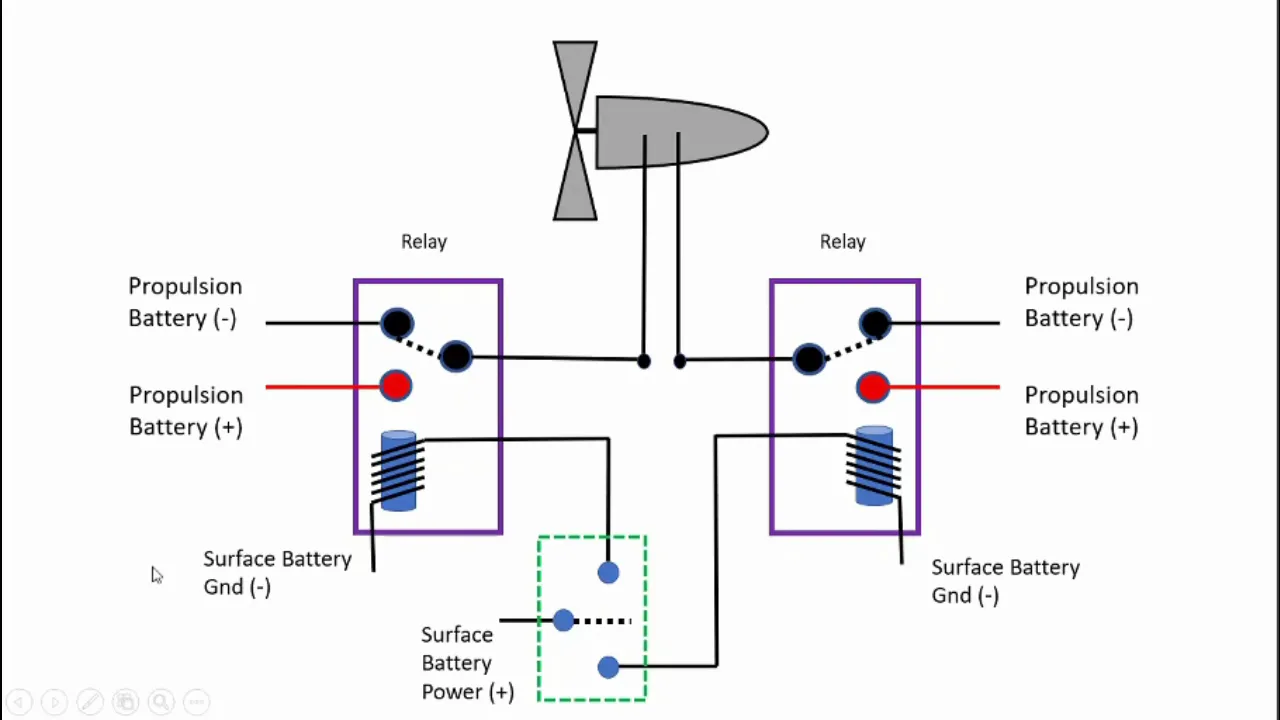

















This video demonstrates how to construct a remotely operated vehicle (ROV) using PVC pipes and fittings, including frame assembly, thruster installation with bilge pump motors, and electrical wiring with heat shrink connectors and DPDT switches for control, enabling the creation of a functional underwater robot suitable for freshwater environments.
Build an Underwater ROV at Home: A DIY Guide
Added:Basic DC electrical circuits, wiring principles, and safe handling of low-voltage power sources.
Fundamental concepts of fluid mechanics, specifically Archimedes' principle, buoyancy (positive, negative, neutral), and hydrostatic pressure.
Basic mechanical assembly techniques, including waterproofing methods such as O-ring seals, marine sealant, and pressure-resistant enclosures.
The operational principles of DC motors and thrusters, including how changing polarity reverses direction to achieve differential steering.
Integration of microcontrollers (e.g., Arduino, Raspberry Pi) and software (e.g., ArduSub) for semi-autonomous control and sensor feedback.
Advanced sensor payload integration, including turbidity, temperature, depth sensors, and underwater cameras for data collection.
Design and implementation of robotic manipulators (grippers) and pneumatic/servo-driven sampling tools.
Study of underwater acoustic communication, sonar mapping (side-scan or multibeam), and acoustic positioning systems (USBL).
Hydrodynamic design optimization and computational fluid dynamics (CFD) to reduce drag and improve thruster efficiency.
49.7K views1Klikes1:26:36Original Release: 2020-07-29
hello my name is woody lee and i'm a research assistant here at the smithsonian marine station at fort pierce for the last several years i've been assisting our marine science educators and students in our summer camp program how to build underwater robots or rovs or remotely operated vehicles this year because of the coved 19 pandemic we can't have in-person classes so what i would like to do is to teach you how you can build an rov at home these rovs are very similar to the scalp class of the mate rov competition m-a-t-e stands for marine advanced technology education and with a few modifications your robot would be able to compete in the mate rov competition i'm going to show you what you're going to need in the way of pvc pipe and pvc fittings in order to build your rov now pvc pipe comes in several different thicknesses this is half inch pvc both these are half inch this one is called schedule 40 this is your normal thickness for half inch pvc pipe and then this is thin wall if possible please get thin wall because you'll make your rov lighter and easier to maneuver now once you you're going to need to get a 10 foot length of pvc pipe and you're going to need to cut it into different lengths this is called this is a toy hotly suggests it's called a pvc cutter and it's a ratchet and it makes a nice clean cut whenever you cut the pvc pipe you can use a saw but it makes the edges very frayed and makes it harder to fit into the sockets of the fittings so once you get your 10 foot length of pvc pipe you're going to cut two pieces that are 20 centimeters long two pieces that are 15 centimeters long two pieces that are 12 centimeters long eight pieces that are 10 centimeters long three pieces that are seven centimeters long four pieces that are five centimeters long and seven pieces that are three centimeters long you're also going to need a very short piece of three quarter inch pvc this is thin wall but if you don't have you can't get thin wall just get the regular schedule 40 but you're going to need two pieces that are five centimeters long or the three quarter inch pvc pipe and one you're going to cut a slit in like this now these are the pvc fittings now your whenever you go to home depot or rows you're only going to get white fittings i painted mine different colors so that makes it easier to see whenever we build the rov in the video you'll be able to see what the parts are better this is a half inch 90 degree elbow half inch pvc and it's socket by socket you're going to need nine of these this is a cross this is a half inch pvc cross and it's socket by socket by socket by socket you're going to need two of these this is a half inch pvc t and it's half inch by half inch by half inch socket by socket by socket you're going to need nine of these this is another tee but you're only going to need one of these this t is three quarters by three quarters by a half and it's socket by socket by socket you're going to need two of these this is a three quarter inch pvc cap and it's a socket and this is another t you're going to need three of these this t is one and a quarter by a half by one and a quarter and then socket by socket by socket and what i did here is i wrapped a piece of tape right around here and one around here and then this is the neck for the half inch socket right here and then you're going to need a saw to cut down along here and cut down along here you're going to need to use the saw you can't use the pvc cutter because it's much too thick and when you cut it you're going to end up with something like this again you're going to need to have three of these and i've painted mine red okay so now that we have our parts all together here let's start assembling it so we'll start with the front put a t here the half inch t here in the front with the middle pointing up two ten centimeter two ten centimeter pieces on the side and then two elbows and these are horizontal facing backwards towards what's going in the back of the rov put in two three centimeter pieces in the elbows one on either side and then put in another t but this time with the middle part of the t pointing straight up and you notice that these will close up there's no gap in here between the elbow and this t right here then you're going to stick in a five centimeter piece into each one of those again pointing towards the back and then we're going to put in another t but this one's going to be angled out 45 degrees so the one on the left is going to be leaning to the left and the one on the right will be leaning to the right then we will put in two 12 centimeter pieces behind that followed by two elbows that are going to be pointing towards each other so the one on the left will point to the right the one on the right will point to the left and then each one of those gets a 10 centimeter piece of pipe put in and in the center we'll be going a t okay now we're going to get our mallet and we're going to persuade it to go where we want it to go instead of where it wants to go okay so that's sort of the bottoms done now we're going to put in two 15 centimeter high pieces of pipe right in here so they go vertical and then in the back here we're going to use a cross there's going to be a 5 centimeter piece put in the bottom and the cross is going to be pointing towards the front one arm's pointing towards the front the other one is pointing towards the back and then on top of that goes a seven centimeter piece on top of that goes t a t goes here pointing front to back another one on this side also going front to back and then the two 20 meter 20 centimeter pieces go here one goes on this side one goes on this side one elbow points towards the t in the back the other one points towards the t in the back from the opposite direction two ten centimeter pieces go in the back here one goes on this side i'm matching one on this side and then here in the front two of the three centimeter pieces go here one on the other side the elbows point towards each other and then in the in the center is going to go this cross two ten centimeter pieces on either side okay slightly tap everything a five centimeter piece you know seven centimeter pieces here in the center with an elbow pointing forward 10 centimeter piece goes here and then the motor mounts go on this motor mount these go in the 40 and the t's are playing at 45.
you tap it in again it goes close so there's no gap right there this one gets tapped in here and this other one already has its seven centimeter piece on it that goes here this is for the vertical thruster and in the back this is for managing the cable this is the t that has the three quarter inch by half inch that also gets a three centimeter so that's going to close up so you can't see it and then these are the three quarter inch three quarter inch pipes and these are five centimeters long each one of these the one without the slit goes in the top with the cap and this one goes with this slit goes facing towards the back right here this gets inserted here and the cap that goes on it and that's roughly the pvc frame right there just sort of encourage everything to go where you want it to go and that's the pvc frame from here we'll mount the motors and then we'll go ahead and start working on the electrical system this is going to be a mount where you can put a camera here so you can look forward and you're going to get make a camera you can make a camera and so that will work underwater it goes to a tv set or you could get it to go to a computer and from this we'll be putting a hook on the end so we can actually do some do some tasks that are underwater so that's the pvc frame for the rov okay the next thing i want to do i want to talk about working on this what i call the tool post area now one of the great things about using pvc and pvc parts is you can make all sorts of changes this is using an elbow right here but you know if you want to change it you can change it to a t you can change it to a cross and you can put all sorts of different what i call tools on the front but for this one we're going to use the um use a wire hanger and i've already cut the pieces and these are pieces i cut out of it and we're going to put a couple hooks on the front for uh for as a tool for doing some things in the water so i have a hot melt glue gun here behind the cam behind the table i want to squirt a little hot melt glue in the hole and then put these hooks in it these hooks are they're about 15 centimeters long and i'm using a rubber stopper you can use corks or a wood dowel this is just what i had handy a little bit of hot melt glue on the cork on this rubber stopper i mean shove it in and i'll clean up this a little bit later but now this is what we're going to be using um to um for whenever we put this in the pool in the kiddie pool and then do some do some do some experiments okay what i'm going to show you next is how to mount the thrusters onto the rov and what we're using for thrusters are these bilge pump motors they're cartridges this is a thousand gallon per hour this might be a little bit too powerful for for um for what we're going to be doing with this sized rov but you can buy 500 gallon per hour off of amazon or you can also get those from from the cma organization as well and i'll have the cma information sometime later so this is the these are where the motors are are mounted and this is actually a one and a quarter inch t with a half inch um receptacle at the top but these are all socket that was called socket socket socket socket nothing's threaded so with this particular one you see it this blue tape right here we have to cut the sides down so i put this blue tape here and i used a band saw to cut this you can use a hand saw but i had a bandsaw available and then you end up with something like this now i painted all these different parts of different colors so whenever you look at the pitch you can see what these parts are so this is the uh what would be the thruster for going up and down and this one mounts here now these thrusters if you put it in here to hold it it's a little bit loose and so if you take a seven centimeter piece of masking tape put it there and then it will slide on and it's held secure now you need to remove this blade right here so using a screwdriver you just pry that off and this is i believe this is an eighth inch shaft but there's also a flat spot on it you can buy these these props you can buy these props from seamate and um you could get them in a kit of three and with this one to mount this on this is that there's a there's an indent right there that's going to face face to shaft so this will you screw this in until it bottoms out then this nut goes on with the star washer it's going to be facing towards the towards the motor and this is a 3 16 wrench just snug it up and this is a shaft a shaft adapter so then this will screw in one end is has a small hole going that the other end is tapped put this on hold it with a wrench tighten this and then use this as a stop knot you just tighten this just a little bit to firm it up and there's a set screw here and then there's a flat spot i don't know if you can see it on the shaft so you want the set screw to fit right over top the flat spot and then there's a tiny little allen wrench do not lose this wrench and then you tighten it up then once tight you slide it in there and this motor is mounted now i'm going to do this i just showed you the first one the other two motors ago will get done the same way but with the shot the propellers will be pointing this way so that's how you mount the thrusters into this rov so here pretty much is the completed frame for the rov and i've put the measurements of the pieces a half inch pvc um on the frame so as i rotate it you'll be able to see it and wherever you see a yellow and a blue together or a blue and a red together there are there um they're three centimeter pieces there so this is pretty much the finished frame and then after this all we need to do is the electrical system these number right here these are all half inch pvc parts this is a strange t where it's three quarter three quarter by half right there um all socket and these are three quarter inch pvc pipes and these are three-quarter inch pvc caps and this is one of the three centimeter pieces in between holding those two pieces together it's called a close and here's another one right here okay so that's the frame now we're going to start wiring the frame for the rov i've already hooked up the start running the wires for the other two motors but now i want to do one to show you okay so this is your motor and then these are the wires that are coming off of it there are two colors of wire one is black and the other one is brown the black will be your negative will go to the negative terminal the red will go to the positive so we need to run the wires along the frame and try to keep things out of the way so we're going to use these cable ties to tie everything down so this first one is going to go over this 5 centimeter long section of pvc pipe and you snug it down don't do it all the way tight yet in case we have to move things around okay so i have it cable tied there i'm going to do another one right here in front of this in front of the same t another one in front of this elbow and just we want to try to keep the wires either on top or maybe to the inside so it won't snag anything as we're running it in the water um at this corner of this elbow we're going to put one diagonally across it to hold the wire and then it's going to go back and behind the center post right here the other two wires actually have coming in the other thruster on the left hand side and from the one going up and down is going to be on this side this is going to run on the opposite side so we're going to go around this post on this side you can see where these had gone on the other on the other side and we're going to snug all this down with a cable tie and just just do it just not hard but just snug okay so now we want to run the wires up this thing right here this is for the wire management and before i told you that there was a slit and this five centimeter piece that goes down here this is drilled up here oh about two or three centimeters this is a quarter inch drill and then i just took the blade from the hacksaw and took it all the way down to the bottom so this is the wires for this for this one that we're wearing right here and we tape them together and we're going to shove them up this pipe right here so now the wire is coming up here there it is okay so put all the wires in the slot and then we're going to use this green cap and push it on so you can see all the wires now are tucked in there and then this goes and push back to here and then we're going to put where all these wires go into this pipe right here we're going to put another cable tie to cinch it and that's going to be a strainly strain relief for all these wires and once that's done and use a pair of diagonal cutters just cut tighten these up cinch them down and then use the diagonal cutters and cut off all the tails okay so now we're going to try to to connect it to the tether and these are what we're going to need to do that these are called heat shrink butt connectors with glue and these are pink and those are for 22 to 18 gauge wire this is the wire that we'll be using this is 18 gauge wire and it has six pairs of wires in it and i have them matched up like this now this 18 gauge wire is actually braided wire if you look at it really closely it's not a single wire but it's actually several wires and that makes it much more flexible so if you can take a look at that you can see that it's actually several different strands in there and if you can you want to use that you i have seen people with these rovs especially for using the 500 gallon per hour pumps is that you can use what's called cat 5e cable which is what they use for running for cable for land networks the problem with that is cat 5e cable is is single strand it's just a single wire and if you use that sooner or later one of those wires will break and if it breaks that means one of the thrusters won't work so if you use multi-strand it will actually last longer and the cable is actually much more flexible than with the cat5 so i have these in three different pairs and the way i think of it is the red and the green go together because that's christmas time the brown and the black go together because that's actually each one of the wires that come off the bilge pump they are black and brown and then there's blue and white and well they're the remainders but also i went to penn state the colors are blue and white that's easy for me to remember now whenever with these color combinations red anytime you see a red water that's generally red wires generally connected to the positive terminal to the positive green normally goes to ground sometimes called the negative um white generally will have power so in this case we're going to use the blue for ground for the negative and then on this one on the bilge pump it says actually on the wires we'll say the brown is to be connected to the positive wire black is going to be connected to the negative or to the ground so we got to connect these to these three sets of wires right here and i actually have have coded these these are the last ones we put in from over here so this is going to be our red this is going to be for our right thruster this other one right here is going to be going to the left thruster and this really long one is going to be going to the up down and the reason it's so long is because it's so close that's why this wire is long now we need to to trim these wires down so we can use these butt connectors so um you're going to need to take notes whenever you do this so um the right this thruster right here we're going to use we're going to use the christmas color so that's going to be green and red and the green the red is going to go to the brown wire for that thruster and the green is going to go to the black wire for the left thruster let's use the the blue and the white so the um with the left one the white is going to go to the brown wire and the blue is going to go to the black wire so that leaves for the up and down we have black and brown and the black wire is going to go to the black wire and the brown is going to go to the brown wire okay so we're going to need that we're going to need to keep this keep these notes whenever we actually start wiring the control box so we need to strip off oh about the one and a half centimeters off of each of these so using these wire strippers we're going to go since this is 18 gauge wire we're going to go to 18 gauge on this stripper thing right on the stripper handle right here we stick out about a centimeter and a half and then we pull it and there we are okay so let's just do the next one the blue and the white blue and white and the black and brown again we go to the 18 gauge okay so we have that right okay now four now for these we're going to trim this off be roughly the same size as those and we also got to go and strip these so the black this is i believe this is going to be let's see if it's 16 gauge yep just to make sure that these are going to fit yep okay so this is the for the center for the center one so i might go ahead and crimp this on this is the black and if you look in there you can see the wire and it's kind of bottoming out so i actually need to trim this i made this just a little bit too long okay so now see the red tip of this i'm going to go to the red there and then pinch it hard okay so i'm going to take the black of this one and i can tell already it's going to be a little bit too long so i'm going to give it a twist it in the direction that the wires are twisted there trim it back just a little bit stick the black in there make sure it's pushed in all the way and then crimp it hard here okay so here is the brown for the for the up and down one right here trim off try about a centimeter this time this is 16 gauge put on up still a bit too long i just use the diagonal cutters on that just it's quicker than try to use that the other tool and it can be kind of hard to get that to go to to get the wire to go into the center of that okay so i'm going to pinch it right here and then this is going to go until already it's going to be too big it's going to go to the brown here we're going to do next is use a heat source this is a hair dryer and i'm not sure if this will get hot enough but we want to shrink these ends right here and there's a little bit of glue in there so this will shrink this down tight against these wires and that'll make it waterproof um for going in to fresh water which this will never work in salt water well it needs to be done much differently and much more thoroughly to go in salt water but this is going to this oil is only going to be going in the fresh water there so now these are all heat trunk and sealed and this is ready to go and you can actually see there's a little bit of glue in there and it actually squeezes the glue out as it shrinks down so this is done now what we're going to do now is i have a this is one of that green cap and we got to thread it down and there's a 3 8 inch hole so we got to thread this down and jam a little bit of wires we have back in there and what we're going to do is put a cable tie here in the top now all those heat butt connectors we'll actually strain gauge on the inside we're going to put this here and we're gonna put a dab of hot melt glue here and um and actually right now the the rov proper the rov itself is finished the only thing that i will do i'm not gonna show you but i'll show you later on is for each one of these connectors i'm going to drill a 1 16 inch hole and put in a a number 6 by 3 8 stainless steel screw in to hold all these pieces together now the reason i say 3 8 i mean a number 6 by 3 8 inches is because i can't do it in metric these are stan us stainless steel screws i got to use the us system for um for them so these will be stainless steel number six it gives this diameter and the three eighths is the length so it's just going to be enough to hold this in i don't want to use pvc glue because then i can't modify things one of the great things about this project with rovs is now if you get it you want to make a change all you have to do is disassemble it and put longer shorter pieces make this any dimension you want to add extra things if i glued it i cannot do any modification to it at all so this is why i use stainless steel screws so um the next time you see the rov whenever ready to go in the water it will have stainless steel screws holding everything on okay so we're just about done with the electrical with the electrical system and we're going to be mounting the control box in this this is a a box you can get at home depot and it has had had petitions in it for putting screws and nuts and bolts tonight i took those out and we're going to mount our switches in this now they are they have two models of this this one is the polystyrene it's clear it's a little bit more rigid they have a polyethylene one that's a little bit more opaque but it's a little bit too soft or so i think for uh for making it as a control box now i've already drilled the box um these two holes right here these are in the center line of the box and if you measure um five centimeters from this edge right here to this point right there put a mark five centimeters in from the edge and mark this point uh you can mark it right there and then um i got uh i got a quarter inch drill and drilled where that point was and then i went to a 5 16 and then a 3 8 and a half making a hole bigger each time so this holes a half inch right here um you have to step up to it you just can't go in a half inch because polystyrene can be kind of brittle and you got to be very careful whenever you whenever you drill it you have to do it very slowly and very carefully because it tends to grab and it might crack um this hole again these are five centimeters from this edge here to here five centimeters from this hole from to this the center of the sort here and this was seven and a half centimeters from this point right here to the center seven and a half to here um and then i just kind of eyeballed this one in between the two um halfway between the two and then just a little bit in from the end and the other end i drilled some more holes this is in the dead center of the box opposite the latch there is and i just eyeballed these this is a quarter inch hole right here and this one is a 3 8 inch hole sort of both of them are just sort of in the middle right here and the 3 8 hole i actually did a quarter 5 16 and 3 8 in order to make those holes so now we're going to wire to wire this box up coming from the rov these are going to be the switches that we're going to be using uh this is what's called a dpdt or double position double throw and this switch if you move the switch and it's a momentary switch so you hold it this way the switch will operate one way you let it go it turns itself off and then whenever you go this way it turns it in the opposite direction and i'll show you how to wire it to make it this way this is how we can use the thrusters for going forward and then for going backwards another reason i really like this switch is that whenever i build rovs and i have like when we have displays or i'm demonstrating this in the public i'll have kids drive this thing and sometimes you need to do some maintenance on the rv i don't want the blades to be spinning whenever i pick it up because the blades spin very fast you can cut yourself and so i can just say hands off and i know as soon as the hands are off that that none of the that goes the switch will go to the off position automatically and nothing will be running also there if you look at the switches there's two there's different sides and have different writing i always want to make sure that all my switches are going in the same direction and um and so it makes it easier for troubleshooting when you try to get everything together here's a switch that's already wired and if you notice on one side it said i don't know if you can see this but it says 25 amps 125 volts ac we're only going to be using 12 volts the other side says something different so what i do whenever i put these in the box is that i will mark the side that has the 25 amps on it i'll put a mark right there and then i'll put a mark on this end and that way all the switches will be put in the box in the exact same way and it makes troubleshooting a whole lot easier i got these switches from marlin p jones it's electronics warehouse out of west palm beach i will have the the data for ordering the switches there and marlin p jones has fantastic prices this switch is only i think was a dollar ninety five if you go to amazon it's a whole lot more expensive than that um the wiring that we're going to use for the inside this is also i got from home depot and this is what's called doorbell wire and this wire is actually single strand copper and this is 20 gauge and if you can see that it's just a single wire and it makes wiring this so much easier and i'll be showing you why so this is the wire from the rov and we've already paired it up remember i asked you to take notes the last time so the left thruster is the blue and white wire the uh right thruster is the red and green wire and then the up and down is the the black and brown wire again you can do it in any way you want but just be consistent whenever you wire the thrusters you want to be able to make sure we get it back together in order in the box so this uh and i already twisted these wires together so this this wire right here is going to be going into the quarter inch hole this is about i think 15 centimeters i think i i stripped about 15 centimeters off it took the jacket off and then put the wires together so about 15 centimeters okay so once it gets in i'm going to put a cable tie just where the jacket is just so the jacket stops starts and snug it up really tight and cut the tail off and then i'm going to pull it back until it's tight there and we'll put another cable tie and this is going to stop the wire from pulling out of the box and then what we're going to do after we get everything all done and all the wires tucked away we're gonna top melt glue and kind of slobber this up so that won't be able to move at all okay that gets that wire in okay so this is another wire this is the wire that's going to go to the 12 volt battery i got this at west marine you can get it from home depot or whatever whatever you want wherever you want again this is cut off about 15 centimeters right here and this is going to go into the 3 8 inch hole and again using cable ties i'm going to snug this really tight up against the end of the jacket right there cut off the tail and then pull it back tight up against and then put on another of these cable ties this um this cable i have the 16 gauge wire that's gonna go the battery it's about um about four meters long so about 12 roughly about 12 13 feet okay so this is how it is right now in the box now we're going to put whoops cut off the tail so again we're going to slobber this up with with hot melt glue to stop it from rotating around we're going to set this aside for a moment so these are two switches that i've already done and these are marked as i was saying uh with those marks right there so they're going to be oriented the same so now i'm going to show you how to wire one of these up so again this has some this has the 15 amp 125 volt ac right there trying to see where i can't see what what's on the the camera this has some other writing which i can't really read but this one well i forgot my marker but this this is the orientation i want i would put a dot right there and a dot right there so we're going to need to cut some wires so you're going to need two wires that are seven centimeters long and then two wire um four wires two red and two white that are 13 centimeters long and you're going to strip off about a centimeter and a half on each end i've already done that so there's going to be a total of two 13 centimeter wires that are red two 13 centimeter wires that are white and then one white that's seven and one red that's seven now this this is 20 gauge wire so on my wire strippers i'll use down here which says 2022 and then strip off about about centimeter or so centimeter in half and then here comes another one okay so we're going to get us a um going to get a screwdriver and loosen up these screws a little bit they'll come already snug so they don't fall out during shipping okay so these these are all loose now and i i have to mark this it's really important that i mark this you can see so that's the 125 amp side right there so i'll put a dot right here another dot right here okay again that's so that all the switches are oriented the same way okay so looking at the back the side opposite the end that has the dot is that i see the white wire is going to go on the left and the red wire is going to go on the right so getting a pair of needle nose pliers i'm going to bend this into well a semi-circle and i'm going to do the same for the other end and i'm going to do that also for the red one so that's how they are so now for the switch i am going to put this wire one of the white wires the one here on the right and i'm going to put it so see where the hook is that as i tighten it it actually tightens up the loop that i formed if i do it the other way as i tighten it it will actually undo my loop and it will it might pop off the screw okay so now i'm going to go and put the other loop go across diagonally and put it on this screw and this one i'm just going to just slightly snug this side now back where i started i want to crank that baby down okay so it's down there tight so now i'm going to go and do the red wire on the other side again i put the loop on such as if i'm tightening it it's going to actually tighten the loop as opposed to unwind that loop okay and then it doesn't matter if you cross it over or under but you have to go to the diagonal so it's on this one it's on the back left so now i want it to go on the front right and again this one's going to be just just done ever so lately okay so now we're going to do the two sides looking at how i did this getting my dots lined up is that i want to put the red wire on the right side and the white wire on the left side so working the red wire for my half a loop and i want to crank this one down and again crank it down this one take one of these white wires and the bigger white wires form this semi-circular loop oh it's a little bit too tight open it up oops remember i was telling you about doing it the right way that was the wrong way okay so as i tighten it it's going to tighten that loop up okay so going to the side that has the dot again this orientation we see the white wire comes here red wire goes here so we're going to add this wire right here is going to go the same color that's it's going to go the same color wire so i have to loosen this one up and this is when i said don't quite um just do it snug but not tight undo that wire put this one also together so they share that same screw made that loop just a little bit too tight okay so now that it's on there now i'm going to snug it down tight that's how it looks like from the bottom this is where the dot is we have these two whites will be on one side these two reds will be on the other and then we have this diagonal red and white so we have one two three of these all done the same way so i'm we're going to go ahead and mount this in the box okay so you want to have the wires facing away from you and the switch and the opening of the box facing you so we're going to undo this nut right here take off this switch plate cover and then using either a an adjustable wrench or a 15 millimeter wrench this switch is actually metric it's not it's not in american just tighten that nut down a little bit and you're going to put the switch into the box such that the two wires that are going forward are going to be facing the wires that are coming in so these are going to go this switch is going to go like this you're going to put the switch plate cover on and you're going to put this nut on and then you're going to tighten this now i'm actually holding a switch so it doesn't rotate but the switch rotate a little bit try tightening it up a little bit more there you just snug it up really well the switch is facing front to back and your white dots there so this switch is going to be here now i'm just going to show you i showed you this one i'm going to go ahead and mount the other two in off off camera okay guys you're getting almost getting pretty close to getting done i'm getting pretty excited okay so we have our switches here mounted and i have them such as the wires are facing forward there's the red on the left white on the right red on the left right on the right left red on the left white on the right and then for going up these one comes from the middle of the switch the red on the left white red left white right and left red white right so what i haven't done is stripped off the wires on the on the switch that we just wired so i'm going to take about a centimeter and a half off of each one and this is 20 gauge wire so i'm using the 20 gauge on this covers okay so right on the left white on the right for the middle for those facing forward okay so from the front of the box this is the left and the right up and down the left thruster is this one right here so remember we took notes so the left one is the um blue wire was for the black so the blue wire gets negative so oh we got a strip this is the power wire coming in from the um come from the battery this is 16 gauge and give these a twist okay so the left wire is the blue and the black and the white one so we grab this one right here unwrap a little bit and according to this one the blue went to the black wire which was negative negative so we'll put the white wire together and just because this is temporary because we're trying to see if we have it wired correctly we put the blue to the white of the switch and we're going to use this blue wire nut put over it and twist it clockwise and the white we're going to use with the red you just line them up next to each other get a blue wire nut the blue wire nuts are the smallest ones and they go together like that so the up and down is is wired just like the motors for the wires that come there this blue and the black so on this balloon back pair right here we know that the red is supposed to go to the positive of the motor we'll take this red one right here put them next to each other right up to the same length using one of these blue wire nuts twist it on and you keep twisting until it until they're jammed on and you can't twist it anymore and so the black is going to be going to the white i know it's kind of confusing with the different colors of wires that's why you need to write things down and even if you try to write it down i'm positive that i will have messed up somewhere in this video but by using wire nuts we can go and undo things and make it correct and then at the end we'll make these we'll make these instead of using wire nuts we'll make them permanent if you do do the mate rov competition is that they have role safety rules about how things have to be wired and stuff like that you have to do it their way but this is this is just for us right now to to do some troubleshooting to see if we did everything correctly okay so the last one we have to do is the right thruster remember that was the christmas we called it christmas the green and the red um the right one is the green one went to the black the black's negative so and on this wiring from the switch we're going to put the green on the white blue wire nut twist them on and the red goes with the red that's going to be the positive wire okay so now we have the switches wired but now we got to get power to the switches and we have there's one pair there's a red wire that goes to the middle of each one of these and then the white one so we're going to use this red wire because the red wire will definitely from this one from the battery will definitely go in the positive and we'll probably be using i'm not sure it's going to be the orange or the yellow so you get all the reds and these are the wires again that come from the middle of the switches all the reds go together give them a twist together then this red goes up alongside and all we're going to get twisted i think we're going to need this yellow and use the wire nuts to join them all together make sure that you put the wire nut on tight so that leaves the white wires and we're going to hook the negative up to it so get all the white wires together line them up put the black wire together and then get another with these yellow wire nuts and twist that wire nut on and tuck everything in and close the box now if you look in there it looks kind of a mess but make sure that you have no bare wires that are sticking out that everything is held in there tight and then clamp everything down okay so now we're going to hop out glue these these cables so they don't rotate like that so we're going to use this hot melt glue and you're going to put kind of slob it up there uber it slobber it whatever you want to call it so that it doesn't move around so put some here on the outside and we'll put some on the inside as well okay so i'll let that set for a second and then we'll hot melt glue the inside okay so now i need to put some of this hot melt glue here to the inside so the wires don't pull around don't rotate and to walk the um the cable ties on so we're just going to slobber some of this stuff in there and won't take it nearly as much but we just want to try to isolate everything try to make sure the cable ties won't slip off um you can't really rush the hot melt glue drying you want to make sure that that it stays rigid but we're just about done i'm getting pretty excited here the only thing left to do is to uh put the ends for the cable on for that that goes onto the battery okay so now we're ready to put on the battery the battery clip ends for the rov so the first thing you need to do is to do the do the negative terminal i've already taken off this black insulator and slid it up the wire might have to twist the ends and then once you get it to where the the pinch the wire punch spot is go ahead and fold those dog dog ears over to cinch the wire into position and then you can see where that wires pinch that little tab in there where i'm gonna have to end up coming up and solder these to get a good um good electrical connection so that so that's done now we need to put a fuse on on this so i've already put the fuse on it's already been pinched on but i want the two wires to end up being about the same length so just out of the way so what i need to do is to cut this wire off about here such as with this fusion line it will be the same length this is 16 gauge wire using the 16 on the strip gauge do on about centimeter and a half twist it and then i've already got the butt connector this is a blue one this is for a little bit bigger wires what we're using before insert this what goes inside this metal sleeve in there it's just a little bit too long and then now we're going to be using the blue dot side here we're going to pinch it pinch this side and then um we're going to put we're going to use the heat the heat shrink gun the heat the heat gun and um and shrink this down again there's glue in there so once it shrinks down glue will seal it so water can't get in okay so i just hooked it up to a battery and so um i'm gonna hit the switch for the starboard engine got the wrong side there okay so what meryl's saying about we're gonna use wire nuts so we can get everything straightened out well this is one of those straightened out i i got wires i got two wrong wires on the on the wrong ones so that one works this way it works backwards this one works this way it works backwards but i'm using the wrong one it should be when i push this right button forward just right one come on and then the up [Music] and down okay so what i found out was that i have the left and the right ones are are wired to the wrong switches so now we're going to go back and change them okay so i have the box open and these are the two that are miswired this is the blue and white one i have them over here and the red and green ones are over here so i need to switch these first i need to disconnect power to the battery so i'm going to untwist these untwist these and the blue and the white we're going to go over here and the green and the red are going to go over here okay so on this one the red and red are going to go together put on the wire nut the green and the white are going to go together put on the wire nut and this one we need to go back to our diagram our thing and the pulling the white blue the blue is negative so it's going to go to the white here and the white is going to go to the red over here again i know it's confusing with all the colors but we've switched wires twice on the way to the switch so that's why it's important to to write this down and then using wire nuts to get everything all straightened out to make it temporary okay so now that we've got one wired this should be the right one right here oops i forgot to connect the battery now also i am wearing safety glasses i do that as a matter of work i work all the time whenever you are working around these propellers or energizing anything you should always wear safety glasses they're they can be very inexpensive at home depot like two or three dollars or you get more expensive ones because these are very high speed and sharp and if the bolts aren't on tight things could fly off also these blades are very very sharp eventually you're going to need to put a shroud over it so that you don't think you don't get a finger in there because again you can cut yourself very badly but um this is not showing you how to how how to go this is just getting you an rv in the water and you have to do your own safety okay so this is the right one and we've got correct rotation the left one and up okay actually this is backwards whenever i push what should be up it's going down so we're going to make another change again because we have the wire nuts we do these very very quickly okay so we're going to pop this open remember the black and the brown are the up and down so here's the black and the brown so we just need to change which wires go where so we'll disconnect so we had the brown go on the red we're gonna have the brown going to the white and now we're going to have the black going to red again this is kind of confusing and and generally you don't do black to red but but because we're just using the the colors that are available in the in the power in the the um the 18 to the 18 gauge six wire and so this isn't you know this is kind of non-standard but those are the colors that were available in the box so oops battery back connected right all right we are just about ready to put this in the water okay before we leave to go out to the pool i just want to point out something i just did i wasn't very happy with the way the wires were with these wires exposed here so what i did was i do a little thing better to to stop strain on these wires i put a cable tie here to cinch down on the on the jacket of this wire here i ran it underneath and put another cable tie here i put a cable tie right here where it comes up in front of the post and here i did an x and put this on both sides such as now if there's any tension on the cable it won't be transmitted into this and it won't be pulling the wires out of the motors so it's just a way of managing the the wires i'm not sure if this would be legal for the mate rov competition i know if you would buy a kit from them that has everything you see here except for the pvc frame parts but has the motors and everything like this is that they actually bring they actually send you um these what's called a strain relief which is a better way to manage the cable but i'm just trying to make something that you can do locally um and and a little bit cheaper that would certainly be more convenient to order from made rov but um this is this is a cheaper way and i it's a very good way also i also added some screws here where the where these different fittings go i will add more all the way around whenever i'm satisfied that this is right and i'll also be drilling quarter inch holes in these elbows such that whenever we put it in the water the frame will flood we um you don't want air bubbles in there because they're all effect and if some water gets in it will behave differently but i will mention that later but right now i want to get this in the water and see how it works okay let's make it go forward push the right button forward and the left switch forward goes forward backwards you push the right one back to make it turn to the right and just turn over the left switch or the left thruster to the left make it turn to the right [Music] right if you want it to turn very quickly put one forward and run back go the other way real quick and to make it up and down this goes up and then i usually keep these negatively buoyant but if you wanted to go down fast you want to go down fast you can just switch back it makes it go down fast and that's all there is to driving this little rov and with a few modifications it could compete in the scout class of the mate rov competition [Music] [Music] [Music] [Music] so [Music] you
Up Next
9:52
DIY BLDC Motor Driver ESC Design with Arduino and L6234
@greatscottlab
1.8M views•2017-08-06

12:54
Triumph of Orthodoxy Icon: Byzantine Art & History Explained
@BenCallan
2.1K views•2024-08-06

9:49
FastAPI vs Flask vs Django: Choosing the Right Python Web Framework
@TechWithTim
302.5K views•2024-05-26

1:42
Game of Thrones Opening Credits: A Cinematic Analysis
@gameofthrones
46.3M views•2011-04-18
Related Study Plans & Knowledge Roadmaps
Structured learning paths in General & Interdisciplinary Studies
general-studies
Elevator Engineering: History, Physics & Cities
01From Hoists to Safety Brakes: The Dawn of Vertical Lift
02Hydraulic vs. Traction: The Engineering Physics of Elevators
03Modern Speed, Safety, and Algorithms
+ 2 more learning modules
12h5 modules
Explore Roadmap
general-studies
Rubber: Material Science, History & Geopolitics
01Origins of Natural Rubber & Mesoamerican History
02The Chemistry of Natural Rubber & Vulcanization
03The Geopolitics of the Rubber Boom & Colonization
+ 2 more learning modules
12h5 modules
Explore Roadmap
general-studies
Containerization: Evolution, Logistics & Trade
01Ancient Trade & Bulk Cargo: Amphorae to Barrels
02The Industrial Revolution & Cardboard Packaging
03The Containerization Revolution: Malcom McLean
+ 2 more learning modules
12h5 modules
Explore Roadmap
general-studies
Textile Tech: Evolution, Labor & Global Impact
01Pre-Industrial Textiles: Handloom & Cottage Industry
02Mechanization: The Spinning Jenny to the Power Loom
03The Factory System & Global Labor Transformation
+ 2 more learning modules
10h5 modules
Explore Roadmap