This video demonstrates the complete procedure for preparing peripheral blood smears in a medical laboratory setting, including slide preparation (cleaning factory film from both sides), specimen collection using a diffmaker, proper blood drop placement near the frosted edge, and the critical spreader slide technique where the slide is backed into the drop and moved forward until touching the finger to create an optimal smear with a visible corona at the edge; the angle of the spreader slide can be adjusted to control smear thickness, with increased angle producing thicker smears and decreased angle producing thinner ones.
Peripheral Blood Smears: MLT Lab Technique Guide
Added:Deep Dive
Basic composition of human blood, including the primary roles of red blood cells, white blood cells, and platelets.

Human Blood | RBC | WBC | Platelets in Hindi
17M
Human blood is composed of approximately 55% plasma (the liquid component containing water, proteins, and dissolved substances) and 45% formed elements including red blood cells (RBCs) that transport oxygen via hemoglobin, white blood cells (WBCs/leukocytes) that defend against infections, and platelets (thrombocytes) that facilitate blood clotting; these components are produced in the bone marrow and work together to maintain body homeostasis, deliver oxygen to tissues, fight pathogens, and prevent excessive bleeding.
Click to watch →

मानव रक्त | Human Blood by Neha Ma'am | What is Blood | Function of blood | RBC | WBC | Platelets
72.9K
Human blood is a liquid connective tissue composed of plasma (55-60%) and blood cells (40-45%), where plasma contains water, proteins, salts, and dissolved substances, while blood cells include red blood cells (RBCs) that transport oxygen via hemoglobin, white blood cells (WBCs) that provide immune defense, and platelets that facilitate blood clotting; RBCs lack nuclei and have a biconcave shape with hemoglobin containing iron for oxygen binding, WBCs are classified into granulocytes (neutrophils, eosinophils, basophils) and agranulocytes (monocytes, lymphocytes), and platelets are anucleate fragments that help stop bleeding through clot formation.
Click to watch →

Human Blood – 5 Basic Facts | RBC, WBC, Platelets Explained in Simple Way #shorts
146
Human blood consists of four main components: plasma (the liquid medium), Red Blood Cells (RBC) that carry oxygen, White Blood Cells (WBC) that protect the body and build immunity, and Platelets that help blood clot and heal wounds. Blood is classified into four main groups (A, B, AB, O), each with positive or negative variants.
Click to watch →

الدرس 09 : دور مكونات الدم سنة رابعة متوسط 😍
16.4K
Blood consists of four main components: red blood cells (44% of volume), white blood cells and platelets (less than 1% combined), and plasma. Red blood cells are biconcave disc-shaped, anucleated cells containing hemoglobin that transports oxygen and carbon dioxide. Each hemoglobin molecule binds four oxygen molecules and one carbon dioxide molecule. White blood cells are polymorphous, nucleated cells that provide immune defense against pathogens. Platelets are small cell fragments that enable blood clotting to prevent excessive blood loss.
Click to watch →

Human Blood | RBC | WBC | Platelets by Satpreet Ma'am #human #rbc #wbc #platelets #blood
10.9K
Blood is the most important fluid in the human body and is classified as connective tissue that transports oxygen, food, excretory substances, and hormones. Blood consists of plasma and three types of blood cells: Red Blood Cells (RBC) contain hemoglobin, giving them their red color and enabling oxygen transport; White Blood Cells (WBC) are colorless with irregular shapes and serve as the body's defense system; and Platelets (Thrombocytes) are essential for blood clotting to prevent excessive bleeding when injuries occur.
Click to watch →
Deep Dive
Clinical laboratory safety standards, infection control protocols, and the proper handling of biohazardous materials.

Clin Chem 1 Lab Basics and Safety
16.5K
Clinical laboratories use standardized warning systems including NFPA labels (red for fire hazard, yellow for radioactivity, blue for health hazard, white for other details, ratings 0-4) and biohazard signs for potentially contaminated materials. Essential safety equipment includes eye wash stations, emergency showers, and properly labeled refrigerators (separate from food storage). Biological safety cabinets provide worker and sample protection through specific airflow patterns, while fume hoods only remove harmful vapors and are inappropriate for microbiological work. Biohazard waste containers must be sealed before disposal and contain only appropriate materials. Shipping biohazardous materials requires IATA compliance with specific packaging, labeling, and documentation. Employee responsibilities include no food/drinks in the lab, proper PPE use, hair tied back, and minimal jewelry. Employers provide necessary personal protective equipment including eye and face protection, lab coats, and gloves.
Click to watch →

BMBL 6th Edition Updates Clinical Laboratory Biosafety Recommendations
1.3K
Clinical laboratories must follow standard precautions and implement comprehensive biosafety measures because specimens often contain unknown infectious agents, and studies show laboratory workers face significantly higher infection risks (3-9x for TB, 2-4x for hepatitis B, 20x for meningococcal disease) compared to the general population; key protective strategies include risk assessment, engineering controls (biosafety cabinets, splash shields), administrative controls (training, SOPs), and consistent PPE use across all specimen handling activities to prevent laboratory-acquired infections.
Click to watch →

CLINICAL PATHOLOGY ll BY ll UDITA MAM
528
The most important laboratory rule is maintaining discipline and safety, avoiding noise and disturbances. Essential PPE includes gloves and lab coat, not just caps or shoes. Eating and drinking in the laboratory is strictly prohibited. The biohazard symbol indicates infectious material hazard. Used needles must be disposed of in puncture-proof sharp containers. Autoclave is used for moist heat sterilization at 121°C for 15 minutes at 15 PSI pressure. Infectious material should be cleaned with 1% sodium hypochlorite. Hand washing should be performed both before and after handling specimens.
Click to watch →

MICROBIOLOGY - Labs FIRST
200
Clinical microbiology laboratories require comprehensive safety protocols to protect workers from biological, chemical, and physical hazards. Standard Precautions, established by the CDC in 1987 and renamed in 1996, include hand hygiene, PPE use, proper sharps disposal, and surface decontamination. Biological hazards include bloodborne pathogens (HIV, Hepatitis B, Hepatitis C) transmitted through needlestick injuries or contact with contaminated specimens. Physical hazards include lacerations (32% of injuries), chemical exposure, and eye injuries. Chemical hazards require proper storage in designated cabinets. Gas cylinders must be secured. Mouth pipettes are prohibited due to aspiration risks. Biological Safety Cabinets (BSCs) provide containment through HEPA filtration and negative pressure systems. BSCs are classified into three classes: Class 1 provides basic worker protection; Class 2 provides protection for worker and environment; Class 3 provides highest containment for highly infectious agents like tuberculosis.
Click to watch →

MICRO111 Ch25.1 | Importance of Clinical Microbiology, Specimen Collection
509
Laboratory-acquired infections pose serious risks to healthcare workers handling patient specimens. A documented case involved a microbiologist who died from meningococcal disease after handling a CSF culture plate without proper biosafety precautions. Clinical laboratories operate at varying biosafety levels: BSL-1 for basic work, BSL-2 for most clinical specimens (including TB and COVID), BSL-3 for highly virulent agents, and BSL-4 for the most dangerous pathogens. Standard precautions include hand washing, gloves, face masks, and sterile collection devices. Workers should assume BSL-2 precautions for all patient specimens since unknown pathogens may be present. Controlled access rooms and biosafety cabinets provide additional protection for aerosol-generating procedures.
Click to watch →
Deep Dive
Fundamentals of operating a compound light microscope, particularly focusing on the use of high-power and oil immersion objectives.

How To Use a Compound Light Microscope: Biology Lab Tutorial
594.3K
A compound light microscope consists of several key components including the ocular lens (10x magnification), objective lenses (scanning 4x, low power 10x, high dry 40x, and oil immersion 100x), mechanical stage, coarse and fine focus knobs, and an illumination system with an iris diaphragm; total magnification is calculated by multiplying the ocular and objective magnifications (e.g., 10x × 4x = 40x at scanning power), and when using high dry or oil immersion objectives, only the fine focus knob should be used to prevent damaging the lens.
Click to watch →
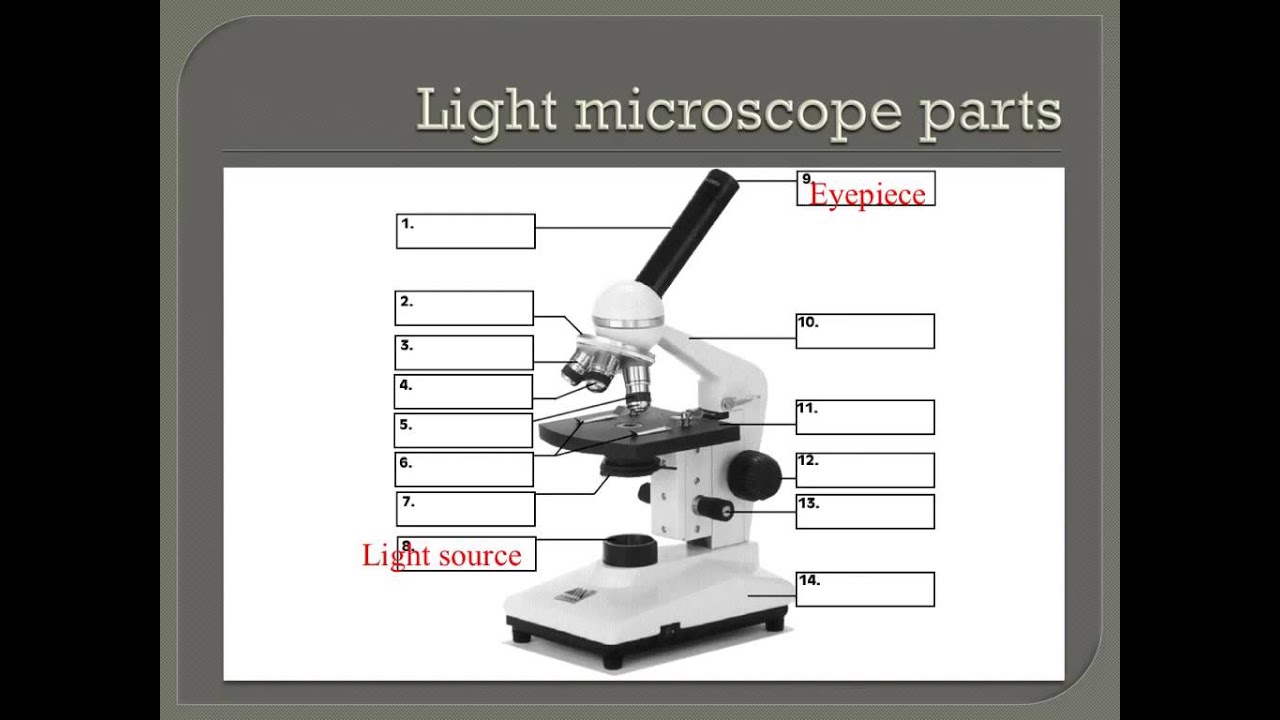
How to properly use a compound light microscope
257.3K
A compound light microscope uses transmitted light to magnify thin specimens, requiring proper handling (holding by base and arm), slide placement on the stage with clips, and systematic focusing starting from the lowest power objective (4x scanning lens, 40x total magnification) before progressing to low power (10x, 100x total) and high power (40x, 400x total) objectives, using the coarse adjustment knob for initial focusing and the fine adjustment knob for precise focus at higher magnifications, with the diaphragm controlling light intensity for optimal viewing.
Click to watch →

How to use a Compound Microscope| Monocular brightfield microscope
54.6K
This extensive section covers advanced microscopy techniques for high magnification observation. It explains how to switch from low power to high power objectives (40X or 45X) by rotating the nose piece, emphasizing the critical safety rule of using only the fine adjustment knob due to the extremely small focusing range (within one millimeter). The section describes modern spring-loaded objective designs that prevent lens breakage if accidental overshooting occurs. It introduces the 100X oil immersion lens for examining microscopic organisms like bacteria, requiring permanent fixed specimens. The complete oil immersion procedure includes: lifting the body tube, rotating to the 100X objective, centering the specimen, applying manufacturer-recommended immersion oil, carefully lowering the objective until contact with the oil surface, and focusing using only the fine adjustment. Advanced microscopes with power focal design maintain focus when changing objectives. Oil immersion requires intense light sources like halogen or LED lamps for satisfactory results.
Click to watch →

Lab 3-1: Microscopy
30.6K
A compound light microscope uses multiple lenses to magnify specimens, with total magnification calculated as objective magnification multiplied by ocular magnification (typically 10x); the four objective lenses (4x scanning, 10x low power, 40x high dry, and 100x oil immersion) provide progressively higher magnification (40x, 100x, 400x, and 1000x total respectively), requiring careful technique including starting at low power for specimen location, using only fine focus at higher powers due to reduced working distance, and applying immersion oil for the 100x lens to maximize light capture and resolution.
Click to watch →

To study Parts of compound microscope/experiment 1/class11 Biology/1st term/by Neerja
71.1K
A compound microscope uses two lens systems (ocular and objective) to magnify specimens invisible to the naked eye. Key components include the basal foot, vertical limb, square stage with clips, concave mirror, body tube, ocular lens, and revolving nose piece with three objectives (10x low power, 45x high power, 100x oil immersion). The working procedure involves positioning in diffused light, adjusting illumination, placing the slide, focusing with low power first, then switching to higher powers using fine adjustments. The oil immersion technique places a drop of oil on the coverslip before lowering the 100x objective, as oil's refractive index matches glass, enhancing resolving power for viewing small specimens like bacteria.
Click to watch →
Deep Dive
The role of anticoagulants in hematology, specifically how EDTA (purple-top) tubes preserve cellular morphology for testing.

TUBOS DE COLETA PARA EXAMES LABORATORIAIS - ATUAÇÃO DA ENFERMAGEM
60.9K
The purple-colored blood collection tube contains EDTA (ethylenediaminetetraacetic acid) as its additive. EDTA is a chelating agent that binds calcium ions and prevents blood coagulation. This tube is specifically designated for all hematology tests including complete blood count (CBC), differential leukocyte count, platelet function studies, and other blood cell morphology examinations. The EDTA additive preserves the cellular integrity of blood components for microscopic analysis.
Click to watch →

SEGREDO REVELADO: O Que as Cores dos Tubos de Coleta de Sangue ESCONDEM?
209.8K
The purple, pink, or lilac-top tube contains EDTA as an anticoagulant. The tube walls are coated with EDTA, which is considered the best anticoagulant for preserving cell morphology. This tube is essential for hematology examinations, particularly complete blood counts (CBC), as it maintains the proper shape and structure of blood cells for accurate analysis.
Click to watch →

Order of Draw and Additives | Blood Collection
1.6M
The purple top tube contains EDTA (ethylenediaminetetraacetic acid) which preserves cell morphology for microscopic examination and inhibits clotting by binding calcium. It is used for CBC, ESR, and A1c testing. EDTA is high in potassium, so cross-contamination with other tubes can skew potassium and calcium results.
Click to watch →

🩸Phlebotomy Certification Practice Test – 50 Questions to Help You PASS!
78.2K
EDTA (ethylenediaminetetraacetic acid) is the anti-coagulant found in lavender-top blood tubes. It is especially useful in hematology testing such as complete blood counts (CBCs) because it preserves the size, shape, and structure of blood cells, which is referred to as cell morphology.
Click to watch →

Ordre des tubes de prélèvement lors de la prise de sang 🩸 #foryou #new
9.2K
The purple top tube (tube EDTA) contains EDTA as an anticoagulant. This tube is used in hematology for: complete blood count (NFS), erythrocyte sedimentation rate (VHS), reticulocyte counts, blood grouping, and detection of irregular agglutinins. EDTA preserves blood cells for morphological analysis.
Click to watch →
Prerequisite Knowledge
- Concept 01Basic composition of human blood, including the primary roles of red blood cells, white blood cells, and platelets.
- Concept 02Clinical laboratory safety standards, infection control protocols, and the proper handling of biohazardous materials.
- Concept 03Fundamentals of operating a compound light microscope, particularly focusing on the use of high-power and oil immersion objectives.
- Concept 04The role of anticoagulants in hematology, specifically how EDTA (purple-top) tubes preserve cellular morphology for testing.
Subsequent Learning
- Step 01Staining protocols for blood films, specifically the chemical principles and practical application of Wright-Giemsa staining.
- Step 02Identification and differentiation of normal and abnormal white blood cell (WBC) morphologies, such as toxic granulation or blast cells.
- Step 03Assessment and grading of red blood cell (RBC) morphological abnormalities, including variations in size, shape, and color.
- Step 04Performing manual differential leukocyte counts and calculating clinical platelet estimates under microscopy.
- Step 05Correlating manual blood smear findings with automated Complete Blood Count (CBC) data to detect and troubleshoot instrument errors.
Slide Prep
Blood Draw
Drop Placement
Spreading Tech
Thickness Tune
Final Check
Slide Prep
0:13Playing Section
- 1
Clean slides by wiping factory film on lab coat.
- 2
Label slides before collecting blood specimen.
Automated Digital Hematology and Flow Cytometry
While manual peripheral blood smear (PBS) preparation and microscopic evaluation remain foundational in clinical laboratories, the medical technology field is increasingly shifting toward automated digital morphology and advanced flow cytometry. Critics of traditional manual PBS highlight that manual preparation, staining, and visual classification are highly subjective, labor-intensive, and prone to significant inter-observer variability and cognitive fatigue. In contrast, automated digital image analyzers utilize artificial intelligence to pre-classify cells with high reproducibility, standardizing the process and accelerating laboratory workflows. Additionally, flow cytometry provides precise, high-throughput, quantitative immunophenotyping that can identify cellular abnormalities beyond the resolution of visual microscopy. Thus, while manual microscopy remains a vital confirmatory tool for complex cases, modern laboratory medicine increasingly views automated digital systems and molecular diagnostics as the primary, more objective standard of care.
Deep Dive
Staining protocols for blood films, specifically the chemical principles and practical application of Wright-Giemsa staining.

How to Prepare & Stain a Peripheral Blood Smear | Hematology Lab Guide
12.8K
This extensive segment provides complete coverage of Wright-Giemsa stain chemistry and the full staining protocol. The stain contains oxidized methylene blue and eosin Y components. Methylene blue, a basic stain, binds to acidic nuclear components (DNA) to produce blue to purple nuclear staining, while eosin Y, an acidic stain, binds to basic cytoplasmic proteins to produce orange to pink cytoplasmic staining. The fundamental principle explained is that stains work by having opposite pH to their target components, enabling visualization of cell morphology invisible under white light microscopy. The complete protocol involves: (1) Fixative application for 30 seconds to adhere cells, followed by air drying; (2) Stain application for 3 minutes; (3) Buffer dip for 6 minutes to maintain optimal pH; (4) Final water dip. All drying steps use air drying rather than heat. The instructor demonstrates managing multiple batches simultaneously while maintaining proper timing sequences.
Click to watch →

How to do a hematology stain (Wright-Giemsa stain) Laboratory Tutorial Procedure
83.8K
The Wright-Giemsa stain is a Romanowsky stain that uses oxidized methylene blue dyes (basic, binding to acidic nuclei for blue-purple color) and Eosin Y (acidic, binding to alkaline cytoplasm for red-orange-pink color) to differentiate cellular components in peripheral blood and bone marrow specimens; the procedure involves preparing clean blood smears, fixing with methanol, staining with Wright-Giemsa stain for 60 seconds, rinsing with buffer for 60 seconds, rinsing with distilled water, and examining under microscope at 1000x magnification using oil immersion.
Click to watch →
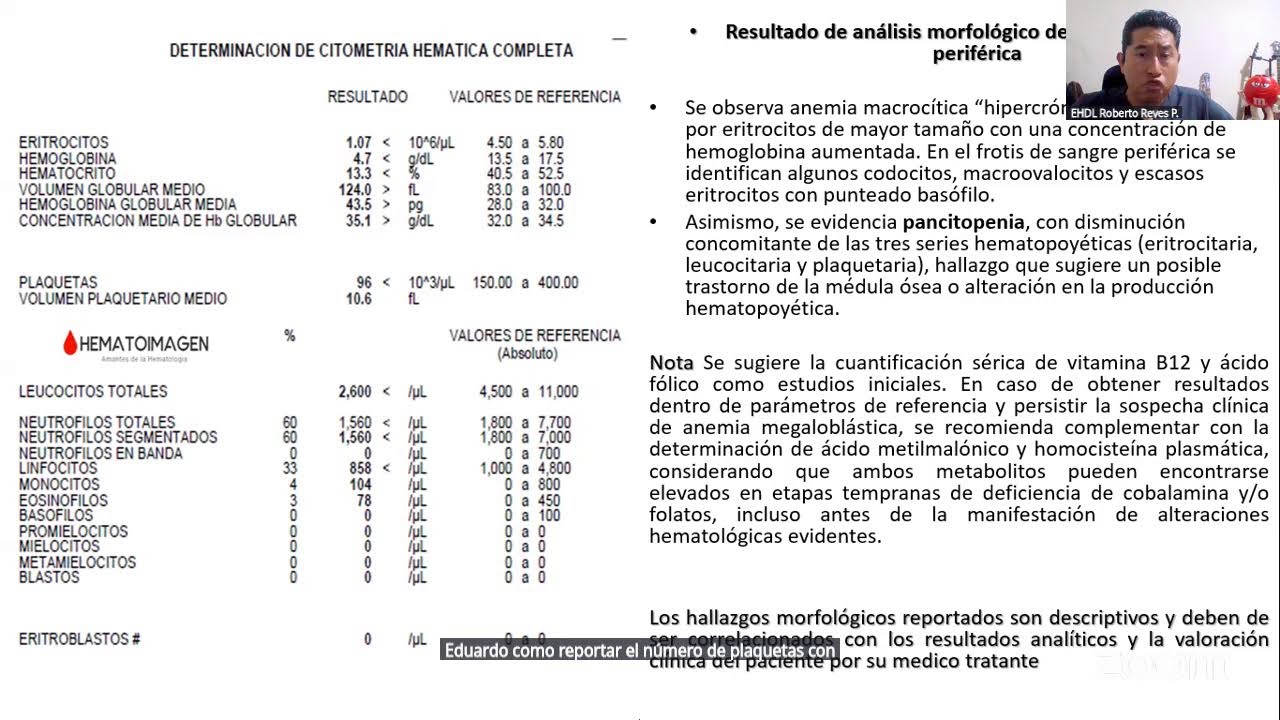
HALLAZGOS HEMATOLÓGICOS
185
Proper blood smear preparation requires specific techniques: the angle should be 45 degrees, and the spreader should be narrower than the slide. The smear should occupy approximately three-quarters of the slide, with a head, body, and tail. The monocapa (single cell layer) is the ideal zone for morphological examination. Wright-Giemsa staining uses two colorants: methylene blue (basic) and eosin (acidic). Methylene blue stains acidic substances like DNA, RNA, and mucopolysaccharides. Eosin stains basic substances like red blood cell proteins, hemoglobin, and eosinophil proteins. The Romanowsky effect (metachromasia) allows methylene blue to produce various colors depending on the substance being stained. Staining times must be established for each new batch to ensure standardization.
Click to watch →

Manual Staining with Wright-Giemsa (FixOstar - Hema) - HOW TO Bio-Gram
100
This video demonstrates the complete manual Wright-Giemsa staining procedure for blood smears using FixOstar fixation solution and JetDye-AF reagents, involving four sequential steps: fixation in FixOstar for 1 minute, staining with Wright-Giemsa reagent for 2 minutes, staining with a 1:5 dilution of Wright-Giemsa in Jet Buffer 7.2 for 6 minutes, and final washing in Jet Buffer 7.2 for 30 seconds twice; the entire process can be performed in batches while maintaining consistent incubation times.
Click to watch →
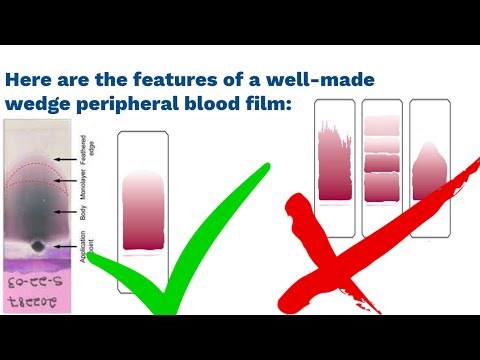
Mastering Blood Film Preparation and Examination
2.7K
This section explains the scientific basis of blood film staining. Polychrome stains like Wright-Giemsa contain azure and methylene blue that stain different cellular components based on pH-dependent reactions. Methanol fixes cells to the slide, while buffer addition initiates staining reactions. The thiazine-eosinate complex stains neutral components, free methylene blue stains acidic/basophilic components (RNA), and free eosin stains basic/eosinophilic components (hemoglobin, granules). Neutrophils receive neutral staining due to their granule pH. Drying artifacts manifest as moth-eaten RBCs, crenation, or echinocytes, caused by humidity or water absorption during drying. Prevention strategies include fixing slides in anhydrous methanol or using ethanol-containing stains. Fresh slides yield optimal staining results, while protein-rich specimens produce bluer stains.
Click to watch →
Deep Dive
Identification and differentiation of normal and abnormal white blood cell (WBC) morphologies, such as toxic granulation or blast cells.

MORPHOLOGICAL EVALUATION OF WBCs/PLATELETS/ORGANISM II PRACTICAL PATHOLOGY II @DR. JIBRAN AHMED
8.3K
This lecture covers the morphological evaluation of white blood cells, platelets, and parasites in peripheral blood smears, including identification of abnormal WBC morphologies such as toxic granules (indicating severe bacterial infection), shift to left (indicating infection/inflammation), hypersegmented neutrophils (indicating megaloblastic anemia), atypical lymphocytes (indicating viral infections), and blasts (requiring immunophenotyping for definitive classification). The lecture also explains differential leukocyte count methodology, numerical abnormalities of WBCs, correction for nucleated RBCs, and commonly encountered platelet and parasite problems.
Click to watch →

Acute Myeloid Leukemia | Clinical Presentation
784K
When blasts spill into the bloodstream, they can be identified on blood smears by two key characteristics: abnormal size compared to normal blood cells, and immaturity indicated by low cytoplasm-to-nucleus ratio. These morphological features help distinguish blast cells from mature blood cells and are essential for initial diagnosis.
Click to watch →

Aula aberta de leitura de lâmina
11.5K
This segment covers blast cell identification and granulocyte differentiation. Blast cells are identified by absence of cytoplasmic granulation, loose homogeneous chromatin, and visible nucleoli. The instructor demonstrates identification of basophils by their characteristic coarse, dark granulation that often obscures the nucleus. Eosinophils are differentiated from neutrophils by their coarse, orange-red granules versus the finer granulation of neutrophils. The systematic approach of first determining granulation presence is emphasized.
Click to watch →

CBC / blood film د سراء سشن 2 part1
237
White blood cell morphology provides critical diagnostic information: Neutrophilia indicates bacterial infections or inflammation; Basophilia suggests allergic reactions or chronic myeloid leukemia; Eosinophilia points to parasitic infections or allergic conditions. Left shift (presence of immature band neutrophils) indicates active infection or stress. Blast cells in peripheral blood indicate acute leukemia, with >20% blasts suggesting acute leukemia requiring urgent treatment. Dysplasia (abnormal cell development) may indicate myelodysplastic syndromes. Toxic granulation appears in severe bacterial infections. Howell-Jolly bodies indicate splenic dysfunction.
Click to watch →

How to Differentiate Lymphocytes vs Monocytes on Blood Smears
119K
This section focuses on blast cell morphology and comprehensive comparison of all three cell types. Blasts are characterized by an extremely high nucleus-to-cytoplasm ratio, with a disproportionately large nucleus surrounded by minimal cytoplasm. Key features include loose chromatin giving a light purple appearance and visible nucleoli. The video provides a side-by-side comparison showing lymphocytes with darkest nuclei, monocytes with granular cytoplasm and elongated nuclei, and blasts with largest nuclei and thinnest cytoplasm. Understanding these comparative features enables confident identification during blood smear analysis.
Click to watch →
Deep Dive
Assessment and grading of red blood cell (RBC) morphological abnormalities, including variations in size, shape, and color.

ICSH Recommendations on Standardization of Nomenclature & Grading of PB Cell Morphological Features
126
The ICSH recommends a two-tiered grading system (moderate/2+ and marked/3+) for RBC morphology, requiring assessment of at least 1,000 RBCs, except for schistocytes which use a three-tiered system. Key abnormalities include: anisocytosis (RDW reflects variability), dimorphism (two distinct populations), microcytes (<7μm, MCV<80fL), macrocytes (>8.5μm, MCV>100fL), hypochromia (reduced staining), polychromasia (immature cells with residual RNA), acanthocytes (irregular spicules), echinocytes/bite cells (spleen removal of hemoglobin bodies), elliptocytes (>2x short axis), ovalocytes (<2x short axis), schistocytes (MAHA diagnostic fragments), stomatocytes (cup-shaped with slit pallor), target cells (central pallor with central staining), teardrop cells, and inclusions (basophilic stippling, Howell-Jolly bodies, Pappenheimer bodies).
Click to watch →
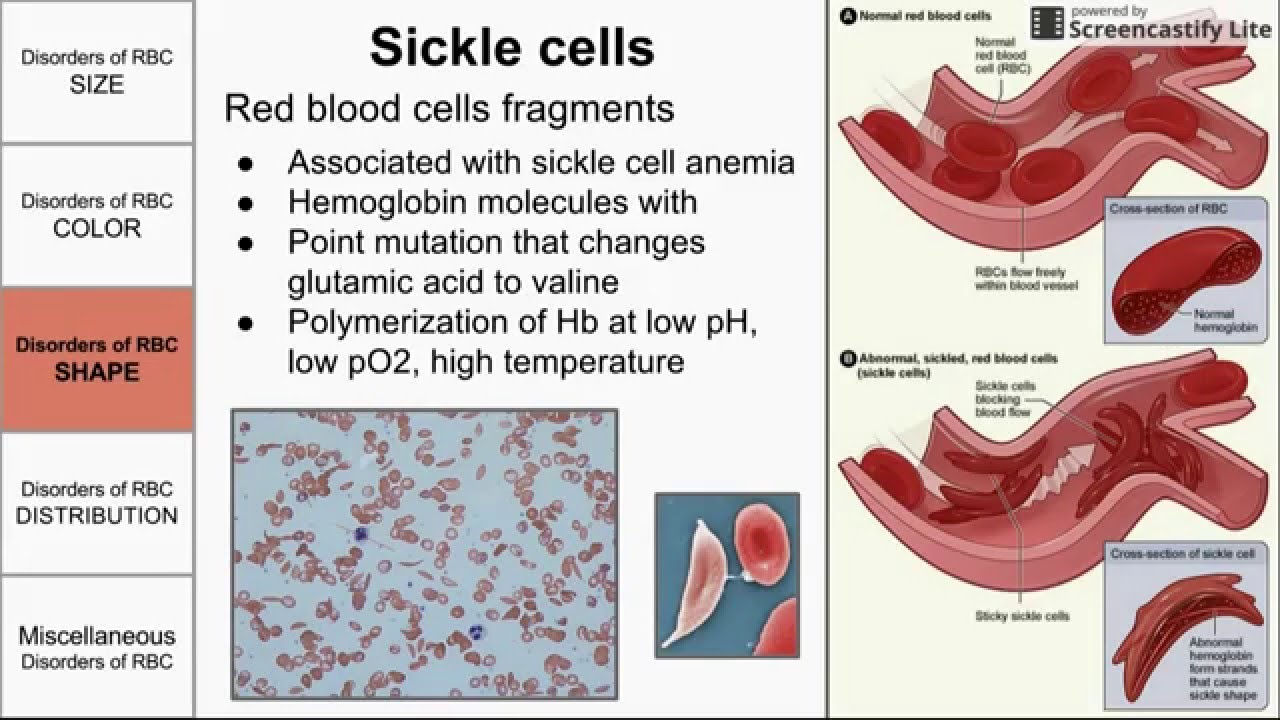
Red Blood Cell Morphological Abnormalities
170.6K
Red blood cell morphological abnormalities include changes in size (macrocytosis with MCV >100 indicating B12/folate deficiency, microcytosis with MCV <80 indicating iron deficiency/thalassemia/lead poisoning), color (hypochromasia with central pallor >1/3 diameter indicating low hemoglobin, polychromasia showing immature reticulocytes), and shape (target cells in liver disease/thalassemia, spherocytes in hereditary spherocytosis/autoimmune hemolysis, schistocytes in microangiopathic hemolytic anemia, sickle cells in sickle cell anemia from HbS polymerization, echinocytes in renal disease, acanthocytes in liver disease, teardrop cells in myelophthisis), as well as distribution abnormalities like rouleaux formation and agglutination, which help diagnose various hematological conditions.
Click to watch →

lecture 2 feild training in hematology
243
RBC morphology assessment includes size (microcytic if smaller than normal lymphocyte nucleus, macrocytic if larger), color (hypochromia indicates low hemoglobin), and shape. Normal RBCs are biconcave discs 6-8.5 micrometers in diameter. Poikilocytosis includes teardrop cells, elliptocytes, schistocytes, and target cells. Inclusions include Howell-Jolly bodies (nuclear remnants), Pappenheimer bodies (iron granules), and Heinz bodies (denatured hemoglobin). Stomatocytes have a central mouth-like opening. These abnormalities indicate various conditions including iron deficiency, thalassemia, liver disease, and splenic dysfunction.
Click to watch →

Abnormal morphology of RBC| Red blood cell morphological abnormalities| morphology variation of RBC
643
Abnormal red blood cell morphology is classified into four main categories: anisocytosis (variation in RBC size, including microcytosis, normocytosis, and macrocytosis), poikilocytosis (abnormal RBC shapes such as spherocytes, ovalocytes, burr cells, teardrop cells, schistocytes, target cells, pencil cells, elliptocytes, blister cells, keratocytes, stomatocytes, and rouleaux formation), variation in color (hypochromia and hyperchromia), and inclusions within RBCs. These morphological abnormalities provide critical diagnostic clues for identifying underlying hematological conditions, including nutritional deficiencies, genetic disorders, liver disease, and various anemias.
Click to watch →

Abnormal morphology of RBC| Red blood cell morphological abnormalities| morphology variation of RBC
200
Abnormal red blood cell morphology encompasses variations in color and intracellular inclusions that indicate underlying pathological conditions; color variations include hypochromia (pale cells with reduced hemoglobin, seen in iron deficiency anemia and thalassemia), hyperchromia (deeply stained cells with excess hemoglobin, seen in hemolytic anemia), and polychromatia (grayish-blue cells with multiple colors from premature marrow release, seen in hemorrhage); intracellular inclusions include Howell-Jolly bodies (nuclear fragments, post-splenectomy, megaloblastic anemia), Heinz bodies (denatured hemoglobin, hemoglobinopathies, G6PD deficiency), Cabot rings (nuclear membrane remnants, megaloblastic anemia, lead poisoning), basophilic stippling (RNA granules, lead poisoning, thalassemia, liver disease), Pappenheimer bodies (iron granules, splenectomy, sideroblastic anemia), and malaria parasites (Plasmodium species causing hemolytic anemia).
Click to watch →
Deep Dive
Performing manual differential leukocyte counts and calculating clinical platelet estimates under microscopy.

Contagem de Plaquetas na Câmara de Neubauer
10.2K
Blood smear platelet counting is the most common routine method, utilizing a single smear for multiple diagnostics including leukocyte differential and RBC morphology. Count 10 fields at 100x magnification, calculate the average, then multiply by 20,000 (for monochromatic microscopes) to get platelets per microliter. Hematology analyzers automate cell counting but cannot replace manual smear analysis for differential counts, morphology evaluation, and detecting hemoparasites. The complete workflow includes: receiving samples with request forms, verifying anticoagulant presence, homogenizing and checking for clots, running analyzer after species selection, preparing and staining smears, performing manual hematocrit, and conducting platelet counts. Results are typically available within two minutes.
Click to watch →

Manual platelets count method,मैन्युअली प्लेटलेट्स काउंट कैसे करते है, platelets count microscopy.
33.3K
Manual platelet count using the slide method involves preparing a blood smear on a glass slide, staining it, and counting platelets in the 'zone of morphology' (where RBCs are in light contact but not overlapping) across 10 fields under the microscope; the total platelet count is calculated using the formula: (number of platelets counted × 15,000) ÷ number of fields counted, which provides an accurate platelet count for clinical reporting.
Click to watch →
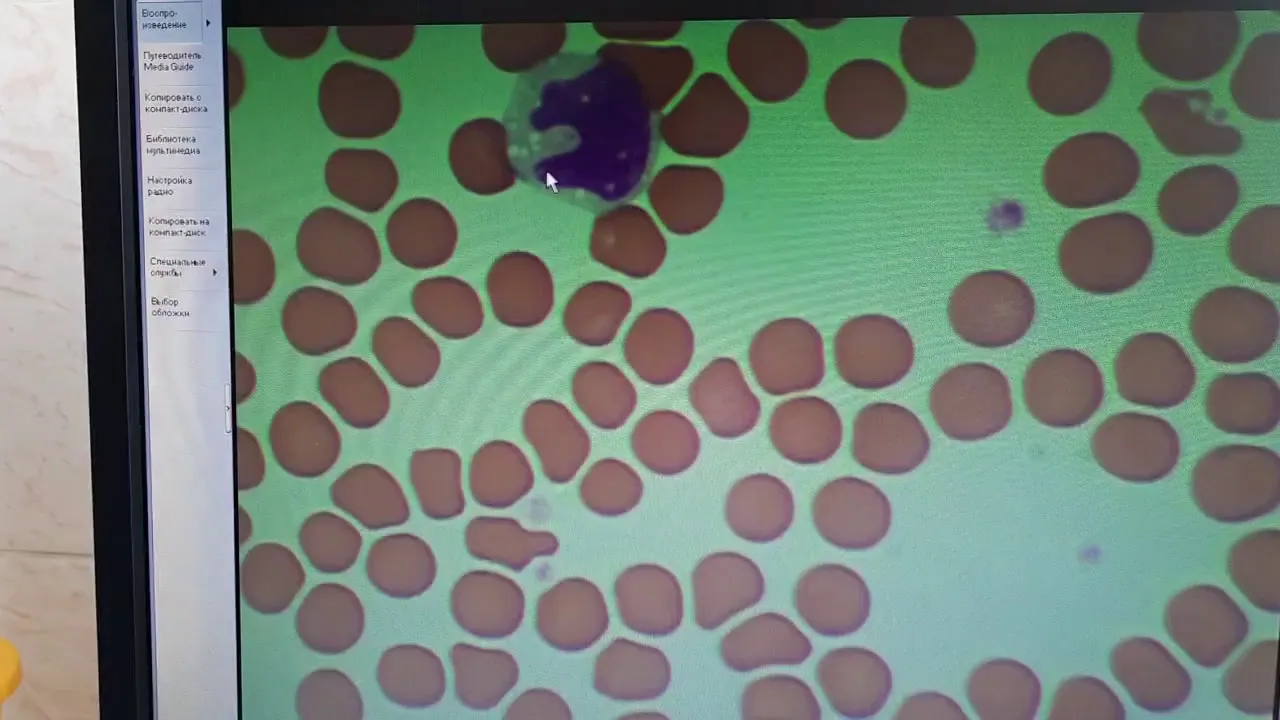
Подсчёт лейкоцитарной формулы с нуля
29K
This video demonstrates how to manually count and identify white blood cell types from a blood smear by examining 100 cells under a microscope, focusing on nuclear segmentation patterns (such as segmented neutrophils with multiple lobes, band neutrophils with a single elongated nucleus, and lymphocytes with round nuclei) and cytoplasmic characteristics to determine the leukocyte formula.
Click to watch →

Numération manuelle des plaquettes sanguines #hematology #medecine #foryou
2.8K
The complete manual platelet counting workflow includes preparing the Malacé cell slide by placing the lamella correctly without air bubbles, allowing 3 minutes of incubation for cell settling, and examining under microscope starting at 10x then 40x objectives. Technicians count platelets in exactly 10 squares while distinguishing them from white blood cells. The final calculation uses the formula: platelet count per liter = number counted in 10 squares × 10,000.
Click to watch →
#completebloodcount #cbc #anemia #WBCCount #PlateletCount #rbc #hct #mcv #mch #dlc #lab #blood
160.8K
The Differential Leukocyte Count (DLC) identifies specific infection types. Neutrophilia (increased neutrophils) indicates bacterial infections, trauma, or steroid use, while neutropenia occurs in aplastic anemia, sepsis, or drug reactions. Lymphocytosis increases in viral infections, tuberculosis, and blood cancers like CLL. Eosinophilia thrives in allergic conditions and remains elevated in chronic diseases. Monocytes and basophils increase in many chronic conditions. Platelet analysis reveals bleeding risk: thrombocytopenia (<1.5 lakhs) indicates dengue, ITP, or aplastic anemia, while thrombocytosis occurs in some cancers. Critical red flags include hemoglobin <6 g/dL, TLC >1 lakh suggesting leukemia, platelet count <20,000 indicating severe bleeding risk, and pancytopenia (simultaneous reduction of all blood components) indicating severe bone marrow suppression requiring immediate specialist consultation.
Click to watch →
Deep Dive
Correlating manual blood smear findings with automated Complete Blood Count (CBC) data to detect and troubleshoot instrument errors.

Hematology: How to interpret automated Complete Blood Count (CBC) results
291.9K
A peripheral blood smear is indicated when automated analyzers flag abnormalities such as monocytosis, morphology issues, or abnormal scattergrams. The smear allows examination of WBC differential, RBC morphology, and platelet appearance. Key findings include: abnormal cell shapes (poikilocytosis), inclusions, nucleated cells, and platelet abnormalities. The indices from the CBC should correlate with morphological findings observed on the smear.
Click to watch →

浅川 翠先生の臨床病理学シリーズセミナー一次診療で知っておきたい臨床病理学 第4回 「一次診療でやっておきたい血液塗抹標本の作成方法と読み方」
263
Blood smear examination is a microscopic test for morphological evaluation of blood cells that detects abnormalities missed by automated counters. While automated CBC provides rapid numerical results, blood smear offers critical advantages: detecting errors, identifying morphological changes, recognizing left shift and toxic changes, estimating platelet counts, detecting tumor cells, and identifying infectious pathogens. Key findings only visible through smear include neutrophil toxic changes (toxic granulation, cytoplasmic vacuolization, Döhle bodies) and left shift, which indicate bone marrow activation and acute inflammation. These findings are essential for differentiating acute inflammation from chronic inflammation, stress patterns, and other conditions. Combined with CBC, blood smear enables accurate diagnosis of severe inflammatory conditions like pyometra, uterine rupture, and brain abscesses.
Click to watch →

CBC report कैसे पढ़े!!रिपोर्ट देख के बिमारी का पता कैसे करें !! By Drniteshraj
169.7K
Manual examination of blood smears allows detection of parasites (like malaria), abnormal white blood cells, and other morphological changes that automated machines cannot identify. This manual review is essential for diagnosing conditions like malaria, leukemia, and other hematological disorders that require microscopic examination.
Click to watch →

CBC and parts of CBC assembly
111.2K
This video demonstrates practical knowledge about CBC (Computer Based Examination) systems, explaining common defects such as system lag, voltage issues, and component failures, while showing step-by-step troubleshooting procedures including system settings configuration, component replacement, and maintenance techniques to ensure proper system functionality.
Click to watch →

Hematology: Laboratory Evaluation of Cells (Part 3) - Automated Cell Counting (Instrumentation)
3.6K
Quality assurance ensures reliable automated hematology results through systematic calibration and quality control. Calibration verifies instrument accuracy and consistency, performed upon installation and every six months, with daily quality checks before testing. Troubleshooting common interferences is essential: agglutination causes dual RBC populations or right shifts, corrected by warming at 37°C; lipemia/icterus falsely elevates hemoglobin through increased turbidity, corrected by plasma replacement; hemolysis decreases RBC and hematocrit, requiring new specimens; lysis-resistant RBCs (HbS, HbC, HbF) are counted as WBCs, corrected by manual dilution or incubation; microcytes/fragments are counted as platelets, requiring microscopic review; nucleated RBCs and megakaryocyte fragments increase WBC counts, corrected by manual counting; platelet clumps are counted as WBCs, corrected by sodium citrate redraw and multiplying by 1.1; high WBC counts (>100,000/μL) cause turbidity affecting hemoglobin readings, requiring manual hematocrit verification; leukemia/chemotherapy fragments are counted as platelets, requiring blood film review; old specimens cause RBC swelling and altered automated differentials, requiring rejection based on stability criteria.
Click to watch →
Slide Prep
Blood Draw
Drop Placement
Spreading Tech
Thickness Tune
Final Check
Slide Prep
0:13- 1
Clean slides by wiping factory film on lab coat.
- 2
Label slides before collecting blood specimen.
Automated Digital Hematology and Flow Cytometry
While manual peripheral blood smear (PBS) preparation and microscopic evaluation remain foundational in clinical laboratories, the medical technology field is increasingly shifting toward automated digital morphology and advanced flow cytometry. Critics of traditional manual PBS highlight that manual preparation, staining, and visual classification are highly subjective, labor-intensive, and prone to significant inter-observer variability and cognitive fatigue. In contrast, automated digital image analyzers utilize artificial intelligence to pre-classify cells with high reproducibility, standardizing the process and accelerating laboratory workflows. Additionally, flow cytometry provides precise, high-throughput, quantitative immunophenotyping that can identify cellular abnormalities beyond the resolution of visual microscopy. Thus, while manual microscopy remains a vital confirmatory tool for complex cases, modern laboratory medicine increasingly views automated digital systems and molecular diagnostics as the primary, more objective standard of care.
Basic composition of human blood, including the primary roles of red blood cells, white blood cells, and platelets.
Clinical laboratory safety standards, infection control protocols, and the proper handling of biohazardous materials.
Fundamentals of operating a compound light microscope, particularly focusing on the use of high-power and oil immersion objectives.
The role of anticoagulants in hematology, specifically how EDTA (purple-top) tubes preserve cellular morphology for testing.
Staining protocols for blood films, specifically the chemical principles and practical application of Wright-Giemsa staining.
Identification and differentiation of normal and abnormal white blood cell (WBC) morphologies, such as toxic granulation or blast cells.
Assessment and grading of red blood cell (RBC) morphological abnormalities, including variations in size, shape, and color.
Performing manual differential leukocyte counts and calculating clinical platelet estimates under microscopy.
Correlating manual blood smear findings with automated Complete Blood Count (CBC) data to detect and troubleshoot instrument errors.
312K views0likes4:37@PCCvideosOriginal Release: 2010-12-17
Now I'll show you how to prepare peripheral blood smears.
First, you'll need to take your slides.
There's always a bit of factory film on them from the washing process.
You'll need to wipe that off on the cuff of your lab coat, just like this; both sides.
And you'll label them, take your specimen and with a diffmaker, you'll put the needle side down, in the hole in the stopper, until it goes all the way in.
Then you want to release any positive pressure by just rolling it between your hands like this a little bit.
Then, place a drop of blood right there blood right there on your slide next to the frosted edge, but not on it.
You want it right in the center there.
And that's a perfect size drop, right there.
Then, take a spreader slide.
You're going to back into the drop until it spreads and then go forward.
You want to go forward until the slide touches your finger.
And don't swoop up like this, that will make streaks on the end of your smear.
You can wave it dry.
You should have a nice corona right there on the edge.
Place a drop on your slide, a good size drop there.
Take your spreader slide.
Now your first slide was a ittle too thin, you can make it thicker by increasing the angle like this.
If it was too thick, you can make it thinner by decreasing the angle like this.
And you backup to the drop, let it spread and go forward.
This is an example of the best slide here.
See the nice corona here on the end?
So that concludes the demonstration and preparation of peripheral blood smears.
Up Next
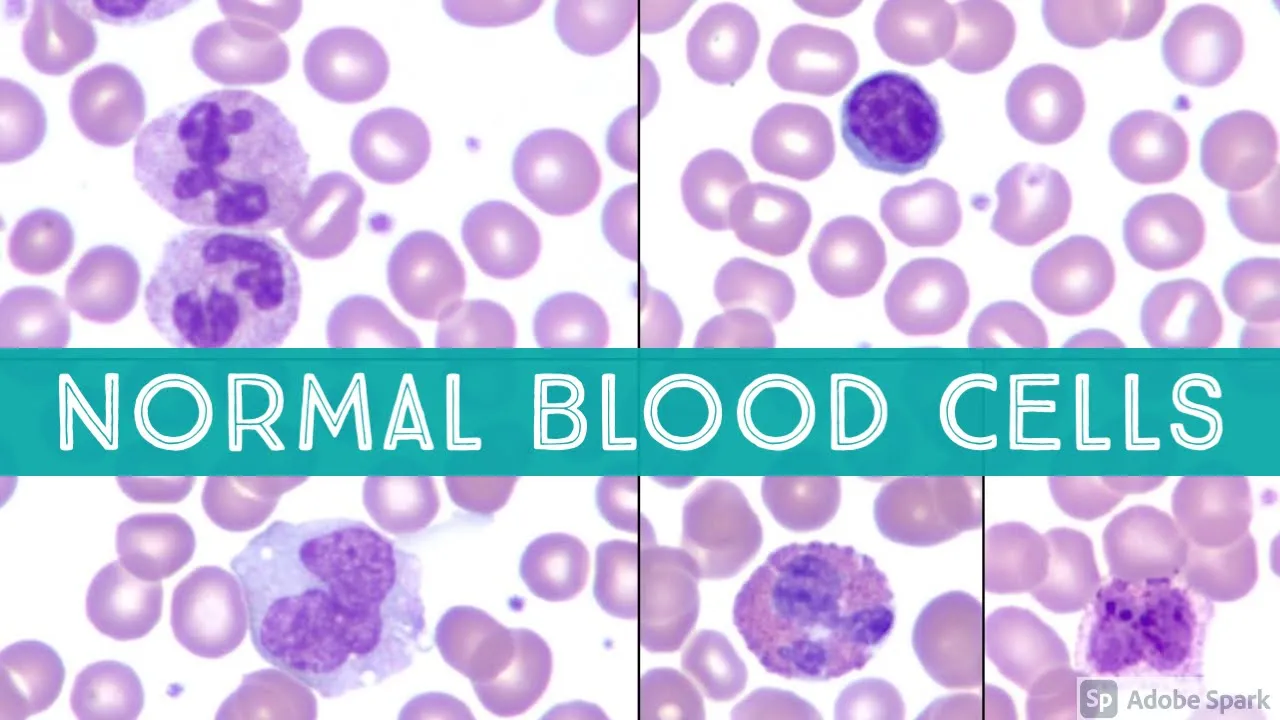
9:29
Normal Blood Cell Morphology on Peripheral Smear | Neutrophils, Lymphocytes, Eosinophils & More | Hematopathology Education
@JMGardnerMD
21.6K views•2021-03-10

48:47
Graphic Medicine: Comics for Collaborative Healthcare Communication
@nationalpatientadvocate
189 views•2023-12-04

10:28
Neuroanatomy: Central and Peripheral Nervous System Divisions Explained
@AKLECTURES
136.2K views•2014-09-20
3:05
Stages of Labor and Vaginal Birth | Childbirth Animation
@nucleusmedicalmedia
52.1M views•2017-08-18
Related Study Plans & Knowledge Roadmaps
Structured learning paths in Medicine
medicine
Abnormal LFTs: Diagnostic Workup & Pathology
01Liver Anatomy and Basic Physiology
02Introduction to Liver Function Tests (LFTs)
03Hepatocellular vs. Cholestatic Patterns
+ 3 more learning modules
12h6 modules
Explore Roadmap
medicine
Analyzing Blood Smears: RBC, WBC & Platelets
01Introduction to Blood Components & Smear Preparation
02Normal Morphology of Blood Cells
03Erythrocyte Pathologies & Morphological Variants
+ 2 more learning modules
12h5 modules
Explore Roadmap
medicine
Mechanical Ventilation: Waveforms & Alarms
01Anatomy and Physiology of Breathing
02Introduction to Mechanical Ventilation & Core Modes
03Ventilator Settings and Waveform Interpretation
+ 2 more learning modules
12h5 modules
Explore Roadmap
medicine
Neuro Exam: Localization & Stroke Syndromes
01Foundations of Neuroanatomy and Vascular Supply
02The Neurological Examination: Step-by-Step
03Principles of Neurological Localization
+ 3 more learning modules
18h6 modules
Explore Roadmap