






















An emulator is software that allows one computer to behave like another by replicating the target system's hardware and software behavior; this tutorial demonstrates building a CHIP-8 emulator in Zig programming language by implementing the virtual machine's architecture (including 4096 bytes of RAM, 16 general-purpose registers, delay/sound timers, and a 64x32 display), loading ROMs, and executing the 36 CHIP-8 instructions including control flow, arithmetic operations, and graphics drawing with sprite-based rendering.
Build a CHIP-8 Emulator in Zig | Beginner Programming Tutorial
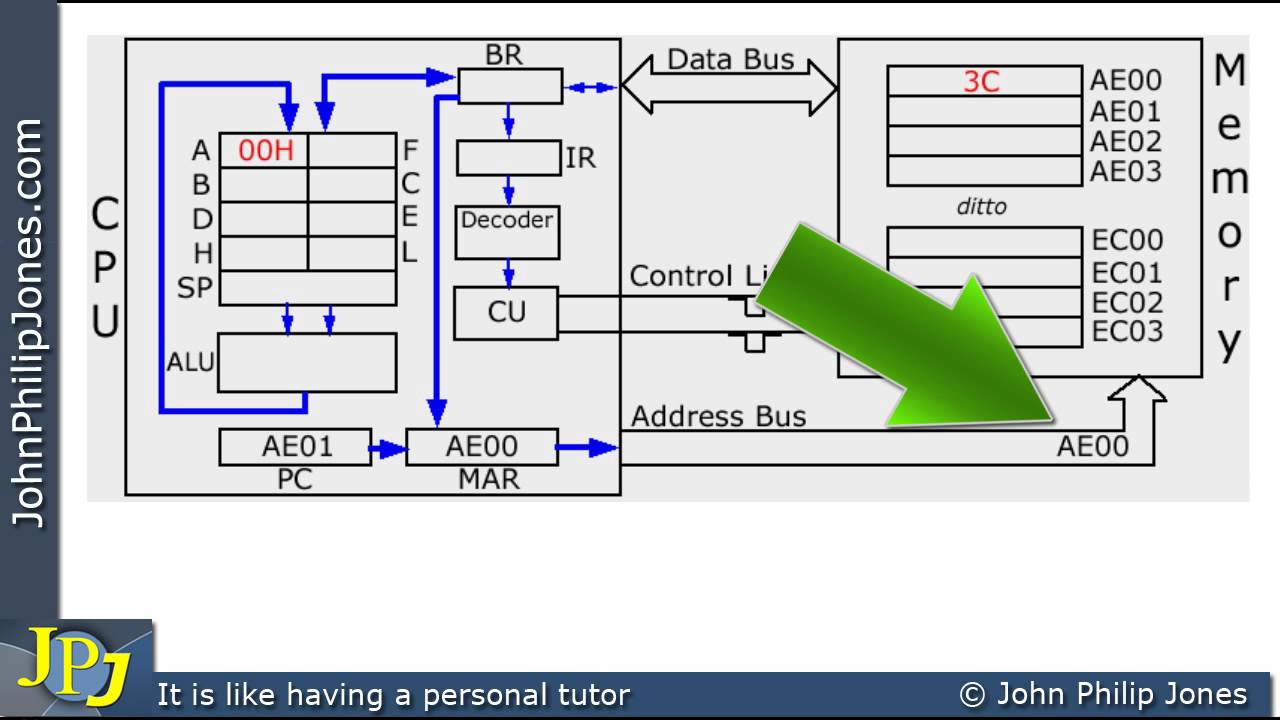
Added:Basic computer architecture concepts, including the Fetch-Decode-Execute cycle, registers, RAM, and the program counter.
Proficiency with bitwise operations (such as AND, OR, XOR, bit shifting, and masking) and representing data in binary and hexadecimal formats.
Fundamental knowledge of systems programming, including memory layout, pointers, and basic syntax of Zig or a similar language like C or C++.
An understanding of how simple graphics are represented using a 1D or 2D framebuffer (pixel grid).
Transitioning to more complex emulator architectures, such as the MOS 6502 (used in the NES) or the Intel 8080, which introduce interrupts and memory mapping.
Deepening knowledge of the Zig programming language, specifically utilizing features like compile-time code execution (comptime) and custom memory allocators.
Implementing cycle-accurate timing and input/audio synchronization to accurately replicate legacy hardware speeds.
Exploring advanced emulation techniques like dynamic recompilation (Just-In-Time compilation) and writing automated test suites to verify instruction behavior.
23.8K views548likes1:02:59Original Release: 2023-01-15
hello and welcome to a brand new video in this video we're going to be taking a look at emulation how does emulation work and how can you get started in programming an emulator in this uh tutorial uh we're going to be describing and creating a chip 8 emulator which is famous for games such as pong bass Invaders uh brick breaker among a lot of others this tutorial will be based in the zig programming language however uh the instructions should be generalized enough that you can do it in any programming language with very little modification so without further Ado let's go ahead and get started [Music] so what exactly is an emulator an emulator is basically a software that allows uh one computer to behave like another in order to run applications so this means something like if I have a Game Boy game and I want to play it on my PC I would need a Game Boy emulator for that PC there are two different levels of emulation which is going to be low level and high level emulators low-level emulators are focused on emulating the hardware of whatever system it is whereas high level emulators are more so focused on implementing the software and Os calls this can be very useful for more modern systems uh being able to run in emulators way faster so what exactly is ship 8 chip 8 is not technically Hardware it's more like a virtual machine uh however it does pretty much Implement all of the ideas of what Hardware is it was quite literally a virtual machine and if we take a look at some of the links that I have included in the description this one is the technical reference and if we go ahead and go to the specifications we can see based the basic design and uh what the uh chip 8 is all you gotta know is that chip 8 has 4096 bytes of ram so zero zero zero zero to zero xff this is hexadecimal notation and it will be used within the context of this video um the first 512 bytes are where the original interpreter was located and should never be used by a program almost all of the chip 8 programs start at 0x200 which is 512 bytes in uh and this is where we're going to set our program counter you'll also have basically a special purpose register for the delay and sound timers and it's not important to note that you have VF which is the final or the 16th register and this one's usually used as a flag so when if you're ever writing a chip eight program try not to use the VF register there's also pseudo registers which aren't necessarily actual registers but they are things that are required for the program to run the first one is the program counter which is a 16-bit memory address and that stores are currently executing a function and the stack pointer which will be pointing to the last uh place where a function was called from other important considerations for the chip 8 is that it has a keyboard which is a 16 key keypad with the following layout one two three C four five six d uh 789e a0bf and these are obviously hexadecimal as well then we also have the display uh it's a 64 by 32 monochrome display in any color and then whether or not the virtual machine's Graphics um representation is set or not determines whether that pixel is on or off uh the chip 8 draws Graphics using Sprites which are up to 15 bytes uh each single byte that you read across is going to use every single bit in that to represent whether pixel is on or off the delay timer basically you just subtract one from the value of the delay timer at the rate of 60 hertz and when Delta timer is zero deactivates sound timer is active whenever the sound timer register is not zero and it also decrements at the same rate however I will always play the buzzer sound while it's greater than zero so then you come across the instructions uh there's 36 total instructions that sounds like a lot but they're all pretty easy to do um and then basically we have these different formats here uh so basically you can sort by whatever the first uh nibble here is a nibble is just one single hexadecimate hexadecimal a nibble is basically one hexadecimal uh digit so the first nibble here determines what what instruction it is and then there are special cases that you'll have to search for and then you'll have these notations this is two and then it's n n where NN n is basically in the address so you could figure out what that address is and this is how you jump to or call a subroutine at that address you'll also have xkk this is a similar one uh where basically X in this case is going to be what the register number is and then KK is a byte and that's similar and then you also have this format here where it's x y and then sometimes it's another number x y n or x y m uh where X and Y are now the registers so v x v y and then the last one is mode so that matters for the ALU instructions which are the eight series here where it's XY zero one two three four five and all these other instructions for this if you guys want to read an article I recommend this one from multi-gesture.net it's pretty cool it goes through pretty much all the basics it doesn't necessarily show you the implementation it's more so just the general concept of how this thing works and it's pretty good A source and then if you want to see the implementation of this uh you can go to this uh James Griffin's chip 8 emulator which is basically the literal interpretation of this tutorial the other two things that I have here are a test ROM this is a chip a test ROM and it just uh it goes through a bunch of instructions and figures them out there's also this one from C8 int and basically it's another test uh but if you look at the source it will it will basically print out a number uh based upon which test is executed and which one fails so if uh if one of these fails it will give you a code and then you'll figure and then you just refer to this key so starting here I've downloaded sdl2 I'm going to be using sdl functions uh I won't be instructing you specifically on how sdl works but we're going to make some basic glue code um which you can skip over if you're not using sdl for basically creating a window and displaying stuff to that window so I'm going to initialize my project here this is a Sig in its EXE which creates our build files here uh and then I'll go ahead and Link in sdl2 all right that's set up let's go ahead and initialize STL I'm gonna try to make this as quick as possible so we start with Main and we're going to create a function in it and D in it and we're just going to call in it and then defer the initialization also I'm going to create an allocator you need to do this in Zig if you ever want to allocate memory so it's pretty much required all right we created a blank allocator here let's go ahead and initialize sdl so to start off let's get STL board here so he has this awesome feature called C import and C include where you can just go ahead and include a header file like sdl.h and suddenly you have access to everything inside of sdl so if I wanted to do STL in it it would automatically be populated here which is amazing so we do need to check if sdl in it fails and if it does we need to exit the application so to do this we'll do a panic this is similar to throwing a runtime error basically if you've used C plus plus or uh whatever language you're using if it has exceptions or error handling like that basically just created variables for the window render and texture this is all you will actually need creating Windows pretty simple Windows equal to sdl sdl create window and then we'll call it ship eight foreign so it shows up in the middle of your screen and then you can choose any resolution here as long as it follows the aspect ratio 64 by 32 so I'm going to do 1024 by 512 depending on your display size you might want to make it smaller and then we're going to create a renderer here with the default settings finally we just need to create a texture this will actually be what represents our data uh that or basically our screen in general so we create a texture uh and it's remember I'm going to be using a texture here A texture format so it's going to be sdl pixel format and I'm going to use rgba Triple Eight which is just going to be 1 by 4 RGB and a and then this is the most important it needs to be texture access uh set to streaming so it can be updated essentially in de-initialization it's pretty simple you just destroyed the window and call that steel quit we're going to need to create a main Loop here so for a variable called keep open and by default that's true and while we're keeping it open uh we're going to call an emulator cycle which we'll deal with in a second and we need to pull for events uh in STL so sdl event and basically based on what type of event we get uh determines what we're gonna do um I'm gonna create an else here just for uh safekeeping in case anything else gets thrown that we don't care about so when quit gets called keep open becomes false and we exit so here a couple rendering functions it's called render clear then render a copy of the uh texture to the screen and then you call present and then here we're just going to sleep uh and you'll sleep before 16.
milliseconds or yes 16 milliseconds uh and this way you'll have that 60 hertz going for you another to do to put here is that after the render clear before the render copy we need to do a uh we need to build the texture uh so we have to refresh the texture based upon uh what's currently displaying on the graphics you can technically make this Faster by having a flag that you set uh in the emulator whether or not you need to rebuild a texture but this is fine I'm going to create a another file here called chip eight uh in Zig you can use files as structures which is pretty cool so I can do const chip 8 equals uh import chip8.0 and now that is actually a structure that I can create I'm going to allocate a structure here so this will be a variable and we'll just call it um we can call it CPU and then it's going to be a pointer to a chip eight it's currently undefined and then to get that we'll do uh GPU equals allocator.create uh chip eight and has to be a try because otherwise it returns an error so let's get into the chip eight itself or create a function here called init we also need uh this if we want this to be a member method we have to create this thing called self and it's uh just going to be whatever this current structure is and we need to take in a self pointer to itself and then we can go over here and call CPU dot in it and it will work the way you think it will another to-do thing we have to do is load a ROM in this case we'll just be doing uh command arguments but we'll come back to that in a minute so if you go ahead and skipped ahead I've created the basics for initializing uh our sdl context here and I've added a little bit more utility to this so we're going to create a structure or a class whatever it is in your language of choice uh that's going to be your main uh system or chip at 8 or whatever you want to call it it's going to be your system that you're trying to emulate and currently doesn't really have that much content of what it does but it will have an initialization it has to have an emulator cycle and then you have to ha then you have to build a texture or find some way of getting your graphics right to be just displayed on the screen and we'll also need to load a ROM these are the fundamental things that you need to do so you need to initialize whatever your window context and everything is you need to then go ahead and create a version instance of your system and initialize it initial load a ROM sometimes you need to load the ROM before you initialize it sometimes after it doesn't really matter that much and then we have a continuous loop that does emulator cycles and then building uh presents to the screen and uses uh whatever texture or Graphics method that you're using so for now let's get on to the technical details of the system I'm going to import the standard library and a couple things from C so the C stdlib is C import see include and this SCD lib and I can do the same thing with time and do time.h and this will be done for the random uh number generator so there's a few things that you need to know for your CPU your CPU should probably know what op code that you're executing which is Operation code uh and if I set that it's going to be a u16 because if we look at the spec the opcode is going to be a u16 because if we look at the spec there is clearly 16 bits here or four nibbles or two bytes however you want to say that every instruction is like this so you have to have opcode being a u16. the next thing you want to have is you want your program memory sometimes you can create this as a separate class or separate buffer depending on if there's memory access rules and stuff like that but in this case we just literally can allocate for 4096 bytes on the stack sometimes your compiler will complain about this because it is a large stack allocation the other thing you will need is graphics uh as you can see Graphics are 64 by the graphics as we discussed are 64 by 32 so you can go ahead and do that as another uh 20 that's 2048 bytes as well then we need some registers we have 16 general purpose registers so that will be that and then we have special registers now we have the index register which is a single u16 or the program counter which is also a u16 and then we'll have the delay the timers so we'll have delay timer it's the u8 and we'll have a sound timer which is another u8 we'll also need to keep track of what is going on with the stack so we'll have the stack we can do 16 and it has to be addresses so it's u16s and then stack pointer which is the current uh thing on the stack we can definitely do u4 here because there's only 16 things that we can point to but it's fine the last thing we should probably keep track of is what keys are being pressed and we'll do that as an array of 16 as well all right let's get into our initialization right now I'm going to always go ahead and see the random uh random number generator and this will have to be a u32 and then we're going to take a Time dot time at zero and that will see the random number generator um this is actually just equivalent to uh s Rand time and all probably seen that before and then we can do self uh we're gonna set the program counter to be the start which is the start of our memory which is 0x200 as we discussed and the current off code is going to be just zero we can do the index it's also going to be initialized to zero and stack pointer is going to also be zero the delay timer is going to be zero and the sound timer is going to be zero anything else I'm missing I think that should be everything uh and then we're going to go through the erase now so we're just going to do a for Loop over uh each of these arrays and set say that each one is zero so we can do that for graphics we can do that for memory we can do that for uh the stack the registers and the keys suck registers and keys now I don't think I'm missing anything else uh the next thing we got to do is we've got to import the font set so to import the fonts uh the fonts are actually laid out and described here but you can get it as an array and if you look at the article here uh this is the font set I basically copied that over uh and I'm going to copy this over now so we can just declare this as a const and then where do you load that that's the big question right uh so we're going to do a for loop on the font set oops and then we're going to have the um character and the index and you basically are just going to load it from zero uh which is going to be your program uh which is going to be your interpreter's uh memory space so it will never be overridden by a program because programs will be loaded at uh this 0x200 value I'm going to create a convenience function here that's called an incremental program counter uh which is PC and then we'll just be a method of self and just increments program counter by two why do we increment the program of counter by two the reason is because every instruction is two bytes uh whereas we have the ability to access one byte at a time through our memory so because we're not getting words of u16s we're getting words of u8 we're going to actually have to go up two because each uh is two words so the next thing this is the this is the entire meat of the emulator right here it's going to be the cycle method which we can go back by the way and that up so this will be running here so CPU cycle right last remain teams will be uh text uh adding building textures loading ROMs and I might as well make a note here uh key presses need to be handled as well so whenever you call a cycle number one let's go ahead and get the op code so self op code is equal to if I take the cell phone memory at the program counter but shift it right to the eight and then or again self-dot memory the self. program counter plus one then let's go ahead and grab what is the uh first nibble so that is the very first uh or most significant rather fight so we'll just call it first and what you gotta do is just take the uh op code and bit shift it right by 12.
y12 because it gets you over three nipples so it will be this so where X will be what first is and then if you do a switch case or match depending on what language you're using uh and then if it's zero zero if uh so you need to detect which version of this it is so if the op code here is um going to be equal to the two cases we have back here so let's go in uh so zero zero e0 that's clear screen so if it's zero zero zero e0 this one is clear to the screen so we're just going to do a for loop on graphics uh software graphics and then click that and then the next one is a little bit more involved this is the return so Zero's x00 ee I believe yes return it returns from a subroutine this one involves the stack so let's get this for now and I'll come back and with the other second structure otherwise this is actually considered a system instruction which is a special instruction uh this may be used but it should be ignored by our interpreter so we actually don't have to have an else here and then we have to increment the program counter of course so we'll come back to that 0x1 so in the case of it being a zero X1 instruction this means that we need to get what n and n is here which will be the address and then The Interpreter will set the program counter equal to n and n this one is pretty easy we're gonna take the program counter and literally all we're going to do is solve that program counter go self.op code and then you're going to end it against the three uh bits over there and they'll get you the address that's how you get uh Xerox and then end from it and then this comma the next one is a little bit more complicated and here's where we're going to discuss the stack now this is going to be the call instruction so The Interpreter will increment the stack pointer put the current PC on the top and the program counter is then set to nnn in our order we're going to do itself.stack at self.sp is equal to self dot program counter so we're storing we're storing the perfect camera to stack then we're incrementing the program counter or the stack pointer and then we're setting the uh program counter equal to the yourself.op code and 0x0fffff and there you go now you have that so the opposite uh has to happen here when we return from it so what we do is solve the SP minus equals one itself our program counter equals self.stack at self.sp so 0x3 this is a skip uh skip execution or skip next instruction uh and basically s so it's 3x KKK so we need to get the X so that will be our uh Pro our register and then KK will be a byte so it will skip the next instruction if whatever is in the register is equal to that byte The Interpreter Compares and they are equal this increments the program counter by two so by two in this case means twice so for 0x3 we're going to create VAR X and solve.op code and 0x0f00 that's where it is and then you have to bit shift it right by eight to grab that to have this F be in this location at the end as the least significant bite and then we're just going to do if self.registers at X is equal to self.op code and zero X zero zero FF then we're going to do self increment program counter and then we're going to self increment program counter anyways X1 0x4 surprisingly it is literally the same thing except not equal so you can literally copy your code and then just say not equal boom 0x5 what is this so this is our first X Y instruction 5xy zero uh so we'll skip to the next instruction if v x is equal to v y it's pretty much the same concept as here just let me uh zero zerify or zero X5 there we go and you do that except next thing you do is VAR y equals self.op code and Xerox zero zero f zero and then we only get shift by four to get the Y then I would just say if self-douver is just X is equal to self.register so y we increment the program counter same exact thing uh we're gonna skip ahead a little bit so 9xy 0 is Skip next instruction if not so this is the exact same thing once again very simple this is 0x9 and then you just add a knot okay going back we're going to go to Six six xkk is set VX is equal to KK so what this is is going to be just loading a byte uh and the way you do this is we're going to do 06 so once again we gotta grab X in this case we're gonna grab our bytes okay okay so for our KKK equal well we don't really need to if you can just say self registers at X is equal to and then we I have to use a truncate here just to be explicit about it uh that we're going to shrink uh and cut off some bites here it's Alpha off code and 0x30ff and that will basically ensure us that that KK here is going to be loaded into register this register the next thing is 0x7 this is our first mathematics instruction so this one will be saying VX equals v x equals KK so it's VX plus equal KK um so you're just doing an addition so this one is pretty simple the same concept is here except it's just flossicles now the issue uh is that in Zig we have runtime safety uh and that will throw an error if there is an overflow so we have to set that to false here in whatever Scopes we're going to be using on safe instructions uh because we want we want to acknowledge the compiler that this is expected behavior that we can have that overflows the next set is going to be quite a few uh these are the ALU instructions and they're the eight set eight X to Y zero one two three four five uh six seven and E because we can go to eight um there's probably reasoning behind that but Xerox eight so if you notice the last one is actually determining what the instruction is so we're gonna call that M as a uh that's going to be mode so x y and then we're going to create the last one here m equals self.op code and then it's just going to be and zero zero zero zero f and that gets us our mode so now also don't forget self increment PC and self increment PC as well so we need to increment the program counter for all of these methods and that will be true on this method as well so the first couple of instructions here that we're going to do are going to be pretty simple zero is going to be in equals so register X is equal to register y one is going to be an or so self registers X or equals self dot register sub y and this or is a bit wise or not a logical or next thing is going to be 2 is going to be and with or an and you can pretty much create anything uh and then three is going to be a um xor so opposite and you can use xor to actually make a knot as well um and three is going to be an xor so there self.register dot at y okay that was the first four those were pretty easy however now we have four five six seven and E what are these that's going to be add subtract shift right subtract n which is going to be the opposite version of subtract and I'll explain that a little bit more shift left and then that's so if you actually read these descriptions uh it says set VF equals carry set VF equals not borrow uh so uh least significant bit of v-axis one then VF is one uh and then this is VF not borrow again and most significant bit is one then VF is one so this is where we're actually starting to modify that flag register as well so you gotta keep that in mind so for addition uh we're going to have to do an asset runtime safety again um for the same reason uh but then we're going to do some so for addition we're going to create some and it's going to have a type promotion so we're going to promote uh the X and then we're gonna do some possible self.register so why and we need that type of motion here uh otherwise uh we can't catch overflows uh and then we're going to take a look here and then we're gonna say that the flag register so zero South uh it's going to be set if sum is greater than 255. so we can do this inline if statement here and software registers at X is equal to the truncated result of u8 with some and it's true you can technically write it this way with the integer promotion for uh direct7 as well technically so then five is going to be subtraction this is going to be pretty much similar so for subtraction actually saying the flag is easier because you can just determine whether or not something is going to have a borrow or not based upon if self-out registers at X is greater than self-register why because if uh it is then there is going to have to be a viral the self registers at X MySQL self registers at y let's go and Skip ahead really quick or a very similar one which is sub n which is zero eight X y7 this is actually very similar to the previous sub but the only difference is that if you read the uh equation here VX equals VX minus v y for a to X Y five and xy7 is literally the same thing except BX equals v y minus VX so we'll do that uh oops that's seven not six and if you do literally the same thing uh flip the registers here to be y next and then this one will have to be software register set x equals self-doubt register so why minus software register is that dot add X so we're almost done we just need six and E and pretty much it's very simple to do uh the flag register stuff that registers at 0xf here we'll just be self.registers and one uh because one is going to be the least significant and then soft.registers at X hit shift right equals one so this is uh salt equals itself dot x equals self dot X bit shift right one uh and whoops I put that in 14 I meant to put that in 16. my bad or six sorry and then the same thing happens here except it's a shift left one and then the this one actually needs to be a little bit more logic uh if cell phone registers at X and we're just going to use binary here uh actually I think you can use zero x80 uh and then if that's not zero then it's one otherwise it's zero there you go so that is everything's through CX-9 we have a couple more instructions left zero x a so a here is going to be index is equal to n and n so that one's pretty simple it's basically loading in address soft dot index equals self dot current opcode or op code and 0x0ffff that was pretty simple next one is zero to B what does this one do so b n and n is jump to the location at n and n plus the register zero program counter is set to n and n plus the value of V zero so for this one we just say solve the program counter equals self.op code and zero zero FFF so that's n n plus uh uh we're gonna have to do a cast again to integer promote self registers at zero and that's that nice one will be 0xc and through zero XC here we have let's see uh set a random byte and KK this interpreter generates a random number from 0 to 255 which is then anded with the value K and stored in VX this one is a little bit more involved so we'll set x equals the X here and then we're free KK this is Alpha off code and these are zero zero FF there you go so you have X and KK and then software registers at X is equal to this one's gonna be a bit so we're gonna do cstd.rand so that's a random number and then we're going to have to end it against KK and then we have to make sure that this gets truncated to a u8 now that might still throw in there I am not quite sure but let me just round that up really quick so we'll just do a zig build quick bug fix self.registers here should be self.registers at X I apparently virtually messed it up and I was pretty sure about this but I need to uh need to cast this the u32 so that we can perform an ant and end of uh the switch cases need to happen else now here is a very complicated instruction this is probably the most complicated actually which is the draw instruction and it's d x y n where it displays an N byte Sprite starting at memory location I at vxvy and sets the VF flag if there's a collision this is a hard one to think of conceptually so let's walk through it really slowly we're going to go self registers at the flag and we're just going to say that the flag is set to zero to start with we want to grab whatever is in register X and register y real quick so we want to grab let's do x y n or I'm going to call it x x y y and N so we'll do that self so then x x is equal to this YY is going to just be able to put this bit shift four and N is going to be self dot off code and zero zero zero zero f so we have x y and so we want to get the register x value which is self-out registers and xx bar register Y is going to be self.registers at YY so then we're going to go through two uh Loops here so the first one is going to be a while loop so while Y is less than our uh n value y equals equals one so this will tell you how many lines there are on the Sprite and the Sprite is always going to be uh eight on eight bits on the horizontal and n Bits on the vertical so we're going to get the current uh value so this will be our we'll call it pixel and we just need to grab the memory at self.index plus the current y value and then we'll go varx new size is zero and we're going to say well X is less than eight so we're going to increment X we're going to have constant value here uh that's going to be our uh most significant bit so let's call it MSP I guess so my significant bit so this one is the big one so if pixel and the most significant bit the shifted right by X I have to cast it to u3 here for X so now once we have done that we just now need to compare if it is set or not so let's take an example here if we read this from left to right we have 0 1 0 1 0 1 0 1. so if we read that 0 here this is what we're scanning for since it's zero here it doesn't matter we're going to skip this pixel but now when it's one we now realize that this pixel is being set so we have to um actually do the drawing logic so we have to do the wrap around so we're going to create this variable TX and TX is equal to register at X plus the x value and then we have to make sure we do the remainder against the width within this case 64. we can do the same thing for t y equals resistor y plus Y and but this is against the height so it's 32. we can calculate an index from this which will be TX plus t y times 64. this is how indexes work in um plot arrays you have to use one times the other so we're going to do self Graphics at index and then we're going to xor it with one so if you actually look at what this does it does say Sprites our X or onto the existing screen this causes pixels to be erased the VF is set to one so if there was a pixel there right let's say then Graphics have one Graphics would be set to one so what's the result of One X or one is the result of one extra one is zero so we only need to check here for the flag if self.graphics at index is equal to zero because then we'll do stop that registers add Xerox f is equal to one and normally this check wouldn't be fine if we didn't do this previous one if we didn't do this previous one here uh then this would actually set VF uh on any blank French on any blank thing but because it's specifically only when it gets set now VF works correctly and of course at the end here self.programmed dot uh incremental program the next set of instructions are 0xe so this is 0x90 and A1 and these are literally skip next instruction if the key is pressed or not pressed so basically this will be used in an if statement essentially so we're going to grab the x value here and it will have a KK value which will be our mode basically in this case so then if KK is equal to 0x9e that's if it's pressed and then else if take a equals 0x A1 and then all we do here is if self.keys at self.registers at X is one then we will self Dot increment program counter otherwise we will otherwise if it's not equal to one then that's for the other case and then we always have to increment the program counter anyways here next set of instructions is the Xerox F which is a bunch of miscellaneous instructions uh it's pretty much the same format here where you have a mode collector uh and we'll just use if else if here uh at the bottom of course self.informat program counter and let's go ahead and take a look at our instructions so if we take a look we have fx07 fx0a fx15 18 1e 29 33 55 and 65.
these are all actually relatively simple fx07 is load VX DT so VX is equal to the delay timer that one's incredibly simple little bit so if the mode is zero seven registers at X itself that's delay timer otherwise uh if uh the mode is zero zero a H we'll come back to this one this one is going to be uh wait for key pressed or the value of the key in VX we don't have key presses yet so that's not exactly helpful to have um so we'll do an else if and then we'll do KK equals 0x15 these ones are incredibly simple uh so 15 and 18 are literally the same thing uh they are set delay timer equals VX and set sound timer equals to be X so self dot delay timer equals uh soft.registers at X and then the same thing happens for Xerox 18. except it's going to be sound timer the next one is going to be 29 actually no it's one e my bed uh the next one is one e which adds an index plus VX it's going to be self dot index plus equals self dot registers at X the next one will be then if there is AKA equals 0x29 0x29 is the location of a Sprite for digit VX value of I sets a location for the decimal Sprite corresponding to the value VX which is 0 through f so what you actually have to do here is you have to realize that this is actually looking for your uh chip eight font set which when we load it into memory was at zero so we're gonna start at zero and then based upon what value it is uh it's going to be the memory address there are five bytes here for each image so it's going to be times five so to do that we just got to do a self Dot index equals self.registers at x times Xerox five you might want to do safety check here where you check self.registers that X is less than or yeah he's less than 16.
there are plenty of other places you can put safety checks as well uh so Xerox 33 this stores the BCD representation of VX and memory locations I I plus one and I Plus 2. basically what you're doing here is you are literally taking the uh the individual numbers so if I have a number 137 uh I would store the hundreds value first so one and the uh and then I plus one is going to be the second value which is three and the next one value will be seven so it's basically just performing what are the digits of a number and this is actually incredibly easy to implement you just do self.index equals self.register set X first one is divide by 100.
second one is going to be divided by 10 but now what happens if it's uh 130 is going to be 13. uh you want it to be three so you have to do a modulus so remainder uh and then index plus two and then this one is going to be literally mod 10.
next one is xerx 55.
55 and 65 are basically the same thing so hold up let me just copy that uh 65 and 55 there we go so for 0x 55 if what does it do Source registers v0 through VX and memory starting at location I so what this does is that we're going to take we're basically doing a for Loop here uh zero and then we're going to do while I is less than or equal to X we have to do I plus equals one and then what do you do in this flip it's just self that registers that I is equal to self memory at or sorry I did that the reverse way self dot memory at self.index plus I this is a self.registers at I this one is going to be dumping all the registers registers into memory now the opposite of this is going to be this one where we do self.registers at I is equal to the self uh is equal to the memory so this one loads it and that's what this one does and then last one here 0x0a this one's complicated because basically it's just going to wait let's go into waste Cycles every time it does this so we have to check if if a key is pressed so by default that's false then we can go through the entire key array so let's go to U size equals zero I mean technically I could just do four self.keys and then check the value V and then so if stuff like keys at Value V is equal to uh was not is non-zero then uh the key press has to be true so if you do a break and then we also have to check uh self.registers at um X equals uh which which key was pressed uh I might need an index here we go and like that we have a method there and then what we have to do to burn the burn the cycle if it doesn't uh if it's not pressed if you do if not okay press and then you just do a return and that will just keep running it rerunning the same instruction it will not get to the self.increment PC here so you can keep uh going over and over and this line is basically just saying that uh if the key is pressed set the register equal to whatever key was pressed however now if you go and run it nothing actually happens and why does nothing happen well nothing here happens specifically because well we didn't give it any input there's nothing that's running it's running zero zero zero which is just being ignored until eventually it will just run out of uh memory space and probably crash oh survival close well okay now what do we do so we have everything here except one important thing which is loading a ROM now Logan arama is pretty simple you just want to grab uh so in this case if we're going to run it from the command line we're just going to grab a command line argument so we can go ahead and get a command line argument you won't get the file name so in zag I'm going to create an iterator for Arguments for I process dot RS with allocator then we're gonna use the out character we already have and then we're going to say we're going to skip the first one because the first argument is always going to be the name of your program or the past year program which is helpful when you want to get a current working directory but not so helpful when you're trying to get the actual arguments so then we're going to create a file name this will just be the next value and if this gives us an error we're going to do debug print dot debug print and then we're just going to say no ROM given and yell at the user because they're stupid and there we go so then we got a load of ROM so let's create a functions that do that we'll do public function uh load ROM and it creates uh what does it need am I think here we'll just need the file name so to do this we're going to create a file with whatever programming language so let's file system current working directory open a file at the file name but I could hear any flags and then close it at the end so input file close at the end uh and then we're going to do we need to get the size so in certain certain uh languages or certain architectures you want to see to the end so we're going to do input file get end to position that'll give us the relative size of the ROM and then we'll create a reader first so we'll create a reader of our reader the input file reader and with however method you've gotten this we're just going to basically be doing a loop over the size so while I is less than size I plus equal one and you're just going to say your uh CPU memory at I plus you have to do a plus offset the initial uh five twelve fights because that's where our program counter is and we're gonna do try reader.read byte and you can do this however you want in whatever programming language and that's how you load a ROM then we're just going to try load ROM so there's this very nice repository on um GitHub that you can uh clone into yours uh it's called chip eight ROMs and we'll go ahead and clone that over so one thing that I like to do when I have a bug is debug print and we're just going to print out whatever the cycle is so whatever uh instruction we're currently uh executing so salsa okay to build a texture uh with STL for example uh you need a array which you can access so Q32 small and we'll set the pitch as the seat such as the C int equal to zero first thing you gotta do is you gotta lock the texture so STL lock texture and it'll be texture no the pixels will be uh we're going to do a pointer cast here we have to do a podcast uh to pointer C question mark pointer any opaque that looks terrible but it's it's what's necessary uh and then submit the bytes as well and then the pitch so then we have to do uh and pitch we don't actually care about the pitch but it just needs to exist sdl.str unlock texture will also be done here and it is texture again so now what are we gonna do pretty much we can do um we can do A4 self dot graphics um or not self CPU directs uh for cpu.graphics we're gonna add G and we're gonna get an index and then bytes at the index is going to be equal to if this uh if CPU or graphics at the index is equal to one if it is then we fill it with the value for y which is all F's otherwise it is going to be black with Alpha and now there we go we get an okay on everything meaning all of our tests have passed here however let's run run it through the other test test method as well this is a little bit more thorough and it tells us that number 16 fails uh let's check what that means ah fx07 fails because the delay timer is not implemented that is correct uh I did forget to do that uh so for the delay timer uh we just go to the end here of the function yes I believe so uh and then we say if delay timer or if uh soft dot delay timer zero or minus equals one sorry same thing happens for the sound timer although for the sound timer you should technically play a sound here although we can ignore that for now and there we go everything else is okay so you can run through a bunch of these test programs now uh let's do the chip eight picture and it displays this nice chip eight here on the screen another one we can do is going to be um the BMP viewer that one I showed at the beginning give it a second and it draws the hello at the from the start you can also go through some of the other ones maybe the uh fishy should draw a fish it does minimal game here should have this little flashing guy framed MK1 draws this like frame thing around it and then uh what it should do is it should start tracing a really random path and this path can go wherever it wants to so you'll see this thing randomly decide to go and move around that's a test of your random number generator the other one you can do is a square root or root test here uh for 144 takes its time to uh load but the result here is where 144 should be 12. of course now we have games like Palm but we seem to have a problem here the issue that we're going to have is going to be that we can't move because we haven't implemented keys yet now we have implemented everything except keys and pretty much we're just going to put the keys into um sdl so I'm going to create a map of scan codes corresponding to each and every single uh key press so this is the scan code map uh so this might not necessarily be clear but zero where is zero uh if you remember the image of the keypad give me one moment you want to correspond the number value with the key value so index 0 of the array is where the zero key is index one of the array is where the one key is so on and so forth and we're pretty much using one two three four qw e uh R ASDF z x y z as the ones but we're reordering it in that fashion and what this allows us to do is write some very simple code here where we do scl key down uh VAR we'll just do a simple Loop here you size zero while I is less than 16.
I plus equals one if e so the event a key the key symbol that's scan code is equal to the key math at I then we'll do CP or yeah our CPU dot keys at I is one now we can do the exact same thing uh for STL key up so if we're just going to set it to zero now if you run pong Q I believe brings you down and one brings you upwards and then the uh thought we'll come back to us and we can block it and boom it's now going back up now there is a bit star to this and there's multiple solutions to fix the stuttering but uh let's go ahead and remove the print spam and congratulations you actually have your first emulator now things that you can do to continue with this is one you would probably want to uh get these delay timers to be uh you would probably want to remove the delay timers from being within the cycle you'd want the delay timers to be separate maybe even to the point where you create just a separate thread that's dedicated to making sure those timers are being incremented and decremented correctly uh or sorry decremented correctly the other thing that you can do is of course adding sound so whenever uh so whenever this is true inside here you would add sound so you create a full if statement um and then another thing you can go experiment with is changing the colors you can change the color of the background in the foreground uh stuff like that and then of course there's more to go on with the chip emulator chip 8 emulator you can uh start remember making super chip uh so Superchip 48 or whatever it's called Uh it adds another 10 instructions uh and then you also have some games that will have uh for example some games do indeed have this thing where they can do um 64 by 64 mode or 64 but I think it is 64 by 64. uh where it can have extra pixels and you can go ahead and try and figure that out these are just some ideas of what you can do to go ahead and get a better you can go ahead and just essentially create better results here it could be a very good uh practice uh if you want to get into emulators and I hope to continue this series maybe starting with a more Dance Project like an NES emulator or something later on congratulations on your first step and I'd love to see your progress in the comments below and have a great day
Up Next

9:18
Chip-8 Emulator Development in C: Architecture and Implementation
@voxelrifts
26.7K views•2023-05-28

87:26
Introduction to Secure Multiparty Computation with Yehuda Lindell
@fhe_org
7.7K views•2021-02-04

4:55
HTTP Requests Explained: GET, POST, PUT, DELETE
@codecademy
103.1K views•2021-10-07

19:25
Enigma Machine Mechanics: WWII Encryption Explained
@JaredOwen
13.2M views•2021-12-11
Related Study Plans & Knowledge Roadmaps
Structured learning paths in Computer Science
computer-science
Container Runtimes: Namespaces, Cgroups & Go
01Linux Systems & Go Programming Foundations
02The Core of Isolation: Chroot and Filesystems
03Linux Namespaces: Process Isolation
+ 3 more learning modules
32h6 modules
Explore Roadmap
computer-science
Building a CHIP-8 Emulator: Rust & CPU Basics
01Computer Architecture Foundations (Bits & Bytes)
02Rust Programming for Systems Development
03CHIP-8 Virtual Hardware Specifications
+ 2 more learning modules
32h5 modules
Explore Roadmap
computer-science
Building BitTorrent: Go, P2P & Concurrency
01Go Fundamentals & Concurrency
02Networking Foundations & P2P Architecture
03Bencode Parsing & Torrent Metadata
+ 3 more learning modules
26h6 modules
Explore Roadmap
computer-science
Actor Models (C++ Concurrency & Lock-Free)
01C++ Multi-Threading Foundations
02Thread Pools and Task Scheduling
03Atomics and Lock-Free Queue Design
+ 3 more learning modules
45h6 modules
Explore Roadmap